Recycling Heroes - Contact App
In this tutorial, we'll model a RAP application from the database, through the model and UI, to deployment and provisioning in the system. This should teach you the full development cycle for modern ABAP Cloud applications.

Table of contents
Today we'll go through the application development process step by step, from modeling and deployment to permissions.
Introduction
A while ago we started the YouTube series about the Recycling Heroes and today part of the journey is complete. The contact app is now finished and we've released another full video about its construction. This article will accompany the video, addressing relevant techniques and examples.
RAP
The ABAP RESTful Application Programming Model is an important component in building modern Fiori applications in the ABAP Cloud environment. It is therefore crucial to learn and fully understand this topic. The initial steps are relatively easy to grasp, but mastering the model will take at least a year, and you will encounter numerous challenges. Therefore, we have created various tutorials, guides, and deep dives to delve into the different aspects.

Video
We have created a complete version of the video for the entire series. On YouTube you can find the video and the corresponding playlist if you want to take a closer look at the various tutorials. Below the section description, you will find further articles that deal with the topic.
Modeling
In this section, we will manually model the RAP stack across the various layers. We will use the Classic Pattern, as it is best suited for getting started with RAP development and is the standard for local new applications. We create the table, model the CDS stack on the object, and activate Draft to create an OData v4. In the later phase, we fix a bug we encountered due to the naming of fields in the backend. Finally, we create the first test data to see something in the UI.
UI Design
In the UI design, we then look step by step at the structure of the individual elements in the application. We create the filter, display the fields in the output list, model the object page and the header, and organize the fields into groups within a structure. Here you will learn the different annotations you need for the UI and what effect they have on the display.
Value Helps
After creating the UI, we want to make it more convenient for the user and create a lot of value helps for the different fields. Fields that only work with a key are additionally enriched with text, so that gradually only readable information is present in the UI.
Virtual Elements
We now want to integrate fields that don't actually exist in the data model, such as an icon for the Object Page. Additionally, we want to dynamically hide fields and information on the UI. We use virtual elements to implement additional logic. We'll also delve into the details of how this is determined and examine the specifics of hidden fields.
Factory Actions
Besides the actual Create action, we can also use Factory Actions if we want to implement specific scenarios. In this episode, we'll implement a separate Factory Action for each different type of contact. This will allow us to better manage permissions later. Furthermore, we implement late numbering for the different types and numbers and set up the number ranges in the Fiori app. As a special feature, we use the "Auxiliary Class" to encapsulate parts of the code from the behavior implementation.
Validations and Determinations
To ensure that we only receive the correct data and filter out erroneous data records directly upon input, we implement checks and automatic determinations. To this end, we will implement a rudimentary interface for deriving address data for a later use case. For the generation process, we will look at the IDE action for generating new classes. To ensure our user sees the change directly in the UI, we'll implement a side effect.
Fiori and Deployment
The application is now ready to be created in the Business Application Studio. To do this, we set up a new development environment (Dev Space), generate the application using the wizard, and make further adjustments (adaptations) to the application. Finally, let's take another look at the structure of a Fiori application and begin with deployment to the ABAP environment.
Launchpad Integration
Now that the application is deployed to the system, we'll take care of integrating the application into the Launchpad. To do this, we'll create an IAM app and a business catalog. We then integrate a business role and design the Pages and Spaces in the system to provide the user with their standard workspace.
Custom Descriptor Item
In this episode, we want to replace the tile and add more features, such as a counter, a unit, and design customizations. We will discuss the various components and explain the functionalities in detail.
Feature Control
Permissions are an important part of application deployment, so we use Feature Controls to restrict individual UI actions. In addition to the restrictions, we also create a separate permission object and completely restrict access. Finally, access is tested via simple permissions.
Restriction Types
Since the permissions are currently only stored statically, we use Restriction Types to ensure that we can control the user's permissions via roles. To do this, we create additional objects and explain their effect in detail.
Data
Now that the application is almost complete, we'll take care of loading the data. We'll prepare a JSON file, which we'll make available on GitHub. Using an open-source project, we'll load the data into ABAP and use it for EML to populate the contacts. This allows us to reuse the logic and checks. Finally, we'll reset the number ranges to get fresh data into our system. Since the UI still has some gaps after the change, we'll adjust the output and fields again.
App
Currently, we only have one application in the Launchpad, but we've set up a dedicated space for our company.
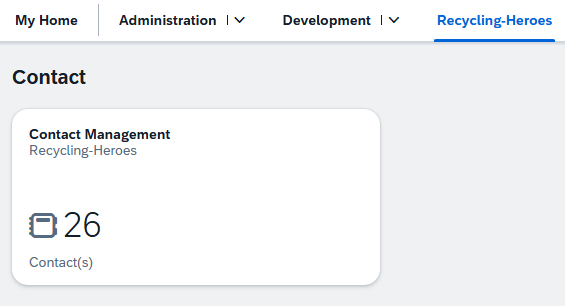
When we open the application, the initial data is loaded immediately, and we can start working right away. Because we are admins, we can see all the data and all actions are available to us.

Looking at a customer, we find a corresponding header that we have built. Below that are the various components and groups of the object page.

Conclusion
This video and article are intended to help you get started with RAP development and illuminate the complete process of creating an application. Since most tutorials only cover parts of a single step, you should be able to create a complete application with this.
YouTube
Video