RAP - Simple Object
In this article we build a simple business object and show you how the framework works.
Table of contents
We create a simple object with all components and show you how to get a simple UI with it. We will introduce most of the components, but also omit some parts, such as UI annotations, which we will explain in more detail in later articles.
Data model
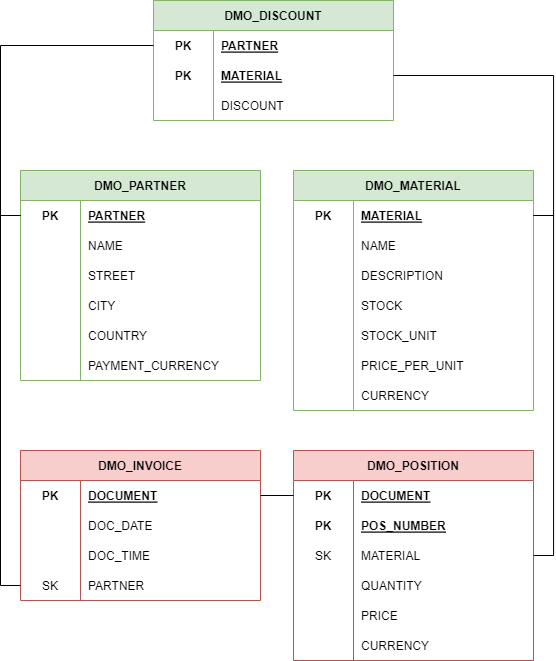
For our data model we use the components from the Core Data Service blogs and use the tables as a basis for this series. Via the link you will find the data model explained in detail again, here is a list of the tables and associated data:
Today's simple application therefore based on the partner and only includes this one entity.
Business Object
The modeling begins with the creation of the core data service above the table as an interface view. This determines the set of fields that will be available in the data model. Here you also have the option of normalizing the fields for the entire data model (CamelCase). The behavior definition that determines the behavior of the BO can then be created. The business object is then fully modeled with table, behavior definition and CDS view and can be used.
Interface View
With a right-click on the table you can create a new data definition (CDS View) using the "Root View Entity" as template. This view always forms the basis of the object and there can only ever be one root node.
Accordingly, after importing the fields, we adjust the field names.
@AccessControl.authorizationCheck: #NOT_REQUIRED
@EndUserText.label: 'RAP interface for Partner'
define root view entity ZBS_I_RAPPartner
  as select from zbs_dmo_partner
{
  key partner          as PartnerNumber,
      name             as PartnerName,
      street           as Street,
      city             as City,
      country          as Country,
      payment_currency as PaymentCurrency
}
Behavior definition
With another right-click on the new Core Data Service, you can create the behavior definition via the context menu. The fields are preassigned so far, the name corresponds to the name of the CDS View and we leave the type on "Managed".
Appropriate implementations are suggested, which we now adapt according to our needs. The finished version now looks like this:
managed implementation in class zbp_bs_demo_rappartner unique;
strict;

define behavior for ZBS_I_RAPPartner alias Partner
persistent table zbs_dmo_partner
lock master
authorization master ( instance )
{
  create;
  update;
  delete;

  mapping for zbs_dmo_partner
  {
    PartnerNumber = partner;
    PartnerName = name;
    Street = street;
    City = city;
    Country = country;
    PaymentCurrency = payment_currency;
  }
}
At this point, the following information about the behavior definition that controls the behavior and the functions of the business object:
- Behavior Class - There is a global class where the behavior of the object is implemented. The global part of the class is empty, you can find the implementation in the "Local Types" tab. You can create the class with CTRL + 1.
- Alias ​​- An alias can be specified after the name of the entity. This can make life easier, especially when using the BO, if the name of the CDS view does not always have to be specified.
- Table - The table is also linked to the BO in order to store and load the data in it. In the managed approach, the system reads and writes the table.
- Operations - The CRUD operations must first be enabled for the object to allow them, and READ does not have to be specified separately.
- Mapping - The mapping of the fields of the CDS view to the table fields is absolutely necessary, otherwise the saving and loading of the data will not work. The system does not recognize the assignment of the fields to the database from the aliases in the interface view.
Publication
With the last steps you have already received a working business object and can use it within the system. Of course we want to do something more and directly make a Fiori application out of it.
Service Definition
To do this, you can create a new "Service Definition" by right-clicking on the Core Data Service. This service definition corresponds to a project in SEGW and combines various entities into a service.
@EndUserText.label: 'Simple Partner Service'
define service ZBS_SIMPLE_PARTNER {
  expose ZBS_I_RAPPartner as Partner;
}
We release the CDS View under the new entity "Partner" in this service to the outside world.
Service Bindung
Again with a right-click on the service definition you can now create the "Service Binding". This determines the bound protocol for the service, whether you want an API, a UI, or O2/O4.
After the object has been created, it still has to be activated and can then be published.
The service is released for testing via the "Publish" button and you receive the end point in the system under which you can call it up.
Preview
With a double-click on the entity, a right-click and the context menu or via marking and the "Preview" button you can then display an automatic Fiori Elements preview of how the app would be generated.
Looks a bit empty in the first step and does not show any data yet. With the standard functionality, however, we can quickly have the app ready for use. To do this, you can use "Adapt Filters" to activate various fields of the entity for filtering. You can determine the output fields in the list via the "cog wheel". If you then press the "Go" button again, you already have a good result.
Git
For this series we are again creating a Git repository so that you can access the complete sources. You can also look at the changes in the repository via the Git repository and the commits. The components are developed using the ABAP environment, so we always use the most up-to-date components.
Conclusion
The start is always halfway easy. Today a small and simple business object, where some functions are still missing (detail screen, delete, create, automatic fields). In the next blog we will then show you how to create the detail and further UI annotations and design the app accordingly. Furthermore, we will implement the projection in a later version, which is completely missing here.

