RAP - Generator (from Scratch)
Does your development with RAP sometimes feel very slow? Generators do the work for you, building the actual stack and eliminating repetitive work.

Table of contents
It's been a while since we introduced the various RAP generators. Back then, we covered the first version in ADT and an open source component in Fiori. In this article, we'll look at the next generation of the generator.
Introduction
The hardest and most complex part of learning the ABAP RESTful Programming Model is the relationships in the data model and the implementations of the various functions. Once you've understood RAP, building the actual stack from the database to the UI can be a bit challenging, as so many objects and relationships need to be created in the system. This is where RAP generators come into play, as they can take the work out of the installation for you. Ultimately, you can then focus on the actual implementation.
Hint: As always, before you start using RAP generators, learn RAP development to understand the different scenarios and components.
Preparation
Before we start using the RAP generator, we need two things in the system that we will need for the generator. In the first step, we create a package, preferably an empty one, in which we can then generate the objects. Using the context menu We generate a new subpackage for our RAP package.

We give the package a name and a description and then create it in the system. Depending on the system, you may also need to specify a transport.

Under the package, we create an abstract CDS view, which will serve as the structure for the generator and for testing a few functions.
@EndUserText.label: 'Template for RAP Generator'
define abstract entity ZBS_A_GeneratorTemplate
{
  @EndUserText.label: 'Position'
  PositionNumber : abap.int4;
  PositionText   : abap.char( 200 );
  @Semantics.amount.currencyCode: 'Currency'
  Amount         : abap.curr( 15, 2 );
  @Semantics.currencyCode: true
  Currency       : abap.cuky( 5 );
}
Generator
In this section, we'll look at the generator step by step. We'll discuss the possibilities and options for generation.
Start
You can start the generator, as always, via the package. In the context menu, you'll find the "Generate ABAP Repository Objects..." option to start the generator selection.

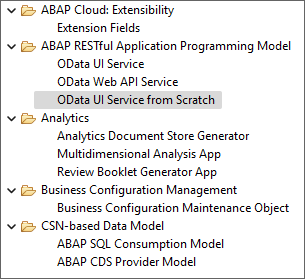
You'll now find a large list of different generators in the menu. In this article, we'll look at the generator in the RAP area. After selecting "OData UI Service from Scratch," we start the generator.
Configuration
The settings under "Service Configuration" are quite simple. You can choose the service type; for now, we'll stick with "Transactional with Draft," as that's the default. We can further influence the generated names using prefix and suffix; we'll come back to this at the end of the article. The project name is used everywhere that doesn't refer to entities, such as services or classes.

In the next step, we define the various entities and how they are connected to each other. First, we add the header using the "Add" button; here, you can actually only enter the alias for the entity. In the next step, we define the position below the header. The cardinality is automatically specified as "To Many." We can specify structures, tables, or Core Data Services as references using the Template Name. We will therefore use the created CDS view for the position.

Finally, we create three entities: a header, positions below that, and various notes below that that the user can create later. We will use a template for creating the positions.

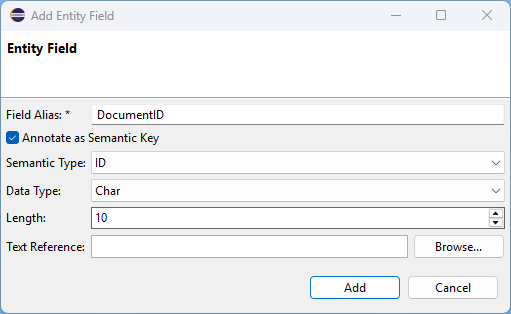
In the next step, we create the fields at the entity level. To do this, we start at the header level with the document ID, which we will later use as the semantic key. You can use upper and lower case for the fields; this will be transferred to Core Data Services later. The settings are dynamically shown and hidden depending on the context. Therefore, in addition to the attributes for the data type, there are also things like key information or reference fields.
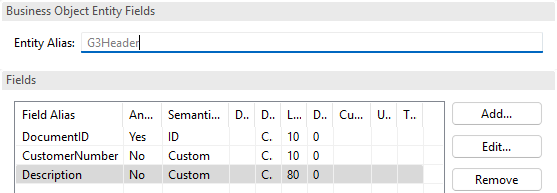
In total, we define three fields at the header level for our entity. Another field for the customer number and a further description of the invoice.
We don't need to define anything at the item level; all information is taken from the template. This includes the field names, the data types, and the relationship between currency and amount. However, we had to adjust the field names here, as the standard only capitalizes the first letter and ignores the name from the abstract entity.

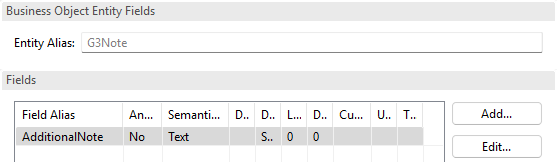
At the note level, we only need one field, which we define as a string, so that we can later enter our notes. This completes the initial configuration.
Implementation
We did not initially fill in the project name, as this is usually initially filled in from the name of the root entity. In most cases, however, the root entity does not describe the RAP business object. Therefore, we'll change the name again here.

We can specify a module using the prefix. In the example, we use "BS_", so "ZC_G3Header" becomes "ZBS_C_G3Header". For use cases other than the module, it's usually not suitable. We can then extend objects at the end using the suffix; it is appended to the end of each object. If we were to define TP, then "ZBS_C_G3Header" would become then "ZBS_C_G3HeaderTP".
Once we're completely finished with the configuration, we'll receive a list of all objects to be generated in the next step. Here you have the opportunity to check the names of all objects again.

The generation will then take a few minutes, and after completion you'll receive information to open the service binding. Finally, all you have to do is publish the service binding. publish.

Next Steps
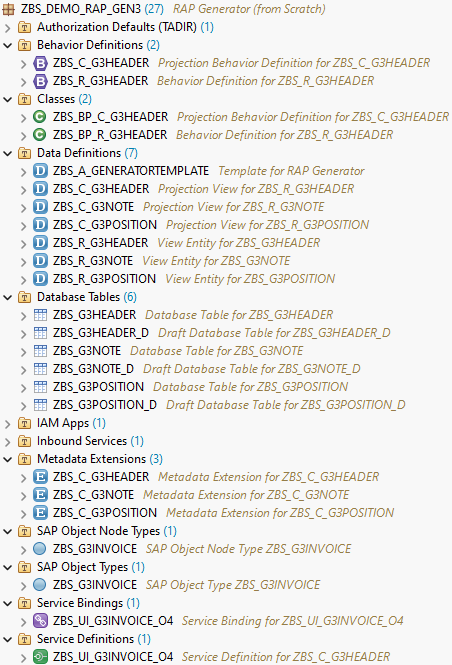
The generator has now generated approximately 26 objects in the system and saved us a lot of work. This allows you to begin the actual work and implement additional actions, validations, and determinations. The various UI elements must also be rebuilt using the metadata extensions, as this will probably not be your target design. If you want to learn how to build a UI step by step, check out this YouTube video from our channel. We explain the different elements and steps there.
Joule
The generator is also supported by Joule. If the AI Assistant is enabled in your system, you can use Joule to populate the generator based on text and make adjustments. Depending on how complex your prompt is, this can save you time.
Suggestions for Improvement
Currently, you should follow a few rules when working with the generator.
- The keys between the entities are generated and named automatically. They are based on common UUIDs, but currently no other types of keys can be defined.
- Using suffixes and prefixes, adjustments can be made to object names, but these will not fully comply with the naming conventions.
If we look at the currently delivered standard, we notice a few minor improvements in usage. Here are our suggestions:
- Suffix for objects - the position of the suffix does not fit in all cases. For the class for the behavior implementation, I would expect ZBP with the suffix (ZBP_BS), but this is inserted between Z and BP.
- Prefix for objects - The extension is always added at the end, which in some cases results in incorrect names, such as ZBS_TEST and ZBS_TESTD, which would be ZBS_TESTTP and ZBS_TESTDTP. This means that the draft table now differs from the original object. The protocol should be at the end of the service, but TP is also appended here (ZBS_UI_G3INVOICE_O4TP).
- Template - We used an abstract entity for the template; all additional information is currently ignored here (field spelling, additional labels, some data types INT4 -> INT8).
- Objects - Some objects should be optional, such as object types and behavior at consumption level.
Complete example
You can find the complete example in the usual place in our GitHub repository. In the package ZBS_DEMO_RAP_GEN3 you will find the generated artifacts and the template.
Conclusion
With the new RAP generator, objects with more and more branched entities can now be generated. This saves a lot of time and effort during initial creation. However, some of the generated names still deviate from the desired result, and some rework is required when adopting the template. However, it is definitely a time saver for development.
Further information:
YouTube - UI Modeling (Contact)