BTP - Pages and Spaces (Apps)
How do you actually add structure to your applications in the launchpad of your ABAP environment? In this article, we'll look at the system configuration.

Table of contents
In this article, we'll look at configuring Pages and Spaces in the Launchpad. We'll discuss the two apps that can currently be used to create the different areas.
Introduction
So far, we've focused on RAP, creating applications, and deploying tiles in roles. However, if we want to deliver the same look to every user, we need to define certain standards. This is where the concept of Pages and Spaces in the Fiori Launchpad comes in. This is a further development of groups, as they were no longer efficient and clear at some point.
Structure
The structure therefore looks like this: Space -> Page -> Section. This allows us to define entry points and overviews in the system in order to configure our various apps in the Launchpad. Let's take a look at an example, in this case an administrator.

The numbering in the image therefore means:
- Title of the space; if multiple pages have been assigned, there is a menu at the end. (Triangle)
- List of assigned pages for navigation
- Heading of the current page
- Various tiles or applications
- Section to which applications can be assigned
Preparation
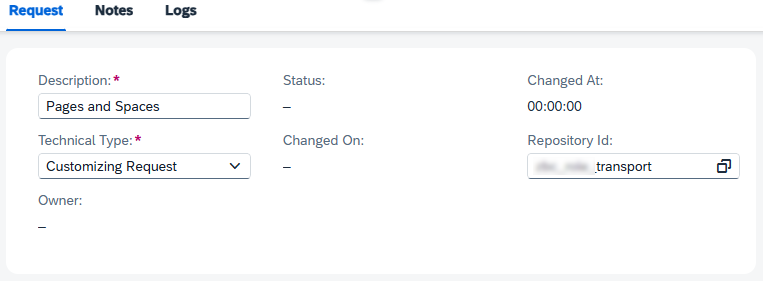
Before we can start customizing, we need a customizing transport in the system. We can create a transport in the system using the "Export Customizing Transports" app (F5069). Next to the text, you should assign the correct software component through which you want to perform the transport later. In most cases, the same component is the role and the development.
Configuration
In this chapter, we will look at the various configuration steps to set up the area and then assign it to the role.
Page
In the next step, we open the "Manage Launchpad Pages" application (F4512) and can create a new page there using "Create". Here we provide some technical information for the installation, as well as the transport from the previous step.

Once the creation is complete, you should land on an empty screen with a few tabs. Here you will find information about the general data, the page content, and the assignment to a space.

Space
The first step is to set up the new space. To do this, we go to the Fiori app "Manage Launchpad Spaces" (F4834) and can start the creation process via "Create". Here we assign a name, title, and description, and again assign a transport.

Once the space is created, we can assign our newly created page and thus establish the connection. You can now basically add different pages to a space.

Assignment
In the "Maintain Business Roles" app (F1492), we then assign the ZBS_DEMO space to our roles, which we later want to add to the various pages. In the Launchpad Spaces area, you can select an existing space or create a new one using the "Add" action. Since we're going through the apps individually, we'll use a previously defined space.

Setup
Now that we've established the connection, we can return to maintaining the page. Once we enter edit mode, we'll receive suggestions for apps based on the space assignment and the role assignment. We can now place these apps in different sections of the page.
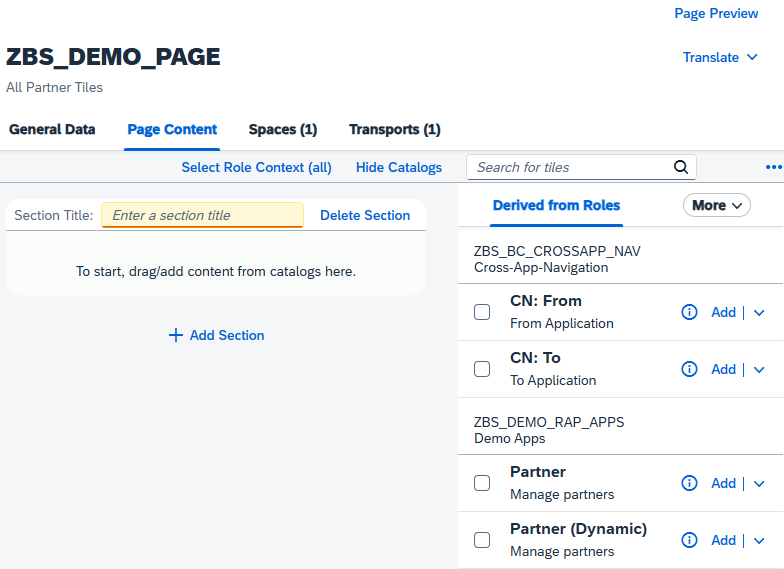
If you want to adopt an app, you can find it under "Add" There are further options for adding them to the section.

There are different types that create different looks in the Launchpad:
- Tile - Normal tile in the Launchpad with a number and text
- Wide Tile - Twice as wide as a normal tile
- Link - Displayed as a link at the end of the section.
- Flat Tile - Half as high as a normal tile
- Flat Wide Tile - Half as high, but twice as wide as a normal tile
Result
Finally, here is an overview of the different types of tiles in a section. In the second section, the tiles are displayed normally again. Depending on the size of the tile, certain information may no longer be displayed on the tile.

Creation Flow
We jumped between different applications to create Page and Space. You can also use the app to manage roles for the initial creation. When adding a space, you also have the option of creating a new space and generating a page at the same time.
If you'd like to translate the various texts at the end, the "Translate" option is available in Edit mode. This allows you to download an XLIFF file, translate it, and upload it back to the system.
Conclusion
In this article, we wanted to introduce you to the configuration of pages and spaces so that you can deliver a uniform standard to end users immediately after development. The configuration also gives you the option of influencing the width and appearance of the tiles.