ADT - My IDE Actions
Write your own functions in the ABAP Development Tools? No problem anymore with the standard IDE Actions and also without Java.

Table of contents
In this article, we'll look at the new features of IDE Actions and develop a function ourselves to create various objects in the system that we work with regularly. But first, let's look at what it's all about, step by step.
Introduction
IDE Actions have been available in the ABAP Environment since release 2502. This is a complete framework for developing your own actions and content in the ABAP Development Tools. The implementation is not done in Java, but directly on the application server in ABAP, which makes things a lot easier for us as ABAP developers. This allows you to implement actions that do auto-completion, generate objects, query data and much more.
Start
First of all, we have to prepare the system and the first action before we can start with the actual development.
Authorization
Before we start developing, however, we may need authorizations for development. For this there is the new business catalog "Development - IDE Action Implementation" (SAP_A4C_BC_DEV_AIA_PC), only then can we create IDE actions in the system.
IDE Action
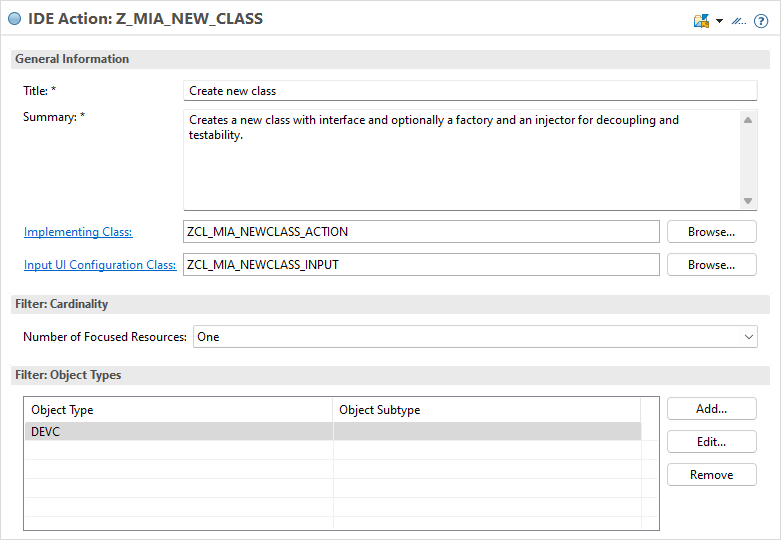
Once we have all the authorizations, we can create our action in the system. To do this, we go to the corresponding package and create an IDE action using the "New -> Other ABAP Repository Object" context menu. Apart from the name and description, we do not need to take any further details into account.

After we have created the action in the system, we then fill the form with the relevant information to create the action and the UI. You can find more details in the next chapter.
My IDE Actions
In this chapter we will look at the first IDE action for "Create new class", which is about generating artifacts for a class. In addition to the class, the corresponding interface, the factory and an injector can also be generated. This means that all artifacts are available to decouple the solution and make it testable.
Structure
The goal is that we can carry out the action on a package and receive an input dialog. If possible, some information should already be displayed there, which we get from the context of the package. If we then add the name, current suggestions for these names should be generated. The artifacts should then be generated and assigned to the package, as well as to the transport.
Generator
In the project, we use a generator for the ABAP artifacts, which we will not describe in detail here. Basically, we pass our configuration to the generator so that it can generate the objects and relationships. Our UI is ultimately based on the configuration.
TYPES:
  BEGIN OF setting,
    prefix      TYPE prefix,
    name        TYPE sxco_ao_object_name,
    description TYPE if_xco_cp_gen_intf_s_form=>tv_short_description,
    transport   TYPE sxco_transport,
    package     TYPE sxco_package,
    interface   TYPE sxco_ao_object_name,
    class       TYPE sxco_ao_object_name,
    factory     TYPE sxco_ao_object_name,
    injector    TYPE sxco_ao_object_name,
  END OF setting.
UI
In the first step we need an action dialog to enable the user to enter data. To do this we can create a new class using the link in the IDE Action. This implements the interface IF_AIA_SD_ACTION_INPUT, but only the method CREATE_INPUT_CONFIG is defined here; the other three methods can be implemented optionally. We define a public type in the class as the structure for the input; we can give the fields certain properties using the ABAP Docs. A list of properties can be found in the documentation, with certain properties being set via configuration.
TYPES:
  "! <p class="shorttext">Create new class</p>
  BEGIN OF input,
    "! $required
    "! $maximum 30
    package     TYPE sxco_package,
    "! $required
    "! $maximum 20
    transport   TYPE sxco_transport,
    "! $required
    "! $maximum 10
    prefix      TYPE zif_mia_object_generator=>prefix,
    "! $required
    "! $maximum 24
    name        TYPE sxco_ao_object_name,
    "! $required
    "! $maximum 50
    description TYPE if_xco_cp_gen_intf_s_form=>tv_short_description,
    "! $required
    "! $maximum 30
    class       TYPE sxco_ao_object_name,
    "! $maximum 30
    interface   TYPE sxco_ao_object_name,
    "! $maximum 30
    factory     TYPE sxco_ao_object_name,
    "! $maximum 30
    injector    TYPE sxco_ao_object_name,
  END OF input.
We create a configuration using the Information Factory, so we can define many additional properties and behaviors. We set the package to display and create a side effect on the prefix and name so that the dependent information is updated when entered.
DATA input TYPE input.

DATA(configuration) = ui_information_factory->get_configuration_factory( )->create_for_data( input ).
configuration->get_element( `PREFIX` )->set_sideeffect( after_update = abap_true ).
configuration->get_element( `NAME` )->set_sideeffect( after_update = abap_true ).
configuration->get_element( `PACKAGE` )->set_read_only( ).

RETURN ui_information_factory->for_abap_type( abap_type     = input
                                                  configuration = configuration ).
Default values
In the next step, we want to set some values in the input to default. To do this, we extend the input class where the dialog is created. From the context object, we get the current focus resource, which according to the definition should be the package. This gives us the name of the package. Based on the package, we can derive the prefix, i.e. either Y, Z or a namespace with a slash. If the package is new, we can read the transport using the lock entry and the XCO class and adopt it.
IF context IS BOUND.
  DATA(focused_object) = context->get_focused_resource( ).
  input-package   = focused_object->get_name( ).
  input-prefix    = zcl_mia_strings=>get_prefix_from_package( input-package ).
  input-transport = get_transport_for_object( input ).
ENDIF.
For the transport we use the XCO class XCO_CP_ABAP_REPOSITORY, which we can use to read the package and determine a lock in the changes to the object area and derive the transport. If the object does not currently have a lock, we must catch an exception and set the transport to initial.
xco_cp_abap_repository=>package->for( input-package )->if_xco_cts_changeable~get_object( )->get_lock( )->get_transport( ).
To start the action in Eclipse, we can mark a package in the Project Explorer and use CTRL + ALT + R to start the Action Dialog, where our IDE Action should now be available.

If we now select our action, we are greeted with our defined dialog. The fields have the appropriate behavior and the default values are set properly.

Side Effects
In the next step, we want to create an update on the dialog. Whenever we adjust the prefix or name, the names of the objects should be adjusted dynamically. We can achieve this using the side effects. To do this, we need to create an additional class that implements the IF_SD_DETERMINATION interface. In the RUN method, for example, we can also check which phase we are in. We read the current data of the popup using the model and then determine the new names. We pass the result to RESULT.
DATA popup_data TYPE zcl_mia_newclass_input=>input.

IF determination_kind <> if_sd_determination=>kind-after_update.
  RETURN.
ENDIF.

model->get_as_structure( IMPORTING result = popup_data ).
determine_names( CHANGING popup_data = popup_data ).
result = popup_data.
In the UI class we still have to define the method GET_SIDE_EFFECT_PROVIDER, this is in the interface, is created by default, but is not created. We then return our class as a new instance via the Side Effect Provider.
RETURN cl_sd_sideeffect_provider=>create( determination = NEW zcl_mia_newclass_side_effect( ) ).
We can now look at the behavior on the popup. The name of the object is always adjusted according to input. The longer the standard name, the shorter the addition. However, at least two characters are required.

Action
After the UI and the behavior have been defined, we must define the actual action. Our class needs an implementation of the IF_AIA_ACTION interface. In the RUN method, we then read the UI data via the CONTEXT object in order to be able to work with it.
DATA popup_data TYPE zcl_mia_newclass_input=>input.

TRY.
    context->get_input_config_content( )->get_as_structure( IMPORTING result = popup_data ).
  CATCH cx_sd_invalid_data.
ENDTRY.
We then pass the data and settings to the generator. We can then convert the result into an output using the HTML converter and pass it to the HTML popup so that the user receives a message.
DATA(action_result) = cl_aia_result_factory=>create_html_popup_result( ).
action_result->set_content( html_output ).
result = action_result.
Result
Now that we have implemented the action, let's take a look at the IDE action and generate a few artifacts. We fill out the dialog as follows:

Since we do not want to create an injector, we delete the entry; this is not a mandatory field. We want to generate the other artifacts. Then we can start the run; the generation will take some time.

Once the objects have been created, we receive our result and if there are any error messages, these are also output here. In addition to the objects, we also find the associated transport in the system.

Finally, we check the package to see whether all objects have been created. We activated these immediately after generation to ensure consistency and freedom from errors.

Open Source
We are making the new actions available as an open source project so that you can also use them in your system. You can find more information and the project in the GitHub repository. Since it is currently not possible to save the IDE actions in Git, the action must be created manually in the system afterwards.
Conclusion
The development of IDE actions in the ABAP Development Tools is very easy and the documentation from SAP has become surprisingly good, so that you can find almost all the information you need for development. Therefore, praise to our colleagues for the complete delivery in the first step. If you are interested in the IDE Actions, then just try them out.
Source:
SAP Help - Working with IDE Actions
ABAP Environment Roundtable #20