Fiori for ABAP - Guided Development and Autoload
Let's first generate the RAP application and then begin customizing individual components using Guided Development in Fiori. We'll enable Auto Load and preview the app.

Table of contents
In this article, we begin generating the application and customize the first sections using Guided Development.
Introduction
Our Sales App is now in a state where we can start generating the application using the Business Application Studio (BAS). There, we want to make some adjustments before deployment to add the last missing features.
Generation
In the first step, we need to generate our application in the Business Application Studio (BAS). We won't show the actual generation process and the individual steps in detail here; instead, we're providing you with two resources. Firstly, an older article that describes the Fiori generator, and secondly, a new YouTube video in which we also go through the generation process step by step. Since the generator and the interfaces may differ slightly in the current version, you should be able to abstract a little during certain steps.
We generate the application based on the List Report Template as an SAP Fiori Elements application. We select the service ZBS_UI_GLOBALSALE_O4, which we previously created in the ABAP environment. This service already contains all the entities we will need for our application later. During generation, we select the Responsive Table and SASale as the entity; we leave the navigation empty in this case.

Since we want to deploy the application to a system later, we make further configurations for the deployment. Here, we define the transport request and the name of the BSP application that will later be created in the target system. Since we are working with an ABAP environment here, we specify a corresponding configuration and a unique technical name. We will leave the SAP Fiori Launchpad configuration empty for now, as we don't need it at this time.

Now let's generate the application and create the structure in the system. Once that's finished, you should find the following structure in the Business Application Studio.

Guided Development
Right-clicking on the "webapp" folder gives us access to various options. We can either start the preview to see the actual preview of the application, or we can select "Open Guided Development," which is exactly what we want to do now.

Guided Development is a kind of wizard that helps us perform certain operations on our application. For example, we can activate the initial load. So we'll activate that action right away.
Structure
In the interface, you'll find various settings at the top, such as selecting the actual project. In this case, our project is already pre-selected. In addition, you'll find an option to group the different guides, as well as a selection by guide type. There are also further filter criteria and a search field if you're looking for specific guides or techniques you want to use. At the bottom, all available guides are displayed if no filter is set. In our case, these are grouped by page type, such as the List Report. There you'll find various options explaining what's possible in the List Report and how you can extend your application.

The different guides are generally structured quite similarly. When you click on a guide, you'll first see an overview page with a short description. From there, you can start the guide. Additionally, there are usually several steps you go through within this wizard. Information is requested in the extra fields provided, where you need to enter data. Generally, a guide offers helpful descriptions so you know exactly what to enter in the fields, how to use them, and what the effects of the changes are. In most cases, you can end the process via "Exit Guide." However, this will not apply any changes. To actually implement the configurations, you usually need to click a button such as "Insert Code Snippet".

Auto Load
Let's begin with the first customization of our application. To do this, we search for "auto load" in the search field and get a first option for the List Report Page. We can then start the wizard by selecting "Configure auto load for a table". There we get initial information about what the guide actually does, namely triggering the automatic loading of the data as soon as the app is started. Clicking the "Start Guide" button Let's begin with the first step in the wizard.
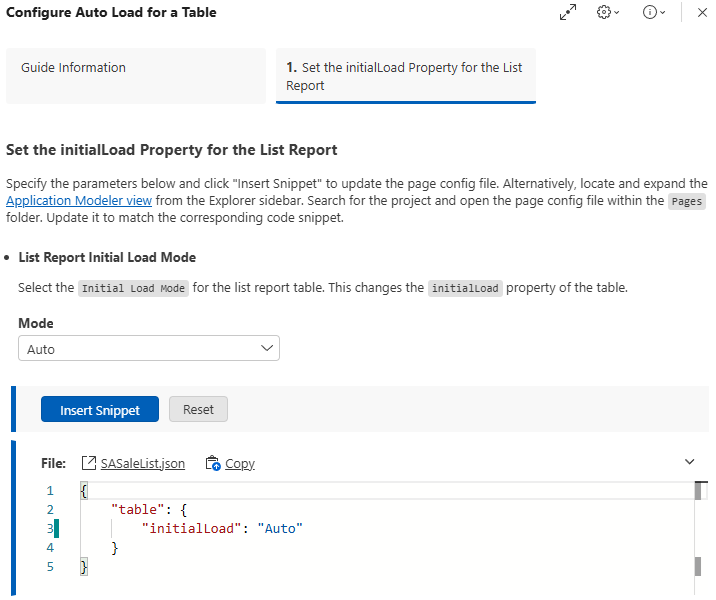
The actual guide is relatively straightforward: We first receive an introductory text and documentation about what the Initial Load actually does. At the bottom, we find the "Mode" field. We can set this to various configurations, such as Auto, Enabled, or Disabled. If we set the mode to Auto, data is loaded automatically as soon as a filter is set in the app. However, if we want the automatic loading to always occur immediately upon app startup, we set the mode to Enabled. Then we can perform the actual action via the "Insert Snippet" button and have the piece of source code automatically inserted into our application.
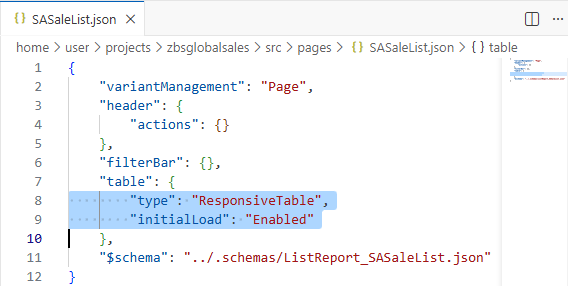
Finally, the configuration file opens as JSON. There we see the changes made highlighted. In this case, the "initialLoad" property for the table was set to "Enabled". Now, when we start our application, the data is loaded immediately.
Preview
In the next step, we want to preview our application. The preview function within SAP Business Application Studio allows you to do this. Switch back to the file view. Right-click on the "webapp" folder and select "Preview Application". Here, you'll find several options for starting the application. We can start the application normally with live data from the RAP service, or we can use mock data. The latter is loaded from a local file, which is very useful if we don't currently have any data in the backend service or simply want to quickly test the UI. In this case, however, we choose the first option and start with the actual data that we have already maintained in the backend.

The application now starts directly in a new tab and can be tested by us as normal. This is an environment that is running within a Fiori Launchpad simulation. This means that we already see the SAP logo at the top and have the classic back navigation to return to the Launchpad entry. Thanks to our previous adjustments, the application's data is now loaded without us having to manually refresh it, so we can get straight to work.

Conclusion
In Guided Development, you'll find numerous guides for making quick adjustments to your application. The wizard always provides you with the relevant background information for each guide, as well as input fields where you can enter the required data. Guided Development offers a quick introduction to features that you could also adjust manually in the code, but which are much easier to implement using the wizard, especially for beginners. Autoload is particularly useful for lists with little data, as it eliminates the need to click the annoying GO button.