Fiori for ABAP - Excel Upload
Do you want to import data from Excel into your Fiori application without necessarily developing all the logic in the backend? Let's take a look at the Spreadsheet Importer and its functionality.

Table of contents
In this article, we'll look at how to implement the spreadsheet import from Marian Zeis into our application, providing a very easy way to automatically create new data sets using Excel sheets.
Introduction
So far, in our Sales App, we've primarily created data sets manually or generated them using a class. This has always focused on the initial generation of items and not on maintenance or adding items during standard usage. To provide our users with a function that allows them to create new entries in bulk, we want to implement an Excel upload in our application. We will use the open-source Spreadsheet Importer project and implement it in our application to save ourselves a significant amount of implementation effort.
Spreadsheet Importer
Why are we using this Plugin for implementing an Excel upload? Couldn't we simply create an upload button in our application, upload the Excel file, and implement it in our action within the RAP object? In principle, this is possible. However, it requires a significant amount of manual effort to parse the Excel sheet and prepare it for the structures; consequently, the message handling is also complex. A simpler alternative is a reusable component, which we can easily implement and which then uses the existing standard.
The importer receives the actual Excel file, uploads it in the frontend, and validates it in the first step. Then, the standard CRUD operations in our RAP object are called, and the data records are passed. This allows error messages to be returned directly to the frontend without us having to make any further implementations. Furthermore, we also receive additional features such as a preview, validation logic, and configuration options.
Prerequisite
In order to integrate the component into our application, we must perform a central deployment. Currently, we are working in a scenario on an SAP BTP ABAP environment. The component is not currently available, and we must deploy it via a so-called carrier app. This ensures that an application with the component is present in the system, which we can then integrate later at runtime, and not just in a single application, but across different applications. This ensures reusability within the system.
How to create the carrier app, deploy it to the system, and update it later can be found in the technical documentation of the spreadsheet importer. In general, the documentation is so well written that you can easily follow it to deploy and keep the component up-to-date.
Extension
Once the carrier app is available in the system, we can proceed with the actual integration into our own app. You will find details on this in the following section of the technical documentation.
Library
In the first step, we again need to extend the manifest.json file, this time not the "libs", but a new node under "sap.ui5". If not already present, we add the componentUsages and the Spreadsheet Importer with the corresponding version number. The version number depends on the deployed version in your carrier app. This means you can provide multiple versions there; you specify the version you want to use at this point.
"componentUsages": {
  "spreadsheetImporter": {
    "name": "cc.spreadsheetimporter.v1_6_0"
  }
},
Here's another example where we've inserted our component. At the top, you'll find the dependencies, where we've also inserted the other UI5 libraries. Below that, we've inserted the componentUsages for the spreadsheet importer. The order doesn't really matter; we could also insert it at the very top of the node.

Button
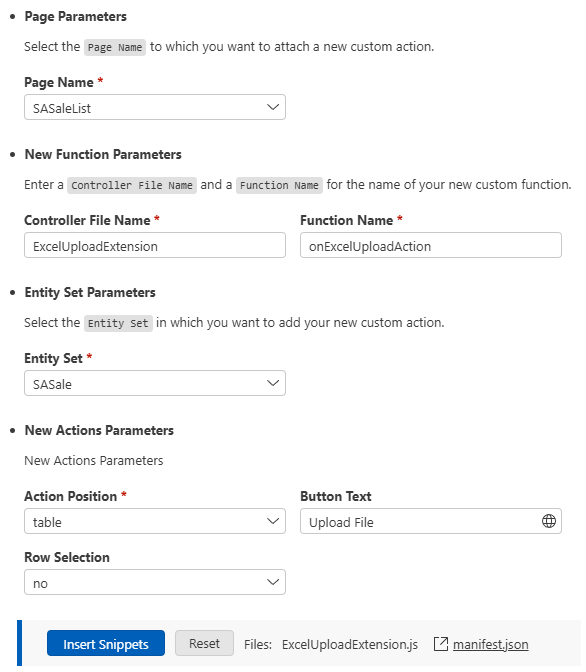
For this, we first access Guided Development. We find a guide for the List Report called "Add Custom Action to a Page Using Extensions". We use this guide to add an upload button to our table.

The guide is relatively simple, but we have to enter a lot of parameters. In the top section, we specify the actual page we want to extend, then we enter the name of the controller file and the function that should be called when the button is clicked. In the middle section, we add the entity to be extended, in this case, the Sales entity of our object. Then we have to provide parameters for the actual action. The action should be located on the table (this is a default setting), and the button text should be "Upload File". The rest can remain at the default settings. You then add the new action using the blue "Insert Snippets" button. This automatically extends the manifest.json file and defines the action there. A new controller file is also created in the extension folder (ext).
Implementation
Next, we need to implement the actual code for the action. A template is already provided in the documentation. Note that your function should be set to "async" because our functions require asynchronicity. You can essentially copy the code verbatim; you only need to adjust the table ID accordingly. The first part of the table ID is the namespace and our app ID, followed by the actual page where the extension takes place. In the middle part, you then need to add the entity name for the table. The rest can remain the same. Generally, this should be noticed later during testing if the ID is incorrect.
this.editFlow.getView().setBusyIndicatorDelay(0);
this.editFlow.getView().setBusy(true);
this.spreadsheetUpload = await this.editFlow.getView()
    .getController()
    .getAppComponent()
    .createComponent({
        usage: "spreadsheetImporter",
        async: true,
        componentData: {
            context: this,
            tableId: "swh.test.zbsglobalsales::SASaleList--fe::table::SASale::LineItem-innerTable"
        },
    });
this.spreadsheetUpload.openSpreadsheetUploadDialog();
this.editFlow.getView().setBusy(false);
Deployment
To test the application and verify the actual implementation of the button, we need to perform a deployment. The component is currently only testable and usable in the Launchpad. You can find further information on how to perform testing within the preview in the technical documentation. For the sake of simplicity, we'll do this directly in the system.
Test
After loading the application, the button should now be available and the functionality set up. If you click the button, a popup should open and you should see a first version of the spreadsheet importer. If this is not the case, you should double-check your configuration or look in the console for errors.

Template
Using the "Download Template" button, we can download an initial Excel template and then fill it with test data. The Excel sheet already contains some dummy data, but this is not real data; it is only intended to illustrate the format. For our test, we would like to create two new data sets.

Preview
Then we can select the files via the Load button and make them available in the pop-up. You should now receive a corresponding status indicating that we have uploaded the first file and everything is available.

Using the "Show Preview" button, we can now see which data from the Excel file has been loaded. Here we can draw initial conclusions: Was the correct number of data records uploaded, and was the correct data imported from the Excel format? This is generally very useful for validation.

Upload
We can now start the actual data upload. After clicking the upload button, a progress indicator will be displayed, showing the number of entries to be uploaded. After the upload, we receive a corresponding message and should be back in the list, unless, of course, corresponding error messages have occurred.

In the current control settings, the data records are created as drafts. We now find two new entries in the draft at the bottom, which we must now edit in order to save them. This means that the handling of error messages and errors is once again handled normally by the RAP object.

Settings
In the Settings section, you will find further options that we can configure. You configure these settings within the code that we introduced above. For example, there is an option to create the entities directly. This means that we don't create a draft first, but activate them immediately afterward, as long as there are no error messages. It's definitely worth taking a look at the settings; you can customize a lot of the control and its behavior there.
Complete Example
You can find the saved resources for our application in our GitHub repository. This will allow you to track all future changes to the Fiori app or use the resources for deployment. You can find the current changes in this Commit.
Conclusion
With some preparation, you can then easily generate upload buttons in your application. These are very easy to create, and there are various settings to customize the Excel upload accordingly. This allows you to load large amounts of data into your application without the effort of manual implementation in ABAP or JavaScript.
More information:
Spreadsheet Importer