Fiori for ABAP - Application Log
How do we actually get the data from our application log into our Fiori application? To do this, we extend the application with a reuse component and take a look at the configuration.

Table of contents
In this article, we implement the Re-Use component to view the application log in our application. We'll also look at the various prerequisites.
Introduction
In a previous article, we extended our Sales App to include the application log behind a Check. Now, what does it actually look like if we want to display the application log in our application? In this article, we'll discuss the topic of "Displaying the Application Log" and its integration into our Fiori Elements application, looking at the various steps and techniques involved. In this section, we will learn about the reuse components in the Fiori Elements area.
Extension
Let's begin with the application extension, as we will need to perform several deployment and permissions steps later. Integrating the Fiori component is the smaller part of this. Later, we will focus primarily on permissions, data provisioning, and the corresponding service. To do this, we will extend the manifest file at specific points.
Library
In another article, we looked at the structure of the Manifest file. In the SAPUI5 area, we find various libraries that are used by our application. The first step here is to implement the extension and add the reuse component to these libraries.
"libs": {
  "sap.m": {},
  "sap.ui.core": {},
  "sap.fe.templates": {},
  "sap.f": {},
  "sap.nw.core.applogs.lib.reuse": {
    "lazy": true
  }
}
You'll find the new library in the last section of the libs node. The lazy property has also been set to true in the dependencies. This activates lazy loading, so our application loads first and the component loads later. This way, our application starts faster, and loading can later happen in parallel without affecting the actual display and availability of the application.
Custom Section
In the next section, we need to add a custom section directly on our object page. According to the documentation, currently only object pages are supported, on which we can insert our segment. Since we already made an extension in another article, we already have the section part on our object page and can simply insert the code from the example.
"ApplicationLogComponent": {
  "title": "Data Validation",
  "embeddedComponent": {
    "name": "sap.nw.core.applogs.lib.reuse.applogs",
    "settings": {
      "logHandle": "{LoggingId}",
      "tableType": "ResponsiveTable"
    }
  },
  "position": {
    "placement": "After",
    "anchor": "idGeneral"
  }
}
After inserting, we need to adjust certain points. For example, we can freely choose the name of the component; in this case, we have used "ApplicationLogComponent". Then we assign a title that will be displayed above this section and integrate the embedded component. In the settings area, we define our actual field, which contains the log ID, and finally, we need to define the position of our section. In this case, we place it after the General section, i.e., after the first section on our object page.
Display
To test the display of the application log, we now need to exit the Business Application Studio. Because currently only an empty area is displayed here, and we have no way to properly test the application log.

Preparation
In the next step, after adapting our app, we need to deploy it to the ABAP environment again. We can do this again via the Application Info or via the console, depending on your preference. This article describes exactly how the deployment works, and you'll also find more information about the configuration there.
Once the deployment in the ABAP environment is complete, we need to make some adjustments to our IAM app to obtain the necessary permissions. We need permissions for the service, but also permissions for the actual application log so we can read it and view its contents. As described in the documentation below, we first need to add the general service required for reading the application log. This service has a specific requirement: a certain number of spaces must be placed between the version and the actual service name. Here is the template to copy:
APL_LOG_MANAGEMENT_SRV 0001
The service entry in the IAM app should now look like this. We have one service that is originally responsible for providing the application. And now a second service that provides the information from the component's application log.

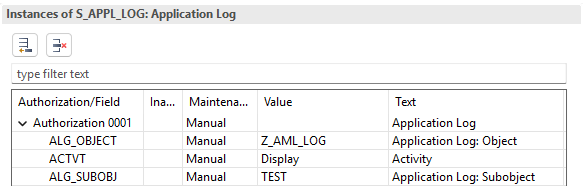
To ensure our users also have permission to access the application log, we need to switch to the "Authorizations" tab in the IAM app. There, we need to add the authorization object S_APPL_LOG and configure the values accordingly so that we can view the values for our saved application log.
Test
Once we have adjusted the permissions accordingly and deployed the application, we can perform an initial test in the Launchpad. To do this, we call our actual application and open an object page where we have either already created an application log or where we will create one immediately. Simply click the "Check consistency" button. Press to start the check and create a new Application Log Handle.

This makes the Application Log work out-of-the-box with the default settings. We see the message types, the actual message, and the creation date. In the upper section, you'll find various settings, such as filtering by type and hiding different filters. In the lower section, we have an additional search option and various settings for the list.
Settings
Let's take another look at the possible settings we can make. These settings are made in the control in the manifest.json file. This means that whenever we make changes to settings, we have to redeploy to the system to see the changes in our application. The controller has a dedicated settings area where we can add various attributes, which are also described in the documentation. Let's test some attributes.
The settings object is already set by default. Here, we find log handling and the table type defined as the default. The documentation shows that we can, for example, disable the header and the filter bar. We do this by setting the attributes to "false". Unfortunately, the documentation doesn't explain very well that we have "true" and "false" available here, which are defined as Boolean values. As the third test value, we use the table title, which is the dot directly above the table, as text and simply insert "More ..." there.
"settings": {
  "logHandle": "{LoggingId}",
  "tableType": "ResponsiveTable",
  "showHeader": false,
  "showFilterBar": false,
  "tableTitle": "More ..."
}
Let's now run the deployment from Business Application Studio again and then update our application to see the changes directly. If a configuration is missing, it's advisable to check the console. In our case, for example, there were problems with the Boolean values. It can happen that the control doesn't load at all because the settings are simply incorrect. If no errors are displayed in the console, the control should be reloaded and displayed accordingly.

For filtering, we can also use the general text filter at the top of the table. If we search for "Quota" here, for example, Filtering will only display messages containing this text. This means we are not necessarily dependent on the actual FilterBar and can instead use the simple search function.

Complete Example
You can find the saved resources for our application in our GitHub repository. This will allow you to track all future modifications to the Fiori app or use the resources for deployment. The current changes can be found in this Commit.
Conclusion
Implementing the actual application log and its display is not necessarily complicated, as there is a good reuse control directly from SAP for Fiori Elements. However, testing and configuration are somewhat challenging and could lead to problems. The issue of permissions could also potentially lead to logical errors and error situations.
Further information:
SAP Help - Fiori Reuse Component
SAP Help - Integration OData v4