Fiori for ABAP - Manifest
What exactly is the central control element of a Fiori Elements application? In this article, we'll take a detailed look at the manifest.json file and the options it offers.

Table of contents
In this article, we'll take a look at the central file for every Fiori application: what it contains, what you can configure in it, and what else you might need it for.
Introduction
We have currently generated our Sales App as a Fiori application in Business Application Studio. In the following steps and tutorials, we will make further adjustments to the application before deploying it to the system. We should also consider the important files and settings in an application that you might need in the future. Therefore, today we'll take a look at the manifest.json file. This is an important and central file when it comes to the effect and function of your application.
manifest.json
You'll find the file in your application's webapp folder. It's located at the top level, right next to the index.html file, which is required to start using our application as a standalone application, as well as next to the controller and other settings within the application.

You can open the file in an editor with a single or double click. As the name suggests, this opens a JSON file divided into various segments that define the settings within our application. Most of the fields have already been created and configured by the Fiori generator. Nevertheless, there are still settings we can adjust to influence the application.

Settings
In this chapter, we'll take a look at the various settings within the file. We won't be able to cover every segment, but we'll at least look at the most important ones.
sap.app
This node provides the entry point to our application and defines important attributes that are essential for the application's operation. Here you'll find, for example, the app ID, which must be unique within the system to identify the application. Descriptive elements such as the application's title and description are also defined here.

Under "dataSources" you'll find various settings for your data sources. Here, for example, we find the annotations used by the service to generate the UI. We also have the option to define local annotations that will later override the annotations from the service. As indicated in the path, you can find this under "webapp/annotations/annotation.xml", which was created as a local attribute.

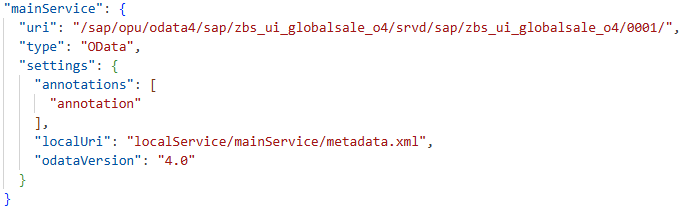
Under "mainService" you will find the actual service for our application, which will provide the data later. The configuration for the service is stored here, including its URL, the type (in this case, OData), and other settings, such as the annotations found there and the version used. There is also a local file for the service that buffers the metadata. Should you later encounter problems with the service or missing settings, you can update it and reload the metadata file.
sap.ui5
The "sap.ui5" section defines the minimum version of UI5 we use and which libraries (libs) are loaded to start and use the application. Here you will find further attributes regarding the application's behavior, such as the flexEnabled attribute, which defines whether Key User Adaptation is enabled for this application. You will also find an attribute for Content Density to define how much space is available in the UI and for which device class the application is actually optimized.

Under the heading "models" you will find all locally available models that we use, for example, to access data. By default, these are the i18n models for reading text from the text file, and the actual main service, which is loaded from the server in this process and provides the data that we see in our application and can then bind to corresponding fields.

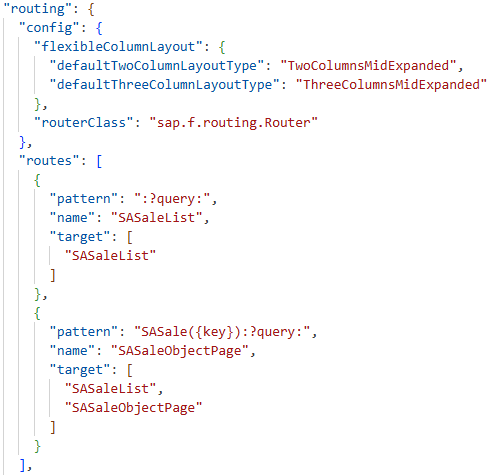
Next, we'll look at the "routing" section, which contains various settings such as the configuration, different routes, and targets. Under "config," you'll find, for example, our defined Flexible Column Layout, which we described in another article. These properties were automatically inserted into the manifest.json file via the wizard.
In the "routes" section, we find possible routes that the application can take. For example, in the first section, we see the List Report, which has the list as its target. The Object Page can also have the list or the Object Page itself as its target. Various patterns are defined for navigation.
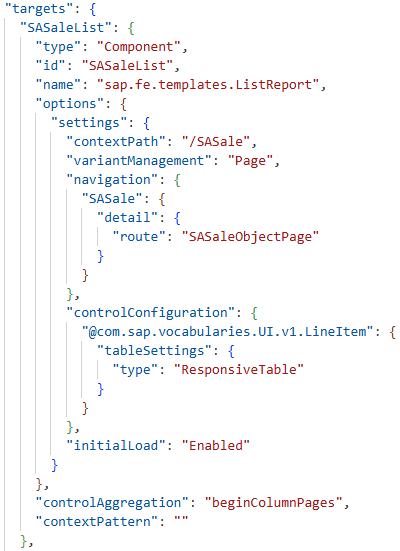
In the "targets" section, you will find the individual defined elements of our application. Here, for example, you will find the List Report Page. Its type, ID, and unique name within the application are defined. Several options are defined that affect the actual list, such as the Initial Load or Auto Load in the lower section, which we have already activated via the Wizard. It is also specified what type of table it is, a Responsive Table in this case, which in turn uses the LineItem annotation of the UI section to display the table.
In the upper part of the settings, you will also find the path through which the page is accessed, as well as the navigation to jump to the Object Page. Thus, the different pages, jumps, and navigation are defined under the various targets.
Further Information
Within the file, you will find further settings and options that we have not yet described in this tutorial. For example, you will find the sub-item "sap.ui", where the actual UI technology, various icons, and the supported devices are defined. Further down, you will also find sections such as "sap.fiori", where the type of actual application is defined, or "sap.fe" for further Fiori Elements settings. Therefore, in this tutorial we wanted to first address the main points of the manifest.json file.
Complete Example
The example shown today can be found in the GitHub repository, where the entire application and all customizations can be seen. The manifest.json file can be found in the project's webapp folder to view its entire structure.
Conclusion
The manifest.json file is an important part of our application. It controls and manages the actual application and also defines its structure, so that the Fiori Elements Framework knows what to generate. Adjustments to the file can be made manually, but also via the various wizards provided by the Fiori Tools. This should give you a first overview of this central file.