ADT - Metadata Wizard [MIA]
In this article, we'll take a look at the Metadata Wizard and how it might simplify your life when creating UI annotations in RAP in the future.

Table of contents
In this article, we'll walk through the concept of the "Metadata Wizard," how it currently works, and how it might help you in the future.
Introduction
In the last article, we created a RAP object using a template, saving a lot of time when creating objects. However, we weren't entirely satisfied with the UI, as too much information was displayed and there was no clear structure. In this article, we'll revise the Metadata Extension, but not manually. Instead, we'll use a prototype wizard that we've implemented as an IDE Action.
Idea
In the Metadata Extension, we define our UI annotations to create the Fiori Elements UI, define the elements, and position them. In most cases, we initially follow the same pattern to design the ListReport and the subsequent Object Page. The generators usually define an initial view, which we almost always need to revise.This is where the Metadata Wizard comes into play, giving us a quick start to the editing process and allowing us to easily place, hide, and group elements.
IDE Action
In this section, we'll take a look at the construction of the IDE Action, the ideas we pursued, and what the final result looks like.
Information
What information do we actually need when creating the annotations for the fields? In most cases, we start with the different facades and then assign the fields to them. Let's start with an input for our IDE Action. In the simplest case, we have one area for the different facets and one area for the fields. Since we want to maintain different information here, we'll create two tables. You can find out how to create and design an IDE Action by searching for IDE Actions.
TYPES:
  BEGIN OF facet,
    "! <p class="shorttext">ID</p>
    id               TYPE string,
    "! <p class="shorttext">Parent ID</p>
    parent_id        TYPE string,
    "! <p class="shorttext">Label</p>
    label            TYPE string,
    "! <p class="shorttext">Type</p>
    type             TYPE facet_type,
    "! <p class="shorttext">Position</p>
    position         TYPE string,
    "! <p class="shorttext">Qualifier</p>
    target_qualifier TYPE string,
    "! <p class="shorttext">Reference</p>
    target_element   TYPE string,
    "! <p class="shorttext">Field to Hide</p>
    hide_facet       TYPE string,
    old              TYPE string,
  END OF facet.
TYPES facets TYPE STANDARD TABLE OF facet WITH EMPTY KEY.

TYPES:
  BEGIN OF field,
    "! <p class="shorttext">Field</p>
    name               TYPE string,
    "! <p class="shorttext">New Label</p>
    label              TYPE string,
    "! <p class="shorttext">Selection [P]</p>
    pos_selection      TYPE string,
    "! <p class="shorttext">LineItem [P]</p>
    pos_lineitem       TYPE string,
    "! <p class="shorttext">Identification [P]</p>
    pos_identification TYPE string,
    "! <p class="shorttext">FieldGroup [P]</p>
    pos_fieldgroup     TYPE string,
    "! <p class="shorttext">Qualifier</p>
    qualifier          TYPE string,
    "! <p class="shorttext">Field to Hide</p>
    hide_field         TYPE string,
  END OF field.
TYPES fields TYPE STANDARD TABLE OF field WITH EMPTY KEY.
Now that we have defined the first structures, you will already be able to see from the fields which features we support. We can hide fields and areas via fields, create different areas, or assign our own labels. If we start the IDE action, we will already find all the elements on the input.

Using the "Hide" button, we will later make fields disappear completely from the UI, for example, if they are UUID key fields, without implementing much logic.
Defaults
In the next step, we want to pre-populate the default values. Let's begin with the different faces in the view. Using the XCO library, we check if the Core Data Service exists in the system, using the name of the Metadata Extension, which might differ from the Core Data Service name. Then, we almost always need a general facet to which we assign all fields, similar to the generator standard. Next, we create a facet for each composition in the Core Data Service to include the entities as a table. We can assign the fields directly to the general facet and simply increment the position in steps of 10. We can then pass the result to the IDE action as the default.
If we now run the IDE action again, we get the corresponding pre-population. In this case, we use the metadata extension of the entity ZBS_C_SASale from our sales app.

Customization
The IDE actions are not just meant to be "dumb" forms that you can fill in at the end, but also to support you in your work. For example, if you change the qualifier of the facet, then all fields with that facet should also change, otherwise we will no longer have a mapping or, in the worst case, we will have to make the adjustment for each field ourselves.
If we want to hide fields on the UI, we use an action in the table. Here we only need to select the field and execute the action; then the properties will be deleted and the field will later be set to "hidden".

Features
Currently, the IDE action primarily supports you in creating UI annotations. More complex features such as headers, buttons, and other annotations are still missing. Therefore, the action is intended for a quick start, and further customization must be done by you as the developer. An open point is the analysis of existing UI annotations so that the wizard could also be used for customizations. We would load the source code and pre-populate the form. This would also entail supporting more features.
Generation
Now that the prototype of the IDE action is complete, we'll take care of the metadata of our Sales App from the last article and update the UI with our new action.
Sales
The metadata extension ZBS_C_SASale contains the List Report, the actual object page, and some entities below it. Therefore, the object page should be a bit cleaner. As a first step, we therefore go to the Metadata Extension and delete all existing information except for the header annotations. We then start the action with CTRL + ALT + R and can begin the configuration.

After the action has been executed, we receive the code comparison and can check the generated changes. In this case, we'll use the result.
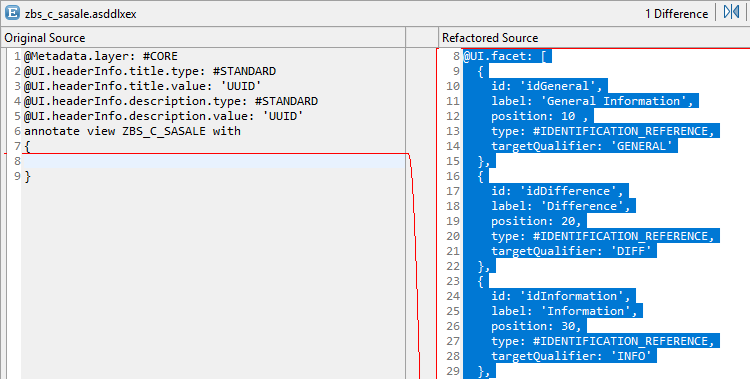
Looking at the UI annotations, the different facets have been generated and the fields with their corresponding boundaries have been used. The generated code from the configuration can be found in the example.
@Metadata.layer: #CORE
@UI.headerInfo.title.type: #STANDARD
@UI.headerInfo.title.value: 'PartnerNumber'
@UI.headerInfo.description.type: #STANDARD
@UI.headerInfo.description.value: 'SalesDate'
annotate view ZBS_C_SASALE with
{
  @UI.facet: [
    {
      id: 'idGeneral',
      label: 'General Information',
      position: 10 ,
      type: #IDENTIFICATION_REFERENCE,
      targetQualifier: 'GENERAL'
    },
    {
      id: 'idDifference',
      label: 'Difference',
      position: 20,
      type: #IDENTIFICATION_REFERENCE,
      targetQualifier: 'DIFF'
    },
    {
      id: 'idInformation',
      label: 'Information',
      position: 30,
      type: #IDENTIFICATION_REFERENCE,
      targetQualifier: 'INFO'
    },
    {
      id: 'idAdmin',
      label: 'Admin Fields',
      position: 40,
      type: #IDENTIFICATION_REFERENCE,
      targetQualifier: 'ADMIN'
    },
    {
      id: 'idSASeller',
      label: 'Seller',
      position: 50,
      type: #LINEITEM_REFERENCE,
      targetElement: '_SASeller'
    },
    {
      id: 'idSASold',
      label: 'Sold',
      position: 60,
      type: #LINEITEM_REFERENCE,
      targetElement: '_SASold'
    },
    {
      id: 'idSAInfo',
      label: 'Info',
      position: 70,
      type: #LINEITEM_REFERENCE,
      targetElement: '_SAInfo'
    }
  ]

  @UI.hidden: true
  UUID;

  @UI.selectionField: [ { position: 10 } ]
  @UI.lineItem: [ { position: 20  } ]
  @UI.identification: [ { position: 20 , qualifier: 'GENERAL' } ]
  @EndUserText.label: 'Partner'
  PartnerNumber;

  @UI.selectionField: [ { position: 20 } ]
  @UI.lineItem: [ { position: 30  } ]
  @UI.identification: [ { position: 30 , qualifier: 'GENERAL' } ]
  @EndUserText.label: 'Sales Date'
  SalesDate;

  @UI.lineItem: [ { position: 40  } ]
  @UI.identification: [ { position: 40 , qualifier: 'GENERAL' } ]
  @EndUserText.label: 'Sales Volume'
  SalesVolume;

  @UI.selectionField: [ { position: 30 } ]
  @UI.lineItem: [ { position: 50  } ]
  @UI.identification: [ { position: 50 , qualifier: 'GENERAL' } ]
  @EndUserText.label: 'Sales Currency'
  SalesCurrency;

  @UI.identification: [ { position: 60 , qualifier: 'DIFF' } ]
  @EndUserText.label: 'Difference Amount'
  DifferenceAmount;

  @UI.identification: [ { position: 70 , qualifier: 'DIFF' } ]
  @EndUserText.label: 'Currency'
  DifferenceCurrency;

  @UI.identification: [ { position: 80 , qualifier: 'DIFF' } ]
  @EndUserText.label: 'Difference Quantity'
  DifferenceQuantity;

  @UI.identification: [ { position: 90 , qualifier: 'DIFF' } ]
  @EndUserText.label: 'Unit'
  DifferenceUnit;

  @UI.identification: [ { position: 100 , qualifier: 'INFO' } ]
  @EndUserText.label: 'Comment'
  SaleComment;

  @UI.identification: [ { position: 110 , qualifier: 'ADMIN' } ]
  @EndUserText.label: 'Created By'
  LocalCreatedBy;

  @UI.identification: [ { position: 120 , qualifier: 'ADMIN' } ]
  @EndUserText.label: 'Created At'
  LocalCreatedAt;

  @UI.identification: [ { position: 130 , qualifier: 'ADMIN' } ]
  @EndUserText.label: 'Local Changed By'
  LocalLastChangedBy;

  @UI.identification: [ { position: 140 , qualifier: 'ADMIN' } ]
  @EndUserText.label: 'Local Changed At'
  LocalLastChangedAt;

  @UI.identification: [ { position: 150 , qualifier: 'ADMIN' } ]
  @EndUserText.label: 'Last Changed At'
  LastChangedAt;
}
You can also add labels to the fields via the IDE Actions so that we have clean and translatable text for the UI.
Subentities
For the subentities, we only generate the annotations for the ListItem, since we want a clean table in our entity, but don't need the Object Page at the moment. We can hide the technical keys like UUID or Parent ID. You can find the complete resources in the GitHub repository, which is linked below.

Header
Currently, if you navigate to the app's object page, you'll see some rather unpleasant text in the header. This text is not currently derived from the UI annotations.

For this, we need to take a closer look at the Core Data Service. At the header level, we find the annotation "EndUserText.label", which was defined for the Core Data Service. This will then be used after navigation in the app. We can now adjust this accordingly.
@Metadata.allowExtensions: true
@Metadata.ignorePropagatedAnnotations: true
@EndUserText: {
  label: '###GENERATED Core Data Service Entity'
}
@AccessControl.authorizationCheck: #MANDATORY
define view entity ZBS_C_SASale
Complete Example
You can find the IDE action linked below if you want to use it on your own system. We updated the UI annotations with this Commit in the repository for our RAP Examples. We will build on this in the following examples.

Conclusion
IDE Actions can make our lives easier and bring a bit more speed to the daily routine of RAP development. Today's IDE Action allows for a quick start to UI design, either directly after running the RAP Generator or after manually creating the objects.
Further information:
GitHub - My IDE Actions