ABAP Tools - IDE Actions (Table)
How do you actually create a table and edit it in the IDE Action? Let's look at the input options and how you can ultimately work with the data.

Table of contents
In this article, we'll look at tables for IDE Action Input and how you can use them efficiently in your development.
Introduction
So far, we've primarily used simple fields for output, each capable of holding a single piece of information. But what if you want to process more information, especially if it's in a structured format? For this, you have the option of using a table, which we'll examine in more detail in this article.
Structure
To begin, we'll start with a new data type that we'll use for output and manipulation. Since we want to define a table, we define a structure and the corresponding table type.
TYPES:
  BEGIN OF table_line,
    "! <p class="shorttext">Key</p>
    key_field  TYPE c LENGTH 15,
    "! <p class="shorttext">Number</p>
    int_number TYPE i,
    "! <p class="shorttext">Long text</p>
    long_text  TYPE string,
  END OF table_line.

TYPES table_body TYPE STANDARD TABLE OF table_line WITH EMPTY KEY.
To do this, we integrate the field into our "input" structure for output.
table_input TYPE table_body,
Let's now call the IDE action and look at the result. We'll notice that a table is now displayed, but we have no way to interact with it. The layout also looks a bit odd at the moment.

Since we can't currently change the table's content, we'll first insert a record into the table. We can set default values in the CREATE_INPUT_CONFIG method before passing the configuration and input to the factory.
INSERT VALUE #( key_field = 'ABC'
                long_text = `This is a longer text` ) INTO TABLE input-table_input.
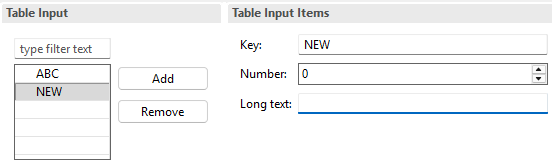
We now receive a record in the table, and when we click on it, we see the data on the right side of the table and can make further adjustments.

Layout
Now let's adjust the layout of the IDE action to activate the standard editing options for the table. We don't need to make any further configuration changes to the table itself; instead, we set the layout of the configuration. You can find the appropriate constants for the layout via the interface IF_SD_CONFIG_ELEMENT.
configuration->set_layout( if_sd_config_element=>layout-grid ).
This setting activates the buttons on the table. This allows us to add and edit new data records. Simply select the record on the left and edit it on the right.
If we want a larger table and to perform the editing in a popup, we can change the type directly to Table. To do this, we retrieve an object for our table using the GET_STRUCTURED_TABLE method and can define a new layout here as well. Additionally, we set the COLLAPSED option to True, so that the area is displayed collapsed when the IDE action starts. This allows you to hide optional options for now.
DATA(table) = configuration->get_structured_table( `table_input` ).
table->set_layout( type      = if_sd_config_element=>layout-table
                   collapsed = if_sd_config_element=>true ).
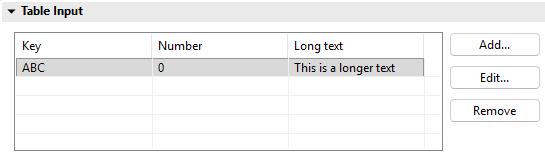
When the IDE action is now loaded and we expand the area again, you will now find the table spanning the entire width. This allows you to quickly and easily present a large number of objects and pieces of information. Additionally, we now have a new button to modify the record.
Input
As the next step, we will now adjust the field properties. Similar to normal fields, we can do this in this case as well. However, we first need to obtain the table's structure object in order to then adjust the individual elements of the structure.
DATA(structure) = table->get_line_structure( ).
structure->get_element( `long_text` )->set_multiline( if_sd_config_element=>height-medium ).
structure->get_element( `int_number` )->set_read_only( ).
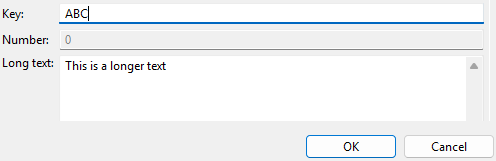
If you now go to "Edit" for a record, the following image will be displayed. We have changed the various settings of the fields. The number field is no longer editable, and the long text field is displayed as a larger field, offering more space for inserting text.
Side Effect
As a final step, we now want to automatically update the data in the table after inserting a new record. Let's first define the side effect in the structure configuration. This should only be triggered after a new data record has been created.
structure->set_sideeffect( after_create = abap_true ).
To do this, we rebuild the class ZCL_BS_DEMO_IDE_FIRST_SIDE and change the validation of the event detection. In this case, we execute the existing logic in AFTER_UPDATE and add a new branch for AFTER_CREATE. This allows us to react to the different events within the same implementation.
CASE determination_kind.
  WHEN if_sd_determination=>kind-after_update.
    input-se_output = |{ input-output_format }: { strlen( input-se_input ) }|.

  WHEN if_sd_determination=>kind-after_create.

ENDCASE.
Logically, we want to update the numbering in the list after each new line. The highest number should be in the first line and decrease with each subsequent line until 1 is in the last line. This allows us to update the field without the developer being able to make any changes.
DATA(actual_index) = lines( input-table_input ).

LOOP AT input-table_input REFERENCE INTO DATA(line).
  line->int_number = actual_index.
  actual_index -= 1.
ENDLOOP.
Let's now look at the table in action. We run the IDE action, maximize the section, and then add new rows. After each new row, the numbering is updated by the side effect.

That completes the implementation of the table. You can now use it normally in the action. There, we retrieve all the data from the IDE action, including the populated table.
Complete Example
You can find the complete code from the entire example in the GitHub repository. You can find the changes from this article in the following Commit and thus understand the current state later.
Conclusion
With this tutorial, you can now manage complex data structures for input and thus have further possibilities to make your IDE actions more flexible. In the future, we will also introduce a new IDE action that uses the table to make complex settings before generation.