ABAP Tools - Working with Eclipse (Classes)
In this article, we'd like to discuss working with classes and how you can extend them cleanly and easily in Eclipse. We'll also look at further options available in the ABAP Development Tools.

Table of contents
In this article, we'll look at working with classes and how you can handle them even more easily and effectively in Eclipse.
Introduction
Switching from SE80 to the ABAP Development Tools (ADT) in Eclipse can be quite challenging for many developers. Looking at the class editor in particular, significant differences become apparent compared to the SAP GUI. For example, there is no longer an input form; instead, the entire class is visible at a glance in the source code. This form-based approach to classes is no longer available in the ADT, which, among other things, improves flexibility and clarity. Developers will face a steeper learning curve here than, for example, when using new tools for RAP development. Therefore, you should familiarize yourself thoroughly with your new tool, especially at the beginning. Learning the ropes will take time, as shortcuts and many operating concepts function fundamentally differently.
Creation
Let's create a new class in the system in our first example. You can start the creation process by right-clicking on the respective package. There, usually directly in the menu, you will find the option to create a new class. When we create a new class, we have several input options, similar to the GUI, such as the class name and a description. Here you will also find additions such as specifying different interfaces or a superclass.

In this case, we only assign the name and description of the class, leave everything else blank, and continue with the generation. In the last step of the creation process, you must specify the transport request, just like in the classic GUI. Once the generation is complete, we obtain the following result.
CLASS zcl_bs_demo_class_creation DEFINITION
  PUBLIC
  FINAL
  CREATE PUBLIC .

  PUBLIC SECTION.
  PROTECTED SECTION.
  PRIVATE SECTION.
ENDCLASS.


CLASS zcl_bs_demo_class_creation IMPLEMENTATION.
ENDCLASS.
Unlike the SAP GUI, here we see the complete generated class, and we are not in an empty form. Visibility settings are also not available and are added automatically.
Quick Fix (Class)
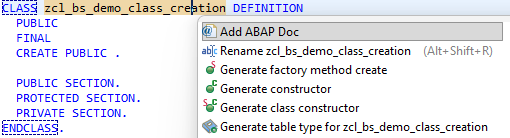
And here we can begin the actual work. If we don't want to create everything manually, or perhaps don't even know exactly what the individual formats are called, the Quick Fix will help us. You can access it by placing the cursor on the class name and pressing Ctrl + 1. Afterwards, various options will be suggested, such as ABAP Doc, which we can use to create the documentation. Furthermore, we can generate various elements, such as a constructor, a class constructor, or a factory method for the class. The generation process behaves differently depending on the existing context.
Factory Method
The Factory method is a static method of the class that creates an instance for us. We can perform various steps, such as initialization or other preparations, before the actual class is used. This gives us the flexibility to incorporate various design patterns, such as the Singleton pattern.
CLASS-METHODS create
  RETURNING
    value(r_result) TYPE REF TO zcl_bs_demo_class_creation.
The method is quite simple, but still uses Hungarian notation in parts. This means that some adjustments are necessary, regardless of whether you want to deliberately retain the Hungarian notation or remove it using Clean ABAP.
Constructor
Generating the constructor is relatively simple. Since we haven't defined any parameters in the class yet, only the method definition and the implementation in the lower part of the class are created.
METHODS constructor.
Instance Attributes
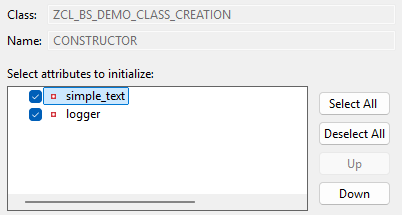
Let's now delete the implementation again and create two private attributes that we want to use shortly. These are a simple string and an instance of the Logger class.
DATA simple_text TYPE string.
DATA logger      TYPE REF TO zif_aml_log.
If we want to generate the constructor again, we will then receive a popup asking us if we want to use certain attributes for the constructor. In this case, we leave both attributes selected and confirm the generation of the constructor.
After generating the method, we get the following method definition. The correct types have already been used and the names added.
METHODS constructor
  IMPORTING i_simple_text TYPE string
            i_logger      TYPE REF TO zif_aml_log.
The implementation of the method then takes the values from the input parameters and passes them to the local attributes of the class for initialization.
METHOD constructor.
  simple_text = i_simple_text.
  logger = i_logger.
ENDMETHOD.
Hint: The factory method behaves the same way: The attributes are adopted as suggestions. You can also customize the method name here.
Getter/Setter
One of the most common use cases when working with attributes is setting or retrieving information from the class. In other programming languages, getters and setters are used for this. You can generate these relatively easily in ADT using the Quick Fix on the attribute. The options for each case are available to you, but you can also create both methods simultaneously.

Let's generate the getter and setter for the simple text. The logic will automatically use the variable names. If we don't use Hungarian notation here, we'll get the correct method names directly. The type is inherited, and the values are set. This means that creating getters and setters in Eclipse requires very little manual work.
METHODS get_simple_text
  RETURNING VALUE(r_result) TYPE string.

METHODS set_simple_text
  IMPORTING i_simple_text TYPE string.
Texts
Using the Quick Fix, we can also generate text within the class. We can create this directly for the class itself, as well as for any method or attribute within the class. This allows us to define more detailed documentation within the class. This is particularly important later on when other developers work with our objects. The primary tool used is ABAP Doc, which is specifically designed for documenting classes and their components.
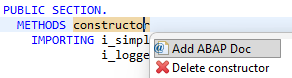
This places the complete documentation for the method and the class directly at the object's definition, rather than within the actual implementation. This significantly improves clarity, as we only see what we are actually programming. We can easily access the documentation as needed using the corresponding key, eliminating the need to constantly read it, as was common in older applications with inline documentation at the beginning of a method.
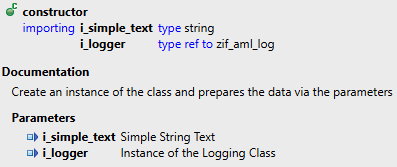
"! Create an instance of the class and prepares the data via the parameters
"! @parameter i_simple_text | Simple String Text
"! @parameter i_logger      | Instance of the Logging Class
METHODS constructor
  IMPORTING i_simple_text TYPE string
            i_logger      TYPE REF TO zif_aml_log.
Using F2, we can access the documentation at various points during use. We must place the cursor on the object and press F2 to open the documentation. If documentation is available, we will see all the details. Otherwise, only the minimal details of the interface will be displayed if no documentation is available.
Hint: The short texts from the input masks of the SAP GUI can be synchronized. There is a corresponding tag for this (<p class="shorttext synchronized" lang="en"></p>), which is automatically generated by Eclipse via the Quick Fix. However, these texts are usually significantly shorter than the descriptions intended for ABAP Doc.
View
We have already discovered several things in our article. In this section, we want to discuss the structure again. To do this, we will look at different views.
Class
The actual class is displayed in a special editor view. In the lower part of this view, there are various tabs that provide us with the different includes of the class. In the classic SAP GUI transaction, we had to navigate through menus to access the different components, such as locally defined types, test classes, or macros (although macros should no longer be used nowadays).

Outline
The outline view provides information about the actual artifacts within the class. For example, we can identify private attributes by their red icons in the view. The constructor also has a special icon, making it very easy to understand the visibility within the class. Furthermore, there are options to, for example, display only public attributes or to sort the methods and attributes alphabetically by name. This gives us significantly more options for working with the class's structural information compared to the SAP GUI. Further details and insights can be found in this article.

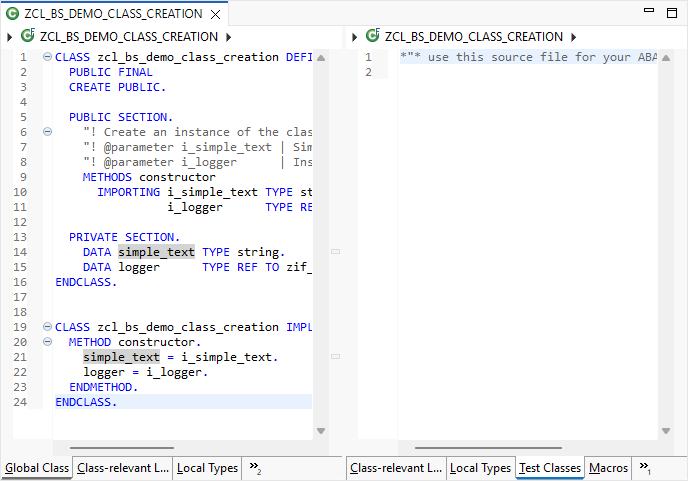
Split Editor
You might remember the Split Editor from the old days, but it works a little differently here. For example, if you want to work on the class and develop the unit tests simultaneously, you would normally have to constantly switch back and forth between the different tabs. Eclipse offers a Split function for this purpose, allowing you to display the two views side-by-side or one above the other. Under the menu item "Window -> Editor -> Toggle Split Editor (horizontal or vertical)" you will find the corresponding setting to change the view. You can also use the same function to switch back to the original view at any time.
Complete Example
Here you will find the complete generated class from today's example. You can review the various points we mentioned in this tutorial or test them yourself. For this, you need the open-source project for the ABAP Message Logger if you want to implement everything yourself in detail. Otherwise, you can of course use other interfaces.
CLASS zcl_bs_demo_class_creation DEFINITION
  PUBLIC FINAL
  CREATE PUBLIC.

  PUBLIC SECTION.
    "! Create an instance of the class and prepares the data via the parameters
    "! @parameter i_simple_text | Simple String Text
    "! @parameter i_logger      | Instance of the Logging Class
    METHODS constructor
      IMPORTING i_simple_text TYPE string
                i_logger      TYPE REF TO zif_aml_log.

    METHODS get_simple_text
      RETURNING VALUE(r_result) TYPE string.

    METHODS set_simple_text
      IMPORTING i_simple_text TYPE string.

  PRIVATE SECTION.
    DATA simple_text TYPE string.
    DATA logger      TYPE REF TO zif_aml_log.
ENDCLASS.


CLASS zcl_bs_demo_class_creation IMPLEMENTATION.
  METHOD constructor.
    simple_text = i_simple_text.
    logger = i_logger.
  ENDMETHOD.


  METHOD get_simple_text.
    r_result = simple_text.
  ENDMETHOD.


  METHOD set_simple_text.
    simple_text = i_simple_text.
  ENDMETHOD.
ENDCLASS.
Hint: To ensure that a class is always consistently and uniformly formatted, we also recommend working with the ABAP Cleaner.
Conclusion
This article was primarily intended to give you an overview of classes in Eclipse and show you how to work with them efficiently. We also wanted to provide you with various tools and resources that will noticeably speed up your daily work within the class editor.