BTP - Business Configuration (Release 2511)
Let's take a look at the changes in Business Configuration creation and what has changed technically in ABAP. Not everything has remained the same; some aspects have been further optimized.

Table of contents
New features are always celebrated, published, explained, and highlighted with great fanfare. But what about changes to existing features?
Introduction
The topic of Business Configuration is no longer so new, and the "new table maintenance" should be familiar to any developer working in BTP or already working on a Clean Core project with ABAP Cloud. This allows us to create our maintenance views for Fiori and offers several advantages:
- Automatic generation of maintenance via a wizard in ADT
- No Fiori generation and deployment required
- Control via permissions
- Adaptability via the RAP development model
- Connection to the transport system
With release 2511, there were some major changes to the wizard, the object structure, and the functionality of the various building blocks. Therefore, let's take a look at the current delta.
Wizard
Let's start with the wizard and the available options. First, we create a new table in the system, as this is the basis for generation. We should consider the basic properties, such as those allowed by delivery class C (Customizing) and maintenance. Additionally, all key fields based on CHAR must be available as data elements and domains. Only then can the wizard be started.
@EndUserText.label : 'BC Changes'
@AbapCatalog.enhancement.category : #NOT_EXTENSIBLE
@AbapCatalog.tableCategory : #TRANSPARENT
@AbapCatalog.deliveryClass : #C
@AbapCatalog.dataMaintenance : #ALLOWED
define table zbs_dmo_pocbc {
  key client            : abap.clnt not null;
  key configuration_key : zbs_demo_poc_configuration not null;
  integer_value         : abap.int4;
  character_value       : abap.char(60);
}
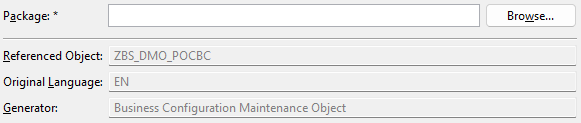
In the next step, we need to specify the package for generation in the wizard. Here, I would have preferred that the same package as the table be used, since in more than 90% of cases the maintenance view is in the same package.
Now let's move on to the generator settings. The biggest change is right at the beginning in the scenario selection. We can now decide whether to generate the projection layer as well or only the actual business object for maintenance. We can also now configure the Transport Selection and deactivate the Transport Selection Strip.
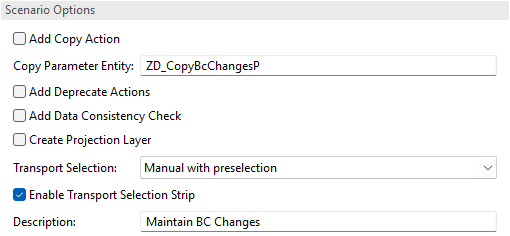
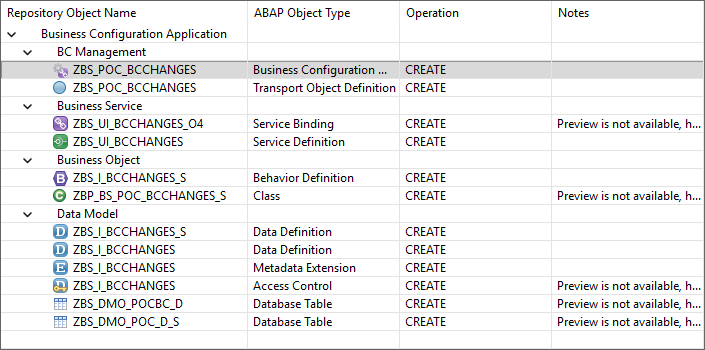
The rest remains the same, and we populate the information on how we want to generate the objects. Once we have finished with the settings, we receive an overview of the objects. Then the generation of the various objects in the system starts.
Activation
Once we have finished generating the objects, the Service Binding is not opened; instead, we land directly in the "Business Configuration Maintenance Object". The first thing you'll notice is that only the Service Configuration is open, and all other configurations are closed. However, the settings themselves are initially the same.

Let's take a look at the "Hiding draft related features" section; there are quite a few new settings there. Since the concept of drafting might be a little unfamiliar or difficult to understand for a newcomer to English, many of the features can be hidden in the interface.
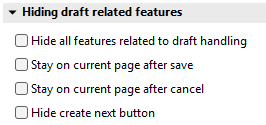
What exactly happens when the features are activated?
- Hide all features related to draft handling - Hides features such as the message in the bar that the draft has been saved or the button being labeled instead of "Discard draft"; now "Cancel".
- Stay on current page after save/cancel - This disables navigation after the actions and keeps you on the current page.
- Hide create next button - A "Create next" button is normally displayed on the object page, allowing you to create another record without leaving the page. This is useful if you want to configure multiple records.
The OData service is currently not active, so we still need to navigate to it and start publishing the service. Simply click the link on the object and the navigation will begin. After activation, we can look at the UI.
Transport
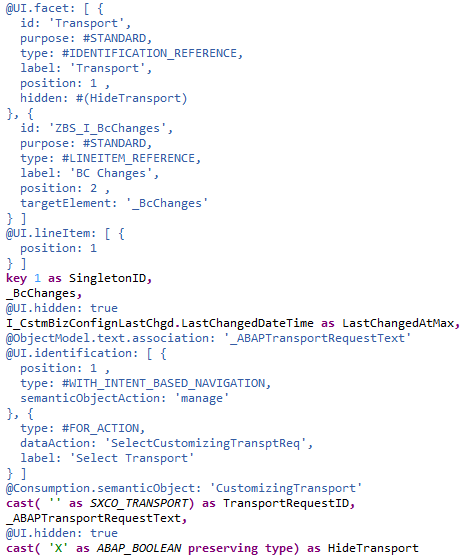
At the time of writing, despite Transport and Transport Strip being deactivated, the function is still generated in the business object. However, we think that this bug will be removed by the next release at the latest, and the behavior will only be implemented upon request.
Coding and Objects
Let's take a closer look at the generated objects.
API
In the behavior implementation, the code is no longer implemented directly, but a reusable API is used that can be changed centrally and doesn't always distribute the same code across all objects. However, the logic is now not as easily accessible.
METHOD get_instance_features.
  mbc_cp_api=>rap_bc_api( )->get_instance_features( transport_object   = co_transport_object
                                                    entity             = co_entity
                                                    keys               = REF #( keys )
                                                    requested_features = REF #( requested_features )
                                                    result             = REF #( result )
                                                    failed             = REF #( failed )
                                                    reported           = REF #( reported ) ).
ENDMETHOD.


METHOD get_global_authorizations.
  mbc_cp_api=>rap_bc_api( )->get_global_authorizations( entity                   = co_authorization_entity
                                                        requested_authorizations = REF #( requested_authorizations )
                                                        result                   = REF #( result )
                                                        reported                 = REF #( reported ) ).
ENDMETHOD.
If you want to specifically disable checks, currently only the entire API method can be disabled. Therefore, the new solution has both advantages and disadvantages.
Admin Fields
You probably already noticed when defining the table that we didn't specify any admin fields, which were previously always mandatory. If we don't specify the fields, a join is created via the Core Data Service "I_CstmBizConfignLastChgd", which adds a field for the last change. This field is then used in the BO ETag to handle the lock. This allows us to omit the fields for the table.
Metadata Extension
For the Singleton, the UI annotations are now generated in the Core Data Service, and a separate Metadata Extension is no longer generated. If you are looking for specific functions from the UI, you should look here, for example, if you want to remove the transport button again. Overall, this makes the object a bit leaner and focuses attention on the actual maintenance objects.
Permissions
When it comes to creating an IAM app and assigning permissions to the user, we are back to the "old" standard. You need to create an IAM app, assign the service, and grant permissions for S_TABU_NAM. Once you have assigned the permissions to a business catalog and assigned them to the user, they should see the object in the "Custom Business Configurations" app.
Conclusion
Outwardly, the changes aren't too noticeable, but the redesign of the generator is evident in various places. Basically, it saves you a lot of work with simple maintenance dialogs, just as the table maintenance generator already did. Currently, however, there is no regeneration of the maintenance data.