BTP - ATC Automation
How can you automate your ABAP Test Cockpit in BTP and have the results sent to you if problems occur? In this article, we'll go into the details.

Table of contents
In this article, we'll explore the current capabilities of the ABAP Test Cockpit for automation in BTP. We'll look at the standard and how we can adopt the rest.
Introduction
The ABAP Test Cockpit in the SAP BTP ABAP Environment offers a central solution for automatically testing all backend systems. However, unlike the classic on-premises ATC transaction, some processes work differently in the ABAP Environment. Therefore, we'll look at the current options and how we can automate the process as much as possible.
Test Variant
In the first step, we need a test variant to be able to perform a test in the system. In this test variant, we want to define the actual test, but also set the scope of the test so that the appropriate development artifacts are tested.
Apps
With release 2508, the "Custom Code Migration" application was split into two new tiles. This is intended to assign the application to different roles, but essentially the same application is called. You can schedule a new run via the applications.

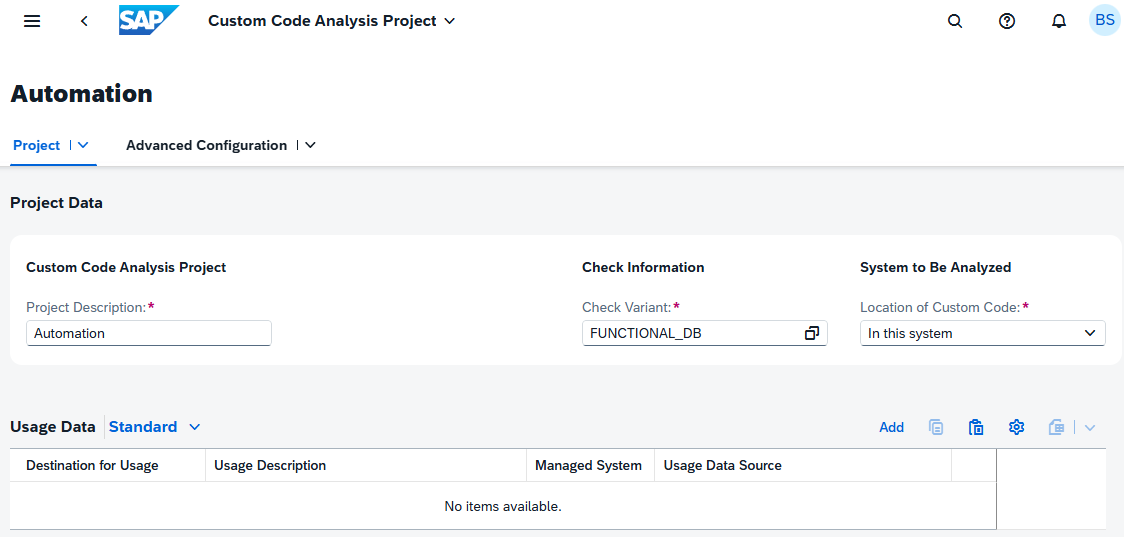
Project
We create a new project in the app. You can create a new "Custom Code Analysis Project" using the "Create" button. We need this to start our own test run.

We can now assign a name to the variant, then select a test variant. Here you can define your own test variants, but you can also select all standard variants. In principle, we can also specify a remote system if we want to test an on-premises system. In this case, we're checking the local system.
In the next step, we can define the scope of the check. If we want to check specific packages, we can specify all of our packages here. If we want to check everything or exclude certain packages, we can set this in the lower section. Once we're done, we remove the flag so that the check doesn't start immediately afterwards.

Job
To automate the check, we can schedule a job in the system. Here we find the "Schedule Custom Code Analysis" application, which essentially uses the standard app for application jobs.

You can create a new job using "Create"; the correct variant should already be preset here. You can also specify whether the job should run once or recurringly. The job now generally performs the check and persists the results to the database.

Results
The results of the run are persisted in the system. Since release 2508, Core Data Services are also available as standard, which you can use for reading. The views are available for this purpose:
- SATC_API_RESULT_HEADERS - Here you can find the various runs that were performed. You can filter by timestamp and other criteria.
- SATC_API_FINDINGS - The various findings of a test run can be found in this table. In addition to the message and classification, you will find further information about the findings.
Automation
That explains the current standard so far. How can we further automate the email sending step? For this, we use a small custom development, which you can also find on GitHub if you want to use it too.
Application Job
Since we want to check the results immediately afterwards, we will create an Application Job, which we will define later as the second step in scheduling. This job should extract the result of the test run via the Core Data Services and prepare it according to certain criteria.

Implementation
When implementing the logic, we read the last runs from the two Core Data Services, check whether the corresponding error categories are included, and prepare the email for sending. We then prepare the data in the email as HTML. You can find the code in the linked GitHub repository if you would like to take a look at the various objects and components. To easily handle errors and messages, we used the ABAP Message Logger.
Template
To ensure that our notification job starts immediately after our check, we create a new template in the system. To do this, we go to the "Application Job Templates" app and create a new template using "Create". Here we give it a name and can set its visibility.

Use the "Maintain Steps" button In the lower area, we can now add our steps. The two steps are added with "Save Job Template." We can set default values in the template, but we can also do this later when scheduling the job.

With "Save" we save the template and can exit the app.
Execution
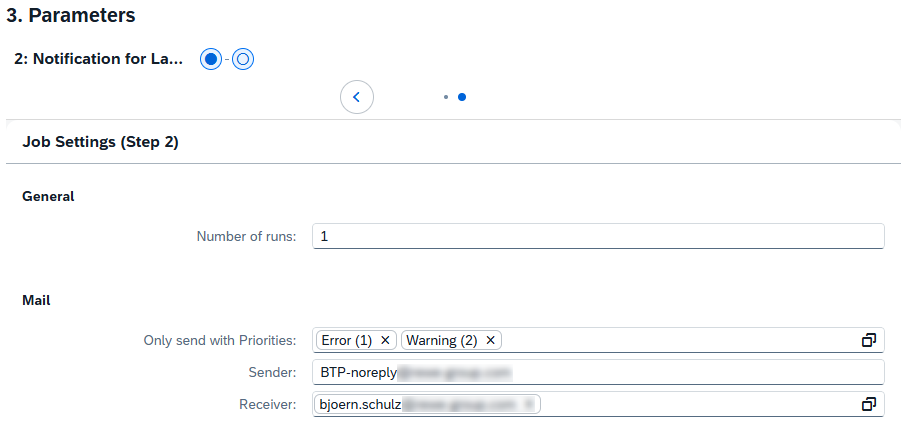
To schedule the job, we switch back to the "Application Jobs" app and create a new job using "Create." Here, we select the selected template for the start. If you want to schedule the job regularly, you can fill in the options in the second step. In the third step, we fill in the parameters and select the test run.

We want to use the last ATC run for our notifications, so we set the number to 1. We would like to receive an email if the priority is set to error or warning. Then we enter the sender and recipient for sending the email.
The job is executed with "Schedule"; depending on the settings, it will start immediately. If all criteria are met, we should receive an email.

Conclusion
The ABAP Test Cockpit has now been automated in the system, and we will receive an email at the end. Additionally, we can specify that we only receive an email if errors are found during the run. This allows us to automate the process with a small custom development.