ABAP Tools - IDE Actions (Input)
How can we retrieve information before the actual IDE action is executed in ABAP? Let's implement the first version of a simple input.

Table of contents
In this article, we'll create an input class and design our first input for the IDE action. We'll look at some formatting options.
Introduction
Unless we're refactoring source code, we typically need input from the developer executing the IDE action. This allows us to request additional data or obtain decisions from the developer about how to proceed. If we want to generate objects or make major changes, input definitely makes sense.
UI Configuration
To do this, we first need to create a UI Configuration class that inherits from the IF_AIA_SD_ACTION_INPUT interface and where we need to define the CREATE_INPUT_CONFIG method. To do this, we can start in the actual IDE action and enter the class name in the "Input UI Configuration Class" field. Enter.

Using the forward navigation (click on the link), we can start the system and only need to define the appropriate interface. We then receive our empty class and can activate the two objects in the system.

Annotations
Before we start with the actual implementation, we should first familiarize ourselves with the annotations that we want to use later. There are currently several sources for formatting and the various attributes:
So what do we need the annotations for? For example, if we want to define a title for a field, limit the length of input, or define a default value for a field, we need additional descriptive attributes. These attributes are defined in the form of annotations directly on the field or type and, in many cases, begin like ABAP Docs. Here's a small example of setting the label for the field:
"! <p class="shorttext">Output of the IDE Action</p>
output_format TYPE output_format,
Structure
In this chapter, we will design the output structure step by step and incorporate various elements for formatting the input.
Structure
For this, we need an initial structure. A good place to start is therefore to create our own structure where we want to store the various input information. Here, we define the INPUT structure with the OUTPUT_FORMAT field to check the various outputs later.
TYPES:
  BEGIN OF input,
    output_format TYPE string,
  END OF input.
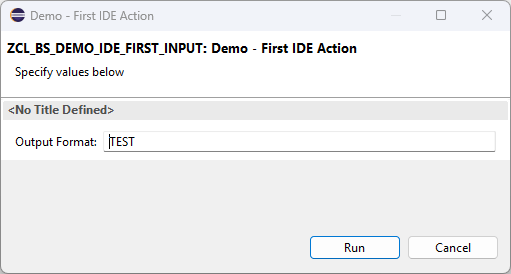
In the CREATE_INPUT_CONFIG method, we now need to prepare the structure and pass it to the UI_INFORMATION_FACTORY. In addition to the actual variable, we can also set default values directly. We then return the instance as the result of the method.
DATA input TYPE input.
input-output_format = 'TEST'.

RETURN ui_information_factory->for_abap_type( abap_type = input ).
If we now execute the IDE action, we will see a popup and our first field displayed along with the default value.
Labels
In the next step, we want to give the fields some labels so they are easier to read and the user receives more information during execution. To do this, we will add a paragraph with the class "shorttext" and the actual text. In this case, we give the structure a description and the actual field.
TYPES:
  "! <p class="shorttext">Out first action</p>
  BEGIN OF input,
    "! <p class="shorttext">Choose an output</p>
    output_format TYPE string,
  END OF input.
As a result, we get the corresponding texts in the popup this time, already an improvement on the first impression of the UI.

ENUM
We now want to give the user a choice for the various output formats. To do this, we need to create a few things so that the input ultimately becomes a dropdown. To do this, we create a constant structure that contains all the values. In this case, we have TEXT, HTML, and CODE so that we can control the output later. We have also already defined texts so that the constants will later receive a nice text.
CONSTANTS:
  BEGIN OF output_enum,
    "! <p class="shorttext">Plain text</p>
    text TYPE string VALUE 'TEXT',
    "! <p class="shorttext">HTML</p>
    html TYPE string VALUE 'HTML',
    "! <p class="shorttext">Code Change</p>
    code TYPE string VALUE 'CODE',
  END OF output_enum.
Now for a somewhat more difficult part: the actual configuration of the data type for the output. We define a type that can accept the contents of the ENUM, in this case STRING. Then we have to configure it. Using $VALUES, we specify where the type definition comes from. In this case, we have a link to the current class, the data area, and there the OUTPUT_ENUM. Then we have to specify which value is initially set. To do this, we specify the ENUM again after $DEFAULT, but this time also a value from it.
"! $values { @link zcl_bs_demo_ide_first_input.data:output_enum }
"! $default { @link zcl_bs_demo_ide_first_input.data:output_enum.text }
TYPES output_format TYPE string.
Finally, we replace the STRING data type with our new type so that the configuration for this field takes effect. This completes the actual configuration.
TYPES:
  "! <p class="shorttext">Out first action</p>
  BEGIN OF input,
    "! <p class="shorttext">Choose an output</p>
    output_format TYPE output_format,
  END OF input.
If we now execute the action in the system, we receive a dropdown field with the correspondingly defined values as a result. This allows the developer to directly select which output they want to generate.

Usage
Now we come to the most important part: how can we use the developer's input in the actual execution of the action? To do this, we need to switch to the actual action and implement additional code in the RUN method. To do this, we create a variable of our data type and call the GET_INPUT_CONFIG_CONTENT method via the CONTEXT object to access the popup's contents.
DATA input TYPE zcl_bs_demo_ide_first_input=>input.

TRY.
    context->get_input_config_content( )->get_as_structure( IMPORTING result = input ).
  CATCH cx_sd_invalid_data.
ENDTRY.
We can then react to the contents of the variable and receive different output depending on the selection.
CASE input-output_format.
  WHEN zcl_bs_demo_ide_first_input=>output_enum-text.
    result = output_text( ).

  WHEN zcl_bs_demo_ide_first_input=>output_enum-html.
    result = output_html( ).

  WHEN zcl_bs_demo_ide_first_input=>output_enum-code.
    result = output_code_change( context ).
ENDCASE.
Complete example
You can find the complete example for developing IDE Actions in our GitHub repository. The actual change from this article is in the commit, as the actual repository will change over the course of the series.
Conclusion
Today we looked at how we can create an output and query the developer for additional information, which we can then use in our action. We also looked at initial annotations for the UI.