ABAP Tools - IDE Actions (Creation)
Let's create our first IDE action for the ABAP Development Tools together. We'll guide you step by step through the process and the interfaces.

Table of contents
In this article, we will look at creating IDE Actions. To do this, you should meet the requirements as described in this article.
Introduction
For an IDE Action, we usually need two objects: the IDE Action as a new artifact in the system, and the actual implementation in a class. Furthermore, various UI forms are available to us, which we will look at in more detail in the next article.
Creation
In this chapter, we will deal with the installation of the IDE action and the implementation of the various components to provide a first version.
Package
First, let's create a new demo package to have all objects in one place. You can create a new package by right-clicking on an existing package or the system. To do this, we define the package ZBS_DEMO_IDE_ACTION under our demo package.

A new feature in Release 2508 (ABAP Environment) was that new packages under ZLOCAL no longer have a transport record. This means we no longer have to create a transport and can create the objects directly.

IDE Action
Now we define the first IDE action; however, you will need the appropriate permissions for this. You can find more information about this in the last article; link to it above. You can right-click on the package in the context menu. Create a new object using "New -> Other ABAP Repository Object".

There we search for IDE Action as the type and find it in the "Others" category. If you don't see the object here, your release is probably too old or you don't have permissions to create it.

In addition to the already defined package, we give the IDE action a name and a description. These will not be visible later, but only for assignment and creation.

Once we have created the IDE action, it should initially be empty. In the following screenshot, we have already added some information, which we will describe shortly.
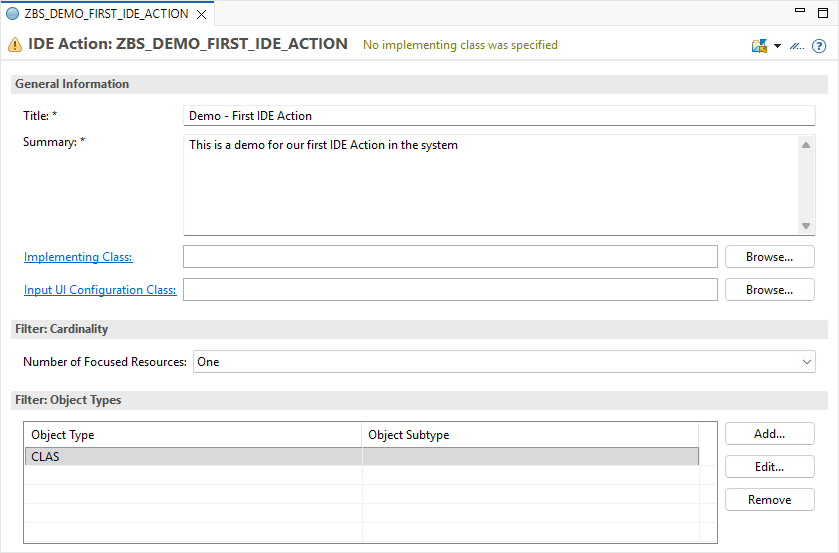
Here is an explanation of the various fields and information:
- Title - The title will be displayed later when the action is executed, and we can choose from the various system actions. The title should therefore already describe the use case.
- Summary - The summary will be displayed later when the action is selected in the popup. This is intended to ensure that the developer receives further information about what happens after execution.
- Class - Here, the class for the actual action is defined, as well as a second class for a possible UI. We generally need at least the class for the action.
- Filter: Cardinality - The cardinality determines how many objects must be selected for the action to be offered. In our case, we define "One," so that a maximum of one object can be in focus; otherwise, our action will not be displayed in the selection during execution.
- Filter: Object Types - We can also restrict the various objects. In our example, the action should only work for one class (CLAS); otherwise, the action should not be displayed. This allows you to define different actions for different objects, and the developer always sees the appropriate action.
Now that we have set the object to a class, we can find additional subtypes and further restrict the selection besides the class. If it is a class attribute or a method, we can also implement different actions.

Implementation
To define an implementation for our action, we can use "Browse" to search for an existing class or start the creation wizard using the link in front of the field. Unfortunately, the appropriate interface is not predefined here. Let's give the ZCL_BS_DEMO_IDE_FIRST_ACTION class a name.

Therefore, we search for the IF_AIA_ACTION interface ourselves, which we need for the actual implementation. Once the class has been created, we can activate both objects.
Execution
This completes the basic implementation, and we can try out the IDE action. If you still have the ZCL_BS_DEMO_IDE_FIRST_ACTION class open, we can execute the action using two options.
- Menu - In the menu, you will find the appropriate option under "Run -> Run ABAP IDE Action..." (fairly far down).
- Shortcut - You can also start the action using the shortcut CTRL + ALT + R. The shortcut is also displayed in the menu and can be configured.
A popup will now appear, showing all actions that match the corresponding filter. Since we are currently in a class, some actions will be displayed. You can use the search field to limit the number of actions if you are looking for a specific action. Once you have selected an action, you will find the longer description below to provide further information about what will happen next.

If we execute the action now, however, we only receive an error message because we have not yet defined any output.

Complete Example
As usual, you can find the complete example from this article on GitHub. We've created a new repository to store all IDE Action examples. You can find the changes from this article and follow them in detail via the following commit.
Conclusion
The first part of the IDE Action is implemented, and we can call the action and receive output at the end. Next time, we'll look at input and how we prepare information for our action.