BTP - Testing with Swagger
Have you just created your service binding in ABAP of the Web API type and don't want to test it with Postman? Have you already taken a look at Swagger, which now works out of the box?

Table of contents
In this article, we'll look at testing with Swagger and how you can use it to map out various test scenarios and save time.
Introduction
With Swagger, you get a standardized interface description for an OData API and can use the software to test the functions straight away. You don't need to install any additional software; you can start directly with the service.
Start
To run Swagger, you need a system with the appropriate release. The feature was introduced in BTP with release 2505, but was not fully usable due to problems generating X-CSRF tokens. To start the UI, you need an OData service of the "Web API" type; in this case, we are working in the ABAP environment. In this example, we use the API from this article to test the UI. You will find the "Test" in the service binding. Button to start Swagger.

After loading the UI in the browser, you will see the typical overview of the entities and options provided by the service. One entity for the administrative data, then the partner as the main entity with all options. Then the various actions and the draft handling of the entity. Finally, you will find the value help for cities and static actions of the service. This way, you can see at a glance which actions are enabled and available for each entity.

Structure
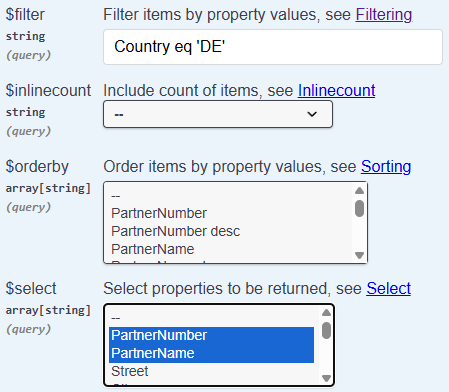
Before we perform the first interactions, let's first take a look at the UI. Let's open the GET method for partners. Here we get an overview of the various parameters that we can use, for example, when calling. Here you'll find everything you need to call the endpoint.

If we look a little further down, you'll find the response section, which shows how the service will respond to a request. Here you'll also see what is returned in the event of an error.

Read
At the moment, the UI is still locked, and we can't change the various fields. To start editing, you need to press the "Try it out" button. This opens the fields and displays the "Execute" button.

To do this, let's set the filter to all partners from Germany (DE). Here, you must pay attention to the case sensitivity of the filter. Then we restrict the fields and only return the partner number, name, and country to validate the result.
The result provides us with several pieces of information. First, the CURL and the URL being called, followed by the service's response, and below that, the header fields, although we haven't displayed these. In total, we receive 2 data records back.

Create
Let's switch to the appropriate mode for creation. As a template, we already receive the payload with many placeholders. Therefore, we can fill the JSON with our data here and are then ready to create.

Here you can find the payload used again. In addition to the actual fields, we also fill in the "IsActiveEntity" flag. If we set the value to True, no draft is created; instead, the entity is activated directly and the entire logic is executed. Thanks to Marian Zeis for the little tip.
{
  "PartnerName": "Swagger Test Company",
  "Street": "Swagger Street 2",
  "City": "Berlin",
  "Country": "DE",
  "PaymentCurrency": "EUR",
  "IsActiveEntity": true
}
If we now execute the request, Swagger handles the token handling for us, and in the result, we immediately see the new partner number that was automatically assigned by the system. You also receive information about the CURL used, the URL, and the response code.

If we now look at the table in the database, the data record can also be seen here. The Swagger API has now created the data record in the system.

Conclusion
Do you still need Postman to test the Web API? For complex processes, it's very likely, but for simple tests and actions, Swagger can be a great help. Especially if you're a beginner and not yet familiar with token handling.