RAP - Position of Buttons
In this article, we'll look at the different button positions. Where can we place the various actions in RAP, and how do we use them?

Table of contents
In this article, we will implement actions at various points in the UI and look at the possibilities and positions.
Introduction
Currently, we have primarily defined actions at the table level in the List Report, but there are also ways to display an action and make it available to our user. Therefore, in this article, we will extend our Sales App with various actions at different levels.
Preliminary Work
Before we begin with the actual example, we first deactivate the Analytical Table, which we activated last time for demonstration purposes. Since we currently want to use all the features of our application again, we switch to the Responsive Table, the default for List Reports. To do this, we remove all aggregation information from the Projection View ZBS_C_SASale.
Behavior Definition
To be able to reference the actions in the next step, we create the various actions in the behavior definition ZBS_R_SASale and implement the empty wrappers.
Search Help
First, we define a search help, which we will need for two abstract entities. This is a simple search help via the partner, just as we have already implemented it for the material.
@AccessControl.authorizationCheck: #NOT_REQUIRED
@EndUserText.label: 'Partner Value Help'
@Search.searchable: true
define view entity ZBS_I_SAPartnerVH
  as select from zbs_dmo_partner
{
      @Search.defaultSearchElement: true
      @Search.fuzzinessThreshold: 1.0
      @ObjectModel.text.element: [ 'Name' ]
      @UI.textArrangement: #TEXT_LAST
  key partner as Partner,
      @Search.defaultSearchElement: true
      @Search.fuzzinessThreshold: 0.8
      name    as Name
}
Abstract Entities
In the second step, let's define two abstract entities that we will later need as input for two of the new actions. We want to define Factory Actions that first query some data. First, the entity for populating the fixed-value deviation.
@EndUserText.label: 'Fix Value Create Action'
define abstract entity ZBS_S_SAPopupFixValue
{
  @Consumption.valueHelpDefinition: [{ entity: { name: 'ZBS_I_SAPartnerVH', element : 'Partner' } }]
  @EndUserText.label : 'Partner'
  PartnerNumber      : zbs_demo_sa_partner;
  @EndUserText.label : 'Sales Date'
  SalesDate          : zbs_demo_sa_date;
  @Semantics.amount.currencyCode: 'DifferenceCurrency'
  @EndUserText.label : 'Amount'
  DifferenceAmount   : zbs_demo_sa_amount;
  @EndUserText.label : 'Currency'
  DifferenceCurrency : zbs_demo_sa_currency;
}
The second entity is for entering a percentage deviation. The first two fields are the same, but then we have other fields for input.
@EndUserText.label: 'Percent Create Action'
define abstract entity ZBS_S_SAPopupPercent
{
  @Consumption.valueHelpDefinition: [{ entity: { name: 'ZBS_I_SAPartnerVH', element : 'Partner' } }]
  @EndUserText.label : 'Partner'
  PartnerNumber      : zbs_demo_sa_partner;
  @EndUserText.label : 'Sales Date'
  SalesDate          : zbs_demo_sa_date;
  @Semantics.quantity.unitOfMeasure : 'DifferenceUnit'
  @EndUserText.label : 'Quantity'
  DifferenceQuantity : zbs_demo_sa_quantity;
  @EndUserText.label : 'Unit'
  DifferenceUnit     : zbs_demo_sa_unit;
}
Definition
In total, we define 5 actions. The first 4 actions are defined at the ROOT level in the entity ZBS_R_SASale. Here we define two factory actions with input parameters, one action for a consistency check of the object, and one check to delete the differences.
static factory action ( authorization : global ) createFixValue parameter ZBS_S_SAPopupFixValue [1];
static factory action ( authorization : global ) createPercent parameter ZBS_S_SAPopupPercent [1];
action ConsistencyCheck;
action ClearDifferences;
In the entity ZBS_I_SASold, we define another action to trigger the release of the positions in the entity. We define this as a normal instance action.
action ReleaseItems;
Implementation
We create the implementation of the empty shells using Quick Fix (CTRL + 1) and format the class. We will not carry out the implementation in this article.

Projection
To ensure that the actions also work later in our app, we need to enable them in the projection of the RAP object. The various actions are made available externally using USE ACTION. Do the same at the level of the fifth action; we have omitted this from this example, but you can find it in the GitHub repository.
use action createFixValue;
use action createPercent;
use action ConsistencyCheck;
use action ClearDifferences;
Action - List
The simplest and most frequently used action is defined directly on the table in the List Report. Static actions, factory actions, and normal actions can be defined there. The normal action always requires selected items in the list; the other two are static and do not require a reference. The action is defined at "UI.lineItem". Here you can choose the object (field) to be implemented; this is irrelevant. "Position" determines the order in which the buttons are displayed.
@UI.lineItem: [
  { position: 10, type: #FOR_ACTION, dataAction: 'createFixValue', label: 'Create Fix Value' },
  { position: 20, type: #FOR_ACTION, dataAction: 'createPercent', label: 'Create Percent' }
]
The two actions are now displayed in the List Report above the table and are located before CREATE and DELETE. Since they are STATIC, they can be executed even without a selected entry and are active from the start.

If we execute one of the actions, an input will be displayed accordingly.

Action - Object Page
In the next step, we will define the action on the Object Page in the upper area directly next to the EDIT and DELETE buttons. Instead of the LineItem, we now use "UI.identification". This moves the button from the list to the object page.
@UI.identification: [
  { position: 10, type: #FOR_ACTION, dataAction: 'ConsistencyCheck', label: 'Check consistency' }
]
The action is available and active. However, this is not a static action; it is bound to an instance because we are currently viewing the details of our selected object. Unlike in the list, our own actions are located after the default.

Action - Section
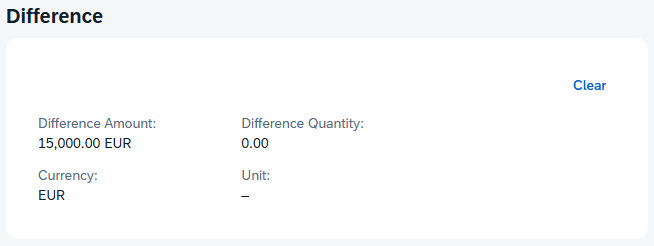
In the third step, we define an action directly within our data. This brings the actual action as close as possible to the section it affects. Several positions are available for this. Let's define an action at the difference level, again using "UI.identification", but this time we specify the "qualifier" to attach the action to a scope.
@UI.identification: [
  { position: 20, type: #FOR_ACTION, dataAction: 'ClearDifferences', label: 'Clear', qualifier: 'DIFF' }
]
If we update the UI, you'll find the new action next to the heading of the area. This places it outside the actual area, making it quite visible.

If we add the additional annotation "inline", the action will be moved into the area, but the spacing will also increase.
@UI.identification: [
  { position: 20, type: #FOR_ACTION, dataAction: 'ClearDifferences', label: 'Clear', qualifier: 'DIFF', inline: true }
]
After the change, the actual action is displayed in the area. Depending on the available space on the UI, the action is integrated differently. Basically, you can attach the action not only to "identification" but also to "fieldGroups". Since you can define multiple groups in an area, you can also attach them to different positions within that area.
Action - Subentity
As a final step, we repeat the actual action and bind the new button to a table. In this example, we use a subentit in the object and thereby create a button on the object page, on the actual table. The annotation is identical to the step for the list; here we only extend the metadata extension of ZBS_C_SASold.
@UI.lineItem: [
  { position: 10, type: #FOR_ACTION, dataAction: 'ReleaseItems', label: 'Release' }
]
As a result, we get the button above the table on the object page and can use it to unlock individual items in the table.

Color
In principle, we can also give a button on the UI a color. Here, we have to use the suffix "criticality" and reference the content of another field. We use a virtual element that we created previously and which we currently fill with 1.
@UI.identification: [
  { position: 10, type: #FOR_ACTION, dataAction: 'ConsistencyCheck', label: 'Check consistency', criticality: 'ButtonCriticality' }
]
As a result, the color of the button changes to red, according to the defined criticality. Further information on the available colors can be found at this link to Fiori Elements.

Complete Example
The complete example can be found in GitHub in the corresponding package for the Sales App. The changes from this article can be found in this Commit and you can follow the changes, plus the additional information.
Conclusion
If you want to create specific actions for specific areas in your application, you can attach them to the different areas in the UI. The additional design elements allow you to guide the user more easily through the UI and clarify what the actual action is intended for.