BTP - Connect On-Prem (SQL Service)
How can we connect an on-premise SQL service to our ABAP environment, and what advantages does this offer? Let's take a technical deep dive.

Table of contents
In this article, we will discuss connecting an SQL service to BTP. We will walk through the various steps to create the configuration, establish the external entity, and subsequently create the connection.
Introduction
For creating side-by-side scenarios, connecting various services and technologies is crucial to modeling such scenarios. In the past, we have already looked at OData, RFC and native connections. One relatively new technology that shows great promise, especially in the area of RAP modeling, is SQL services. These have been available on-premises since earlier releases and can also be used as a data source. Therefore, let's take a look at the use of this type of service and how we can use it, especially in the ABAP environment.
SQL Service
For setting up the SQL service, we use an S/4HANA 2023 release, which already offers SQL services in the SELECT case. If you already have a 2025 release, more functions are available that you can activate in the SQL service. This would also make writing to this service possible. The SQL service offers simple operations on so-called data sources, which are intended to enable reading and later writing, thus enabling native, simple and fast access to data sources within an SAP system. As a basis, we can use Core Data Services here and, for example, also use an access control in the definition to enable secure access to the data and the data source.
In this scenario, we define a new service binding of type "SQL - Web API" on our service definition ZBS_DEMO_PERFROMANCE_DATA, which we already used for our performance test.

You don't need to activate the SQL service after creating it, it is automatically available and protected by appropriate permissions. If you look more closely at the service, you will see the available SQL operations, in this case, only SELECT. In modern systems, you will also find various checkboxes here for enabling and disabling the different CRUD operations.

External Entity
In principle, you can now also create the external entity in the BTP manually or via copy and paste. However, if there are a large number of entities, if they are complex, or if they have different data types, it is worthwhile to extract a definition from the system using JSON. Therefore, in this chapter we will look at how to generate the definition and make it available for the BTP.
Creation
To do this, we call the transaction SCSN_EXPORT_COCKPIT in the current system, where the SQL service was also created, to extract the model definition.

Here we specify the SQL service under the "Services" section, since we want to extract it completely, including all entities. You can also choose whether you want to export the types as well. This means that corresponding simple types are created in the target system for typing. In this case, we want to extract without types. This means that an external entity is created in our target system, and normal ABAP types are used for the definition.

Once you have finished with the settings, you can perform the extraction using the Start button. In the next step, a JSON file is generated and processed and displayed in a pop-up. You can then check whether the extract corresponds to what you want to create in the target system and then save the contents of the pop-up as a local JSON file on your system. We will need the file for the next step.

Definition
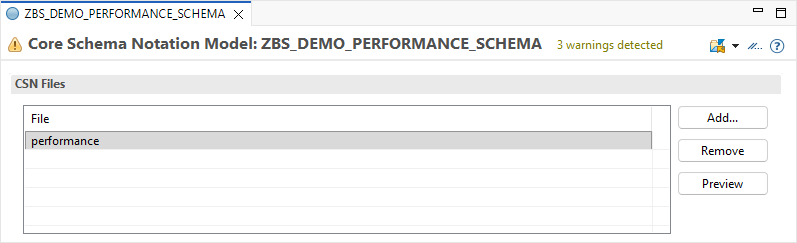
In the next step, we create a so-called "Core Schmea Notation Model", which we need as an artifact in the system to import our CSN file from our system. You can find the object in the "Others" section if you search for all repository objects. Here you assign a name and a description for the object; the name itself isn't particularly important in this case.

Using the "Add" button in the UI, we can then upload our file to the system. We also need to assign a name to the file; in this case, we'll use a simple identifier like "Performance". This name isn't particularly important either, as the information comes from the actual file we're uploading. Finally, we need to save the object so that all changes to the object are saved.
Generation
Now we can begin generating the actual artifacts, i.e., the external entity in the system. The easiest way to start the generator is by right-clicking on the previously created object. There you will find the generator in the context menu under the item "Generate ABAP Repository Objects ..." and start it in the system.

In the next section, we specify the actual generator we want to start. Since we started from a specific object type, the available generators are already limited to the relevant options. Because we have an SQL service running in the background, we want to create an "ABAP SQL Consumption Model".

In the next section, we find the actual configuration of all the entities and elements to be defined that the system wants to create. Here you can click through the different tabs and see if the naming conventions suit you and if the objects can be created that way. In this case, for example, we've adjusted the name of the Core Data Service to match the external entity. We haven't made any other adjustments.

Finally, the generator is executed and the objects are created in the background. Here, the generator works similarly to the RAP generator, and it may take some time to generate them, depending on the number of entities. Once generation is complete, we receive a pop-up and can navigate directly to our entities.

The first version of the external entity has been created in the system, and we already find all the necessary attributes, such as mappings, directly within the entity. We would generally use the names here exactly as we use them on-premises, since we are already using a Core Data Service with corresponding long names and formatting. As we can see at a glance, some annotations have also been imported, such as the currency code or a corresponding label from the backend. Basically, all types used here are built-in ABAP types, as specified during extraction.
define external entity ZBS_X_DemoSQLPerformance external name "Performance"
{
      @EndUserText.label: 'UUID'
      @EndUserText.quickInfo: '16 Byte UUID in 16 Bytes (Raw Format)'
  key Identifier        : abap.raw( 16 )   external name "Identifier";
      ItemDescription   : abap.char( 40 )  external name "ItemDescription";
      RandomDescription : abap.char( 150 ) external name "RandomDescription";
      @Semantics.amount.currencyCode: 'Currency'
      Amount            : abap.decfloat34  external name "Amount";
      Currency          : abap.cuky        external name "Currency";
      BlobObject        : abap.string( 0 ) external name "BlobObject";
      NewDate           : abap.char( 8 )   external name "NewDate";
      NewTime           : abap.char( 6 )   external name "NewTime";
      UTCTimestamp      : abap.utclong     external name "UTCTimestamp";
}
with federated data provided at runtime
Hint: This was a very large number of steps we performed to generate the external entity in the system. Basically, the creation can also be done manually; in that case, the types simply need to be adopted as defined. Generating them can certainly make sense when dealing with a very large number of entities.
Configuration
In this article, we will not go into the basic description of setting up the configuration again. There is an older article that describes exactly how to create the configurations step by step. In this article, we use the same scenario, so we have a HANA Cloud database in the middle, which we will access. We will connect to the on-premises system via the Cloud Connector. In the current architecture, a direct connection from the ABAP Environment's HANA database to the Cloud Connector is not possible because the configuration is unknown. As described in the article, we create a virtual table on the HANA Cloud instance, which we use as a basis for later implementing access to the on-premises database and the hop.

On the ABAP environment side, we then create a corresponding outbound SQL service and define it for access to the on-premises database.

In the communication scenario, the service must then be created as an outbound SQL access so that it can be authorized in the system and configured against the communication system. All other settings and descriptions can be found in the linked article, which describes the connection in detail.

Adjustments
Basically, we can now begin testing the external entity. However, we want to make a few adjustments here so that the actual test works.
- First, we want to change the access type. Here we use the PROVIDED BY addition, since we want to specify directly in the entity which schema the access should be via.
- Secondly, we then change the annotations and set the Authorization annotation, which we need because we have changed the scenario.
- Thirdly, we also need to adjust the data type for the amount field, otherwise we will later receive an error message from the service. The extraction used the data type decfloat34 here, which, however, leads to problems because it does not correspond to the data type of the virtual table. Let's take another look at the virtual table in detail. A data type of DEC(15,2) was created here, so we need to adjust the type.
- As a final step, we need to adjust the name of the external entity. This is because we defined a corresponding virtual table on the HANA Cloud, which has its own alias. The generator doesn't recognize this alias, so we adjust the name here to match the alias of the HANA Cloud.
@AccessControl.authorizationCheck: #NOT_REQUIRED
define external entity ZBS_X_DemoSQLPerformance external name "PERFORMANCE"
{
      @EndUserText.label: 'UUID'
      @EndUserText.quickInfo: '16 Byte UUID in 16 Bytes (Raw Format)'
  key Identifier        : abap.raw( 16 )    external name "Identifier";
      ItemDescription   : abap.char( 40 )   external name "ItemDescription";
      RandomDescription : abap.char( 150 )  external name "RandomDescription";
      @Semantics.amount.currencyCode: 'Currency'
      Amount            : abap.dec( 15, 2 ) external name "Amount";
      Currency          : abap.cuky         external name "Currency";
      BlobObject        : abap.string( 0 )  external name "BlobObject";
      NewDate           : abap.char( 8 )    external name "NewDate";
      NewTime           : abap.char( 6 )    external name "NewTime";
      UTCTimestamp      : abap.utclong      external name "UTCTimestamp";
}
with federated data provided by ZBS_DEMO_PERF_EXT_SCHEMA
Test
Once we have made the adjustments, we can write our actual test class. This is relatively straightforward, as we simply perform a SELECT against the external entity, just as we already know from any SELECT against a normal database. In this case, we don't need a schema or any other external additions; we simply perform a SELECT to read the data and then output it to the console. Appropriate error handling follows, as we still had mapping errors during our tests. Generally, it helps to better understand which error messages arise from the access. Here you should take a closer look at the entire exception stack; usually, the first exception generated is the one containing the actual error message.
CLASS zcl_bs_demo_hana_perf_test DEFINITION
  PUBLIC FINAL
  CREATE PUBLIC.

  PUBLIC SECTION.
    INTERFACES if_oo_adt_classrun.
ENDCLASS.


CLASS zcl_bs_demo_hana_perf_test IMPLEMENTATION.
  METHOD if_oo_adt_classrun~main.
    TRY.
        SELECT FROM ZBS_X_DemoSQLPerformance
          FIELDS *
          INTO TABLE @DATA(remote_datas)
          UP TO 50 ROWS.

        out->write( remote_datas ).

      CATCH cx_root INTO DATA(sql_runtime).
        out->write( sql_runtime ).
    ENDTRY.
  ENDMETHOD.
ENDCLASS.
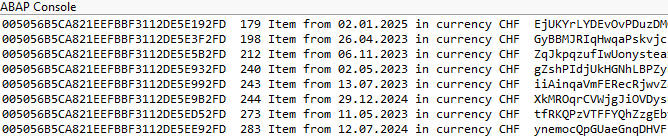
If we then run the class once, we receive the first 50 data records in the console. These correspond to the performance data from our on-premises system. This completes the actual test and the connection. We can now read the data directly from the external CDS entity using simple SELECT statements.
Since the logical external schema is already stored in the Core Data Service, we can also directly execute the Data Preview with F8 on the CDS view. This loads the preview and displays the data directly within it, without us having to manually establish a connection. In the tool, we can then continue to set appropriate filters, select data via filters, and display it, just as we are used to with a local table.

Conclusion
The connection via an external entity has now been established, and we have connected to the remote SQL service. The newly created external entity behaves in the system like a local table. However, some minor performance differences are noticeable here compared to a true local table located on the same HANA database. Fundamentally, though, this is a very efficient method for accessing data remotely.