RAP - Singleton Pattern
The Singleton pattern in rap has been around for a while, but how exactly does it work and how can you use it for other purposes? Let's take a closer look at the details in this article.

Table of contents
In this article, we'll look at the Singleton Pattern, how it's structured, and what else you can use it for. We'll also look at an example.
Introduction
The ABAP RESTful Application Programming Model (RAP) is the new model in ABAP for creating cloud-ready and clean core applications. With RAP, you can provide not only applications but also interfaces for internal and external use. With its latest features, RAP is very flexible in terms of structure and use, which is why we want to divide applications into different patterns.
Structure
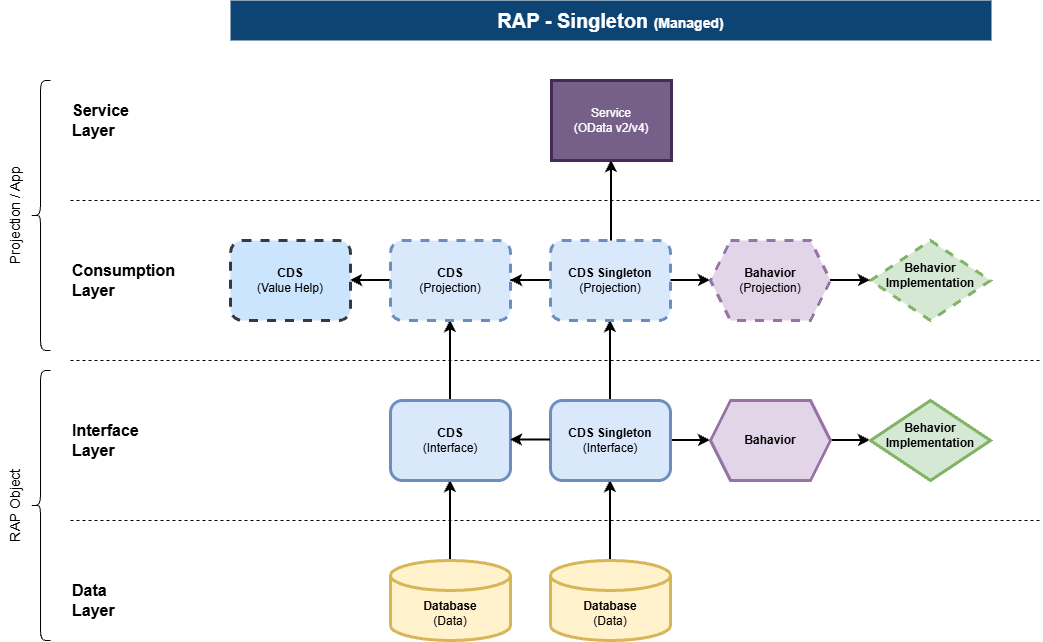
The "Singleton Pattern" It's called that because it returns exactly one instance to us, which we can then process. This allows us to circumvent certain limitations that can occur, for example, when working with the List Report. A typical example of this is the Business Configuration, which is generated using the Singleton Pattern.
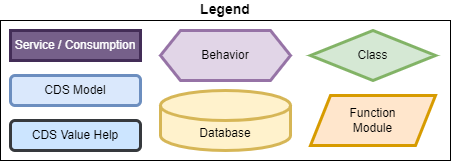
The following characteristics differentiate it:
- Root and child are connected via a fixed key.
- Exactly one instance is returned (root level).
- List Report is skipped for editing.
- Data is edited directly in the table (mass editing).
- Consumption Layer is optional.
Example
The first example that should come to mind is the Singleton pattern, which is used to generate a business configuration. The idea behind this is that we want to edit the entire table directly without having to jump to the object page for each row. This is achieved by jumping directly from the list report to the object page via the Singleton pattern and arriving there in edit mode. This has the advantage that we can maintain the table in fullscreen mode. Another similar example is a form. Therefore, in the next example, we will build a data entry form that the user can submit at the end.
Modeling
In this chapter, we first generate the data model up to the service level to provide our application with all the necessary data.
Data Model
We design the data model to be relatively simple. At the top level, we have the Singleton. Here, we also have additional administrative fields that we need for our draft handling. We could also store additional data from the input form here. The user can enter this data later via the form. Directly below is an input table for participants. Here, we simply want to allow users to enter their names and add new entries via the form. For example, we don't plan to create an object page here, as everything should happen on a single page. Unlike the Singleton, we also use an additional user ID here to differentiate the data of different users across the various forms.

In the data model above, the tables serve only to provide structure. Here, we don't actually want to store any data; instead, it will be handled later in a separate process using the Save button.
Core Data Service
We then model the Core Data Service on the table to adopt the structure. We again pull the actual SELECT statement from the Language table. This is standard practice when dealing with the Singleton in the Business Configuration. This ensures that we always get exactly one entry. However, since we are also using the User ID, we should ensure that our current user is always present here. Another important property is the semantic key: We define this on the Navigation Key as a uniform criterion for navigation. You will need this later to switch to the editor and navigate using the Navigation Key, as we don't always know the currently logged-in user.
@ObjectModel.semanticKey: [ 'NavigationKey' ]
define root view entity ZBS_R_SinEntityTP
  as select from    I_Language
    left outer join zbs_tst_single as _Single on 0 = 0
  composition of exact one to many ZBS_I_SinParticipant as _Participant
{
  key 1                             as NavigationKey,
  key $session.user                 as UserID,
      _Single.name                  as UserName,
      _Single.random_number         as RandomId,
      _Single.local_created_by      as LocalCreatedBy,
      _Single.local_last_changed_by as LocalLastChangedBy,
      _Single.local_last_changed    as LocalLastChangedAt,
      _Single.last_changed          as LastChangedAt,
      _Participant
}
where
  I_Language.Language = $session.system_language
We then model the child entities of the participants against the second table and define the "to-parent" association so that these two are linked. We define the key of the singleton locally, as well as the user ID. These do not originate from the data model or the table below.
define view entity ZBS_I_SinParticipant
  as select from zbs_tst_sinpa
  association to parent ZBS_R_SinEntityTP as _MainForm on  $projection.NavigationKey = _MainForm.NavigationKey
                                                       and $projection.UserID        = _MainForm.UserID
{
  key uuid          as ParticipantKey,
      participant   as Participant,
      @Consumption.hidden: true
      1             as NavigationKey,
      @Consumption.hidden: true
      $session.user as UserID,
      _MainForm
}
Behavior Definition
We then model the behavior definition on our data model. This is a managed implementation that doesn't deviate much from the standard. We also use a Draft Query to obtain the specific draft for the currently logged-in user. This is important because we don't want to return all data records for the ID (Singleton), but only the data records that belong to the user and that you should also see in your form. Additionally, we define the unmanaged save because later, when saving the data, we don't want to store the information in the tables, but rather, for example, store it in a second table for further processing.
define behavior for ZBS_R_SinEntityTP alias Singleton
draft table zbs_tst_singled query ZBS_I_SinSingletonDraft
lock master total etag LastChangedAt
authorization master ( instance )
with unmanaged save
At the level of the second entity, we define a determination to populate the user ID during creation. The connection is generally established via the Core Data Service, but often the field arrives in the draft without a user ID. Therefore, we must additionally populate this information so that only the relevant data records are returned via the draft query.
determination FillUserID on modify { create; }
Behavior Implementation
In the behavior implementation, we need two methods that we must implement. First, we define the determination that updates the username for us via draft. Here, it is sufficient to issue an EML statement to trigger the data update. We pass the user ID and set the control flag to update the record on the database after creation.
MODIFY ENTITIES OF ZBS_R_SinEntityTP IN LOCAL MODE
       ENTITY Participant
       UPDATE FROM VALUE #( FOR key IN keys
                            ( %tky            = key-%tky
                              UserID          = sy-uname
                              %control-UserID = if_abap_behv=>mk-on ) ).
Next, we need to implement the SAVE_MODIFIED method to define our actual saving logic. We store the data in a new table and thus simulate further data processing. First, we sum all participants to obtain the number of entered participants, and finally, we update the data in the database to verify that the saving operation was successful.
LOOP AT update-singleton INTO DATA(new_dataset).
  DATA(number_participants) = 0.
  LOOP AT create-participant TRANSPORTING NO FIELDS WHERE NavigationKey = new_dataset-NavigationKey.
    number_participants += 1.
  ENDLOOP.

  INSERT zbs_sin_result FROM @( VALUE #( uuid                   = xco_cp=>uuid( )->value
                                         created_by             = new_dataset-NavigationKey
                                         created_at             = utclong_current( )
                                         user_name              = new_dataset-UserName
                                         random_id              = new_dataset-RandomId
                                         number_of_participants = number_participants ) ).
ENDLOOP.
Fiori App
To get a good form, we need to generate the Fiori application and deploy it to the system so we can test it later.
Generator
By default, we again use the "from Template" generator to generate a Fiori Elements application. In this case, we use the "Form Entry Object Page" element instead of the List Report, as we have done previously. The reason for this is that this is an object page, and we land directly on the object page after entering the app, not in a list. Therefore, the template provides some special features.

As a service, we use our Singleton service here and additionally define a deployment and Fiori launchpad configuration, since we want to test the application in the launchpad later after deployment.
Navigation
After generating the application, we go to the Page Map. There, we delete the object page for the participants, should it exist or have been created during generation. The reason for this is that we don't want any navigation when we click on the entry. New data records should also be created directly in the table without triggering any corresponding navigation. Here you will eventually work in a form.

We also navigate to the object page of the singleton and check if there are any warnings. In our case, for example, we see a warning message that extends all the way down to the participant table. Here you can expand the elements until you reach the very bottom.

Then select the row with the table and check the properties to see where the warning message is coming from. In our app, for example, the table type has not been defined. The system doesn't know if it's a responsive or a grid table. Here we define the default for a responsive table. If we confirm, the warning message should disappear.

Adjustment
Now we'll make the most important adjustment so that our application works smoothly and the initial navigation is successful. To do this, we navigate to the "webapp" folder and look for the file "Component.js". This was automatically generated with the project and populated with initial content. Here you should find a function for "getStartupParameters" that is already pre-set to "preferredMode" CREATE. This property means that when the app starts, the CREATE mode is automatically activated and a new data record is created. Since we only ever have one record, an error message would occur because the record already exists and creating a new one is no longer possible.
getStartupParameters: function() {
    return Promise.resolve({
        preferredMode: ["create"]
    });
}
To do this, we set the "preferredMode" to EDIT. This means that we immediately land in Edit Mode when we arrive at the Object Page. Additionally, we now need to provide the actual key for which we want to enter Edit Mode. This is where our semantic key comes into play, since we don't know the actual User ID. But we do know that we're receiving a record where the NavigationKey has been set to 1. Accordingly, we set this attribute for navigation.
getStartupParameters: function() {
    return Promise.resolve({
        preferredMode: ["edit"],
        NavigationKey: "1"
    });
}
Hint: Additionally, please note that the NavigationKey is based on the semantic key. We have tried several things here and checked with the debugger: This must always be a single digit, as there is an internal check in the JavaScript framework that verifies the length of the specified key. If you specify a longer key because your entity has one, the framework can no longer perform the mapping and you end up on a blank page.
Test
In our test, we start the application from the launchpad and land directly in the input field without having to press any other keys. We enter the information in the upper area, such as the organizer and a random number, and can then create new entries via the Create button above the table, which we then populate with two participants. Once we're finished, we can use SAVE to call up the saving logic and initiate the processing.
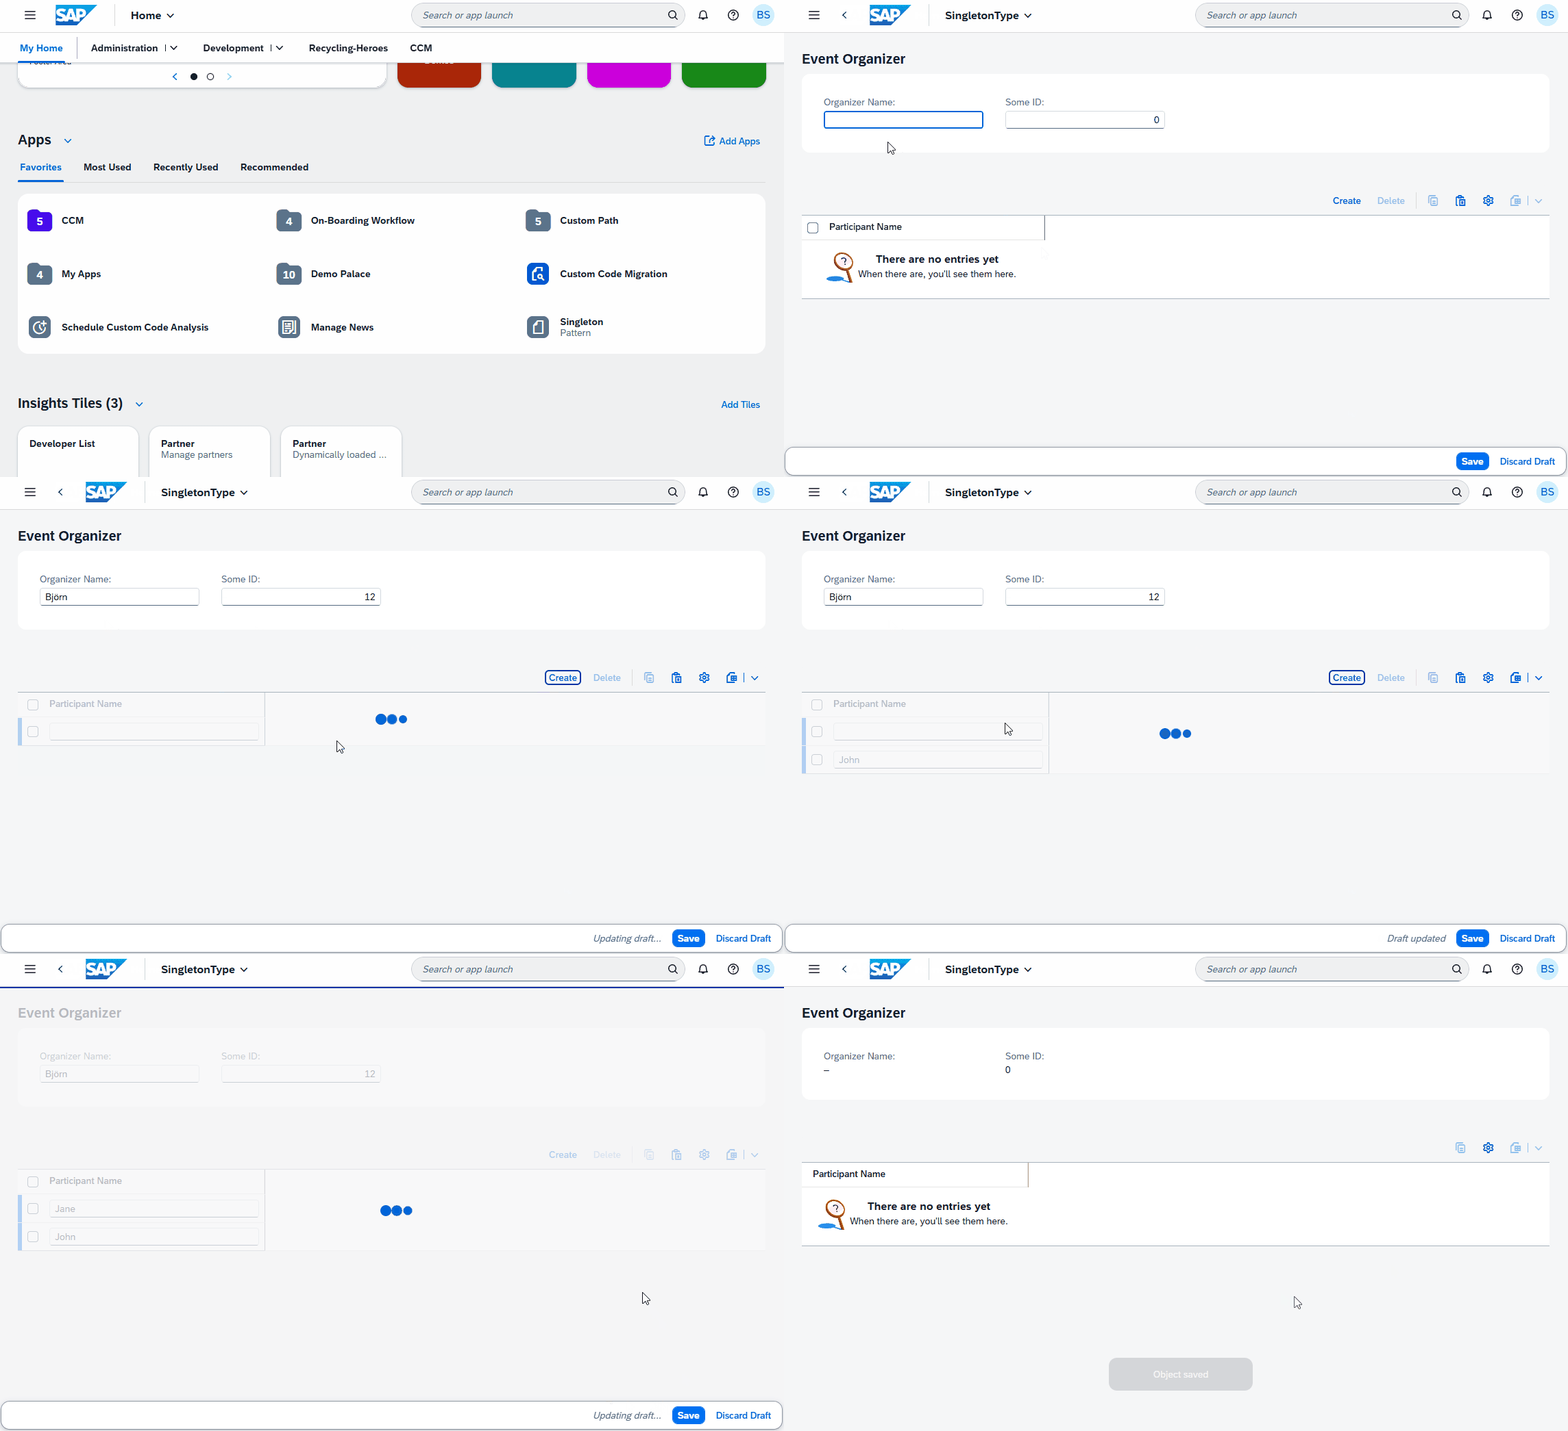
If we then check our table, which is responsible for the dummy processing, we'll find the new record there with the number, name, and number of participants we saved. The process has now worked. As you saw above, the form is closed after saving, and you can't enter any further information. Here, simply pressing Refresh once and reloading the application is enough; the form will then be immediately open again and ready for the next entry.

Complete Example
You can find the complete example in our GitHub repository and via the Commit. Within the repository, the example is located in the package ZBS_DEMO_RAP_PATTERN_SINGLETON. The app has been deployed to the Fiori package for testing purposes.
Summary
The Singleton pattern has the property of returning exactly one record, allowing you to continue working on the same record. This is very often used for business configuration, since a lock object is also behind the business configuration, as is, for example, a transport request, which is then stored in the header while the entries are maintained.
A second possibility, which we have shown in this article, is a form input that should, of course, not only work for one user, but for different users. This is possible by adding another user field and then working with the semantic key. Additionally, our application is also draft-enabled. This means: When you enter the data, leave the form, and later reopen it, all the data is already pre-filled, and you can continue working exactly where you left off. You can also implement additional actions here to clear the form with a single click by deleting the fields in the draft.
Conclusion
Besides its use in the standard, the Singleton pattern is particularly well-suited for forms. It offers advantages such as a central instance for saving, locking, and storing additional information. Above all, it is an intermediate step to access the actual object page for editing.
Further information:
SAP Help - Preferred Mode