RAP - Multi-Input Field
Representing an entire entity in a single field? This is possible with the Multi-Input Field. Today we'll look at this feature in ABAP for RAP development and explore the various scenarios.

Table of contents
In this article, we'll take a look at the multi-input field and how you can use it in your app in the future.
Introduction
In this article, we'll extend our Sales App with a multi-input field. What exactly does that mean? In some situations, we want to store multiple values in a single field within an application. Basically, we need an additional entity in our application because we can't store different entries in a single field; this can only be achieved with an additional entity.
Standard
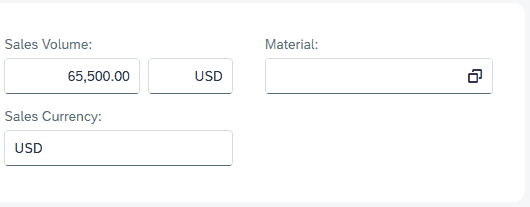
We've already defined our entity for the sold materials using the RAP Generator. This is currently displayed as a table on the Object Page. However, the table doesn't contain much information, and populating it via the button and input isn't ideal. Furthermore, we usually only expect 1-3 entries in the table.

Multi-Input Field
Let's now change this property and make an entire entity into a field in the application. All adjustments are made in the Metadata Extension ZBS_C_SASale.
Object Page
To activate multi-input from the Object Page, we need to add the association. In the next step, we add the entity to the identification for the general fields and reference the corresponding field from the entity via the annotation.
@UI.identification: [{ position: 160 , qualifier: 'GENERAL', value: '_SASold.MaterialId' }]
_SASold;
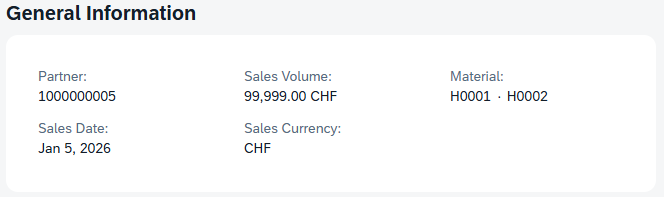
If we now reload the Object Page, the two entries in the facet for the general data are loaded and displayed separated by a dot. This allows us to display multiple values in one field.
If we then enter the edit mode of the record, the different data records are loaded side by side for editing.

List Page
Now let's repeat the process for the LineItem and insert the annotation in the same place. Again, we refer to the value of the material ID.
@UI.lineItem: [ { position: 160, value: '_SASold.MaterialId'  } ]
_SASold;
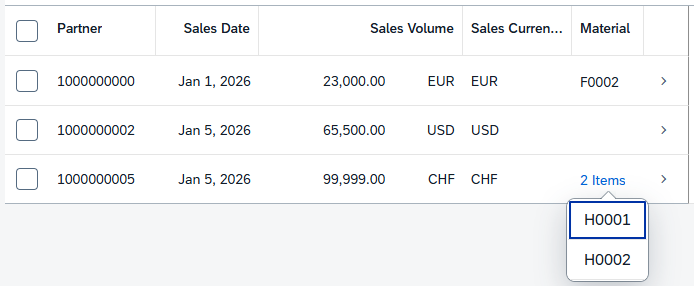
If we reload the list report, the values in the list report will also be displayed. If there are too many items in a column, only the number of existing entries will be shown. By clicking on the link, we get information about the entries. This allows us to see information about the entities below the root at a glance, directly on the entry page.
Optimization
At the moment, we are only using the technical keys for the display and the transfer. Things are still missing, such as value help or a descriptive text.
Value Help
We can implement the value help in this case as usual. Since the field comes from the entity ZBS_C_SASold, we also need to integrate the search help for the field there. As a first step, we create a search help for the table. We define a general search using the material ID and the text, as well as setting the text attribute to TEXT_ONLY.
@AccessControl.authorizationCheck: #NOT_REQUIRED
@EndUserText.label: 'Material Value Help'
@Search.searchable: true
define view entity ZBS_I_SAMaterialVH
  as select from zbs_dmo_material
{
      @Search.defaultSearchElement: true
      @Search.fuzzinessThreshold: 1.0
      @ObjectModel.text.element: [ 'MaterialName' ]
      @UI.textArrangement: #TEXT_FIRST
  key material as MaterialId,
      @Search.defaultSearchElement: true
      @Search.fuzzinessThreshold: 0.8
      name     as MaterialName
}
Let's open the entity directly, not the metadata extension, and add the annotation to the field. Here we specify the search help so that it is used in the UI.
@Consumption.valueHelpDefinition: [{ entity: { name: 'ZBS_I_SAMaterialVH', element : 'MaterialId' } }]
MaterialId,
Here's an example of how to use the new search help. We select two values from the search help. The values are copied to the lower part, and when we confirm the search, the two values are also copied into the field.

We can also search for a value directly in the field and receive suggestions from the search help. If we take the value, the ID will be taken into the field as before.
Texts
Now all that's missing is a proper text, since our users don't know the technical IDs, but usually search for and use the names. To do this, we first need to extend the entity ZBS_R_SASold with an additional association to access the data. We'll use the new value help for this, since the name is also contained therein.
define view entity ZBS_R_SASOLD
  as select from zbs_sasold as SASold
  association              to parent ZBS_R_SASALE    as _SASale   on $projection.ParentUUID = _SASale.UUID
  association of exact one to one ZBS_I_SAMaterialVH as _Material on _Material.MaterialId = $projection.MaterialId
{
  key uuid        as UUID,
      parent_uuid as ParentUUID,
      materialid  as MaterialId,
      _SASale,
      _Material
}
At the level of the consumption view ZBS_C_SASold, we extend the view with a field for the name and add the corresponding annotations to the material ID. This replaces the technical ID with the name.
@ObjectModel.text.element: [ 'MaterialName' ]
@UI.textArrangement: #TEXT_ONLY
MaterialId,
_Material.MaterialName,
If we restart our application or update the app, the values should now appear correctly in the UI. Here's the List Report as an example. The comparison image with the technical IDs can be found further up in the article.

Complete Example
All resources can be found in our GitHub repository and the changes from this article in the following Commit. This should allow you to understand all the adjustments.
Conclusion
For individual keys and smaller entities, it is sometimes helpful to display the values in a field. The input is simpler and less cumbersome for the user, and the limited information is displayed in a more compact format.
Source:
SAP Help - Multi-Input Field