Flutter - Websites
The creation of websites and PWAs has been in beta for quite a while, today we're going to show you a small productive example.

Table of contents
Flutter for Web has been in beta for quite a while now. In today's article, we want to take a look at how far the framework is suitable for development on the web and whether the most important features are already working. We will go into smaller bugs and gaps that we noticed during development.
Beta
First of all, the important note that the Flutter team does not recommend using Flutter for Web for complex productive websites, as the module is still in the beta phase and there may be bugs. Nevertheless, we took the chance to design and launch a simple website.
Website
The website is a one-pager or landing page and you can view it using this link. There is only a main page and two smaller sub-pages to provide legal content.

Features
Which features did we use in the project, which packages are behind them or how exactly does it work in Flutter? More on this in this section.
Hover Effects
The well-known hover effects from the web are not so easy to implement on mobile devices or not implemented at all, as you usually trigger a click with your finger and do not first run over the element. On the computer this is of course the other way around, the users are used to something happening when they move the mouse over an element. The simplest form of implementation here in a small example.
MouseRegion(
  onHover: (event) {
    setState(() {
      containerColor = Colors.blueGrey.withOpacity(0.6);
    });
  },
  onExit: (event) {
    setState(() {
      containerColor = Colors.transparent;
    });
  },
  child: InkWell(
    child: Container(
      padding: EdgeInsets.symmetric(horizontal: 20, vertical: 8),
      decoration: BoxDecoration(
        color: containerColor,
        borderRadius: BorderRadius.circular(15),
      ),
      child: Text(''),
    ),
    onTap: () {
      // Call an action
    },
  ),
);
The MouseRegion widget helps implement this functionality. The "onHover" event is triggered when the mouse touches the element and "onExit" terminates the action. Here you have the possibility to set different attributes with "setState" and thus ensure the hover effect.
Anchor
The anchors on websites are actually standard in web development, but not yet easy to use. That means you click on a link and jump to a certain position on the website. In the first step we have to generate a key, this is best done using the global key.
final keyShop = new GlobalKey();
We can then assign this key to a widget via the key attribute. This means that the element has a unique key and can be controlled by us. As a second step, you then have to implement the navigation to the element. This can be done, for example, in the "onPressed" method of a button. So we work to ensure that the element is really visible after the click.
Scrollable.ensureVisible(keyAbout.currentContext);
Slideshow
For the implementation, we used the popular Carousel Slider package, which is also very easy to implement and configure. This made it easy to implement the three sliders on the website and now they run completely automatically.

Videos
For the implementation of the video and the control, we relied on the package from the Flutter team, the video player. This is now also available for the web version and controls for the corresponding video can be easily implemented.
import 'package:diy_landing_page/helper/constants.dart';
import 'package:flutter/material.dart';
import 'package:video_player/video_player.dart';

class VideoArea extends StatefulWidget {
  final String filePath;

  VideoArea(this.filePath);

  @override
  _VideoAreaState createState() => _VideoAreaState();
}

class _VideoAreaState extends State<VideoArea>
    with SingleTickerProviderStateMixin {
  VideoPlayerController _videoController;
  AnimationController _animationController;
  bool _isPlaying = false;

  @override
  void initState() {
    super.initState();
    _videoController = VideoPlayerController.asset(widget.filePath);
    _videoController.initialize().then((value) {
      setState(() {});
    });
    _videoController.setLooping(true);

    _animationController = AnimationController(
      vsync: this,
      duration: Duration(milliseconds: 500),
    );
  }

  @override
  void dispose() {
    _videoController.dispose();
    _animationController.dispose();
    super.dispose();
  }

  @override
  Widget build(BuildContext context) {
    return Padding(
      padding: EdgeInsets.symmetric(horizontal: 10),
      child: Stack(
        children: [
          Positioned(
            child: ClipRRect(
              borderRadius: BorderRadius.circular(15),
              child: Container(
                width: 300,
                child: _videoController.value.initialized
                    ? AspectRatio(
                        aspectRatio: _videoController.value.aspectRatio,
                        child: VideoPlayer(_videoController),
                      )
                    : Container(),
              ),
            ),
          ),
          Positioned(
            bottom: 10,
            left: 140,
            child: CircleAvatar(
              radius: 20,
              backgroundColor: kMainColor,
              child: IconButton(
                icon: AnimatedIcon(
                  icon: AnimatedIcons.play_pause,
                  progress: _animationController,
                  color: Colors.white,
                ),
                onPressed: () {
                  if (_isPlaying == false) {
                    _videoController.play();
                    _animationController.forward();
                    _isPlaying = true;
                  } else {
                    _videoController.pause();
                    _animationController.reverse();
                    _isPlaying = false;
                  }
                },
              ),
            ),
          ),
        ],
      ),
    );
  }
}
As an example, the widget that is used for each video. The widget is set up and the path to the video is transferred as content. The video is located in the asset folder and is later loaded "locally" from the server.
Navigation
When we talk about navigating the website, we naturally mean the navigator within Flutter. To navigate from the page to a sub-page, we use named routes. This is the easiest way to navigate to the next page. According to the route, the URL for the subpage also changes and can therefore also be sent as a link.

It is also interesting that when you call up the URL directly and navigate via the floating action button, you end up on the start page again, although you did not enter directly via it.
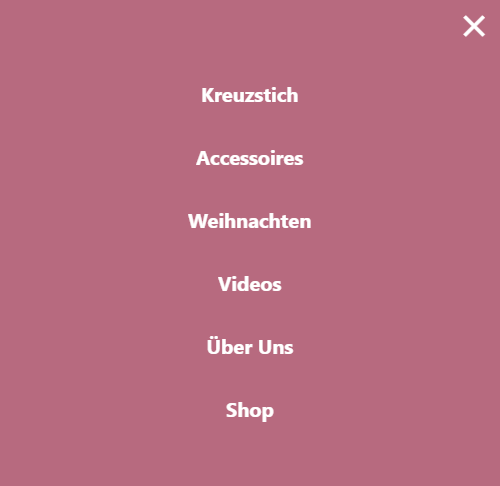
Mobile
As you can see above, there is a large menu on the website that is responsible for navigating through the sections. If you look at the website as a mobile version or open it on your smartphone, then this menu will turn into a compact version. The hamburger symbol appears ...

... and when opening the menu, the navigations are displayed one below the other.
In the first step, we check the currently available width of the page and whether the menu even fits the entire width. Then we can decide whether to load the mobile or desktop menu.
static bool isWidth(BuildContext context, double checkWidth) {
  var screenSize = MediaQuery.of(context).size;

  if (screenSize.width <= checkWidth) {
    return true;
  } else {
    return false;
  }
}
Which menu is displayed decides on the display on the finished page and gives us the option of displaying a different menu for each different page width.
Bugs
So far we have only encountered minor errors during development, which we would like to list again here in more detail:
- URL display - Currently there is always a hashtag (#) in the URL, but it is only visually disturbing
- Texts - preparing and outputting large amounts of text (legal texts) is a bit cumbersome
Conclusion
Flutter for Web is already fully developed for websites and offers many advantages over a small number of disadvantages. The design and handling of the website is simple and ideal for a headless CMS to display the frontend.