BTP - Quick Deployment
Want to make Fiori Elements apps available even faster after RAP modeling? Quick Deployment is now possible.

Table of contents
In this article, we'll look at the next version of Tool Bridge and how you can use it to get applications onto the system faster.
Introduction
A while ago, we wrote about the introduction of Tool Bridge. This is an interface between the ABAP Development Tools and the Business Application Studio to achieve better integration between the two IDEs. If we look at the current development of RAP applications, the majority of development time (approximately 80-95%) takes place in ABAP. A small portion of app development is used to generate the app, customize it, and deploy it back to the system. With release 2505, the next version of the Tool Bridge was delivered in the ABAP environment, which we will look at in this article.
Quick Deployment
We will use our Partner App, which we created and deployed back then, as a basis. Therefore, we will continue working on the ZBS_UI_SIMPLE_PARTNER_O2 service for today's demo.
Idea
The idea behind the generator is that if you are satisfied with what you see in the preview of the application, you can easily perform a deployment. During deployment, the app is created directly without the ability to make further adjustments in the Business Application Studio (Auto Load, Flexible Column Layout, etc.).
Deployment
To start the generator, open the service binding and select the corresponding entity in the various service sets.

Then click the "Create Fiori App..." button to launch the dialog for executing the generator. With the current version, you now have two options to choose from. At the top, you start Quick Deployment; with the option below, you start the previous Bridge tool.

Now select the top option to start the creation process. We will then be asked for a suitable package for the deployment; here we will set a new package to subsequently check the artifacts.

In the next step, we must provide some information, as this is where we will create the artifacts. The service and version are already pre-populated, and we'll take care of filling in the additional information.
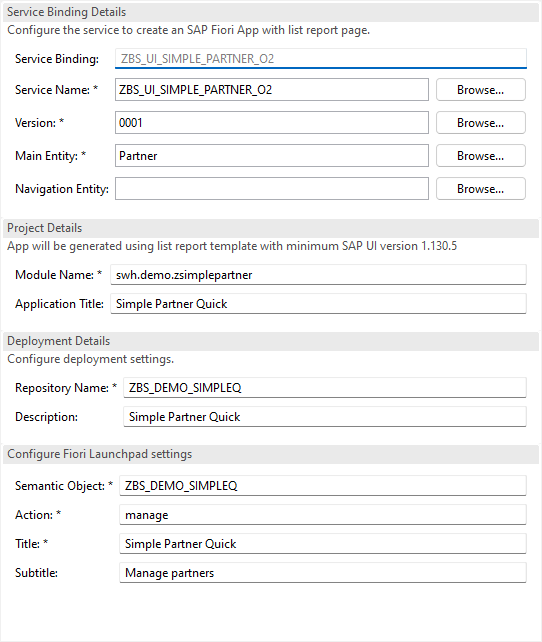
Here's a more detailed explanation of the individual fields:
- Main Entity - Specifies the main entity to be used for the list report. This applies to the entry into the app, but also to the object page.
- Navigation Entity - If there is another entity under ROOT in our app, we can specify it. A list is then included on the object page, and from there we can navigate to the next object page.
- Module Name - Essentially the app ID that uniquely identifies the app in the system. You can usually also find the ID in the Fiori app's manifest.
- Application Title - The title that is displayed at the top of the app after it has been started.
- Repository Name - Name of the BSP application that is deployed to the system. The name can have a maximum of 15 characters.
- Description - Description of the BSP application (optional).
- Semantic Object - Semantic object for navigation within the Launchpad.
- Action - Action for navigation, usually describes the nature of the app. Standards here are, for example, "manage" or "display".
- Title - The actual title on the new tile.
- Subtitle - The subtitle on the tile; this appears below the title.
We then confirm the entry and subsequently receive a list of objects created by the wizard. As a final step, we assign a transport request and start the generation. After a short moment, you should receive this information; the generation is now complete.

If we check the generated artifacts in the system, then the BSP application and the Launchpad app descriptor item have been created. We also find two SICF nodes, which are required to call the app.

Permissions
In the next step, we need to create an IAM app in the system and assign it to a business catalog. We can then assign it to the role and announce it to the system using "Publish Locally." If we then log in to the system, we should find the new tile and can start the application.

Hint: Currently, the subtitle has not been adopted, and the descriptor item does not appear to be editable in this form.
Customization
In the last chapter, we created the app, automatically deployed it to the system, and authorized it. But what happens if we want to make further adjustments? If we call the Tool Bridge again, the current status will be recognized by the system.

If you have already saved your configuration, confirm the installation with OK. In this case, the Business Application Studio will start in the browser, which may take a moment if the instance is not currently active.
Afterwards, this dialog should greet us in the BAS. The connection and application are already filled in. You can make further adjustments here. The project will then be loaded into your workspace, and you can continue working as normal.

Delete
If you want to delete the artifacts from the system, you must first synchronize the project with the Business Application Studio (see the Customization chapter). You can then use the standard "Undeploy" process to remove the remaining artifacts from the system.
After creating the project in the BAS, you should review the "ui5-deploy.yaml" file and adjust the configuration. An error may occur during undeployment if, for example, the BSP application is locked in another transport request in the system.
Complete example
The generated artifacts and examples from this article can be found as a commit in our GitHub repository. Since we haven't created a new application here, but rather just deployed another tile in the system, the ABAP code is quite manageable.
Conclusion
Quick Deployment complements the Tool Bridge with a simple function for quickly viewing results in the system without switching to the actual IDE. This should speed up the development flow for you as a developer. You can find more information about the ABAP Environment in the monthly roundtable (see link).