BTP - Inbound and Outbound Communication
In this article we will go into detail about connecting the SAP BTP ABAP Environment and how the individual connections are created.
Table of contents
How do you use the ABAP Environment in the BTP to establish external communication or to consume APIs in the ABAP Environment yourself? This article provides some more details.
Introduction
When you work with the ABAP Environment in the BTP, you will come to a point where you want to establish communication with another system or provide an API that another system should consume. In the case of the ABAP Environment, there are two common scenarios: inbound and outbound communication. We are looking at the two scenarios from the perspective of the ABAP Environment.
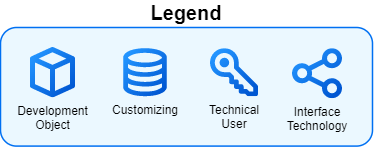
For the scenarios, we use the following icons with the following legend. We differentiate between objects that are created via the ADTs and those that are only customizing in the system. These are not standardized BTP Solution Diagrams; we only use the layouts and icons.
Outbound
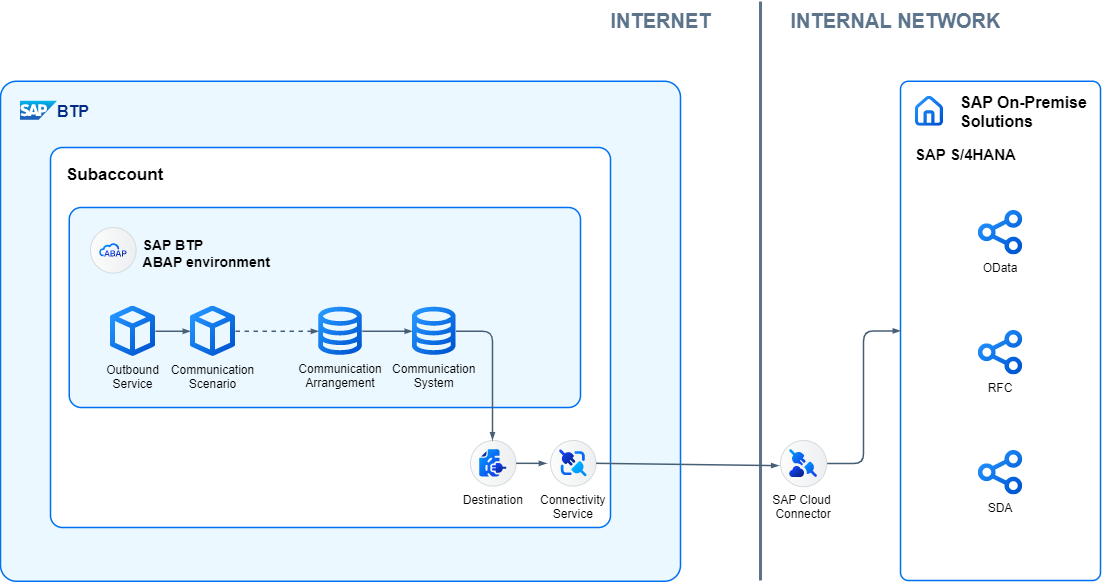
Outbound communication starts in the ABAP environment and establishes contact with on-premise or a web service. In most cases, we need access to another system. The following overview of the structure.
Process
In terms of the process, we first create the necessary development objects in the ABAP environment so that we can then carry out the customizing via the Fiori apps in order to establish a connection to the target system. The releases and resources should already be available in the Cloud Connector.
Development object
For this scenario, we have to create an outbound service, which we can then assign to a protocol. There are currently the following protocols for communication.
We can then create the communication scenario in the system. There we assign our service in the "Outbound" area. In the "Overview" area we can create further attributes if we want to differentiate between different services and target systems.
Hint: The object must be released via "Publish Locally", otherwise it will not be visible in the apps and customizing.
Customizing
Once all the required objects have been created and released, we can create the customizing. To do this, we need the two applications "Communication Systems" (F1762) and "Communication Arrangements" (F1763) to define the necessary settings.
Using "Communication Systems" we define the system we want to access; here we can directly integrate systems on the BTP using the different settings. In our example, we are using the Destination Service in the BTP subaccount. The advantage of the Destination Service is the central configuration in the subaccount, especially if you also have a Business Application Studio (BAS) or other services that require the connection for access and deployment. The relevant users, passwords and settings are therefore stored in the Destination Service.
Finally, we create the configuration for the communication scenario using "Communication Arrangements" and assign the created communication system or use an existing system.
Cloud Connector
In order to be able to access your on-premise system from the BTP, the virtual system in the Cloud Connector must be mapped to the on-premise system. The relevant configurations, firewall releases and service releases are included here. Here we recommend explicitly releasing resources and not releasing resources with a wildcard (*), as this controls exactly who can access which service from outside.
Example
In the blog on connecting an on-premise OData service you will find step-by-step instructions for creating the objects.
Inbound
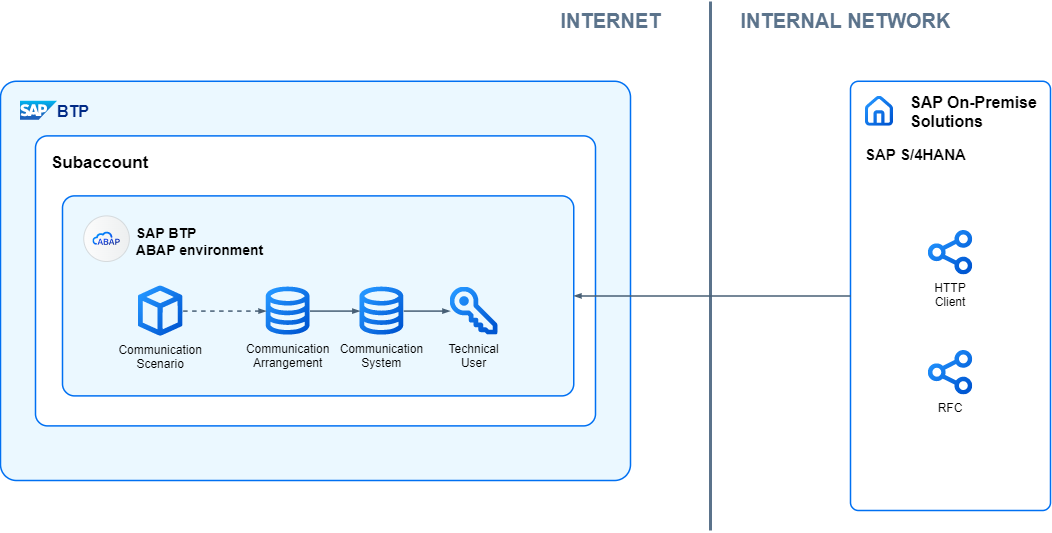
In inbound communication, we are called from outside as an ABAP environment. To do this, the caller needs technical access to the system and a way to log in. As developers, we provide various objects so that services can be called in the system.
Process
In the first step, we as developers must again provide a corresponding scenario so that the customizing can be created for it. Finally, the caller then receives the access data to log on to the ABAP environment and use the resources.
Development object
First of all, we have to create an OData service or an RFC function module in the system, a service that can be consumed from outside. The Web API OData v2 or v4 is ideal for this. We then need a communication scenario where we can assign all objects in the "Inbound" tab. In the "Authorization" tab we assign authorizations that the user will later need to work with the service and the data. This will give the technical user the authorizations they need later.
Hint: The object must be released via "Publish Locally", otherwise it will not be visible in the apps and customizing.
Customizing
Once all required objects have been created and released, we can create the customizing. To do this, we need the three applications "Maintain Communication Users" (F1338), "Communication Systems" (F1762), and "Communication Arrangements" (F1763) to define the necessary settings. The order does not matter as long as we create the configurations.
Using "Maintain Communication Users" we can create a technical user (CC*-BP user) and assign a password. We must make the user available to the calling page, as well as the password.
We then create a system using "Communication Systems" which we declare as "Inbound Only". Here we can then assign the technical user.
In the last step we create the configuration for the communication scenario under "Communication Arrangements" and assign the communication system. The technical user should now appear in the details, as should the released services to which the technical user then has access.
Example
You can find a detailed example of calling a service in the ABAP environment in one of our blogs. We access the ABAP environment from On-Premise.
Conclusion
With this article we wanted to describe the terms inbound and outbound in more detail and how you can use the two scenarios for your development. This should make the two communication channels for the ABAP environment a little clearer to you.
