RAP - Implement change documents (Manual)
This article delves into the manual implementation of change documents in our RAP object and examines the various integration steps. The goal is to generate change documents automatically.

Table of contents
Together, we will integrate the change documents created in the last article into the system and equip our RAP application with this functionality.
Introduction
Currently, no change documents are being written in our Sales App. In the last article, we laid the foundation for logging and manually created the first entries. There are currently two possible ways to implement this, and in this article we will look at the manual implementation in the RAP object.
Behavior
Currently, we are in a managed scenario, and all changes are made automatically by the RAP framework. Therefore, we need to extend the storage logic to have a way to react to the data records and the changes. To do this, we extend the behavior definition ZBS_R_SASALE and add the addition WITH ADDITIONAL SAVE to the nodes SASale and SASeller. Afterwards, we can have the implementation created, and we will receive the Saver class in the behavior implementation.
CLASS lsc_zbs_r_sasale DEFINITION INHERITING FROM cl_abap_behavior_saver.
  PROTECTED SECTION.
    METHODS
      save_modified REDEFINITION.
ENDCLASS.


CLASS lsc_zbs_r_sasale IMPLEMENTATION.
  METHOD save_modified.
  ENDMETHOD.
ENDCLASS.
In the SAVE_MODIFIED method, we receive various structures containing the changes from the interaction phase. We can access these changes and evaluate them later.

Let's look at the CREATE structure as an example. Currently, we find two entities there, each containing all the changes. By defining ADDITIONAL SAVE, these entities were inherited, and the information was provided to us. The other entities in the RAP object are not currently found here, as we do not need them.

Implementation
Now that we have created the foundation in the RAP object, we can implement the actual logic for generating the change documents.
Helpful Methods
Since we want to call the WRITE logic for the different entities, we create one helper method per entity in the RAP object. We pass the old and new data, as well as the change indicator, i.e., what change was made. The `Sale` method takes all this information, and the object ID is generated from the key to identify the instance.
METHOD create_clog_sale.
  DATA object_id TYPE if_chdo_object_tools_rel=>ty_cdobjectv.

  IF new IS NOT INITIAL.
    object_id = new-client && new-uuid.
  ELSE.
    object_id = old-client && old-uuid.
  ENDIF.

  zcl_zbs_co_sales_chdo=>write( objectid       = object_id
                                utime          = cl_abap_context_info=>get_system_time( )
                                udate          = cl_abap_context_info=>get_system_date( )
                                username       = CONV #( cl_abap_context_info=>get_user_technical_name( ) )
                                o_zbs_sasale   = old
                                n_zbs_sasale   = new
                                upd_zbs_sasale = change_indicator ).
ENDMETHOD.
The method for the seller follows almost the same steps, but has different input types and parameters. Here, we use the parent ID as the key to reference the parent entry.
METHOD create_clog_seller.
  DATA object_id TYPE if_chdo_object_tools_rel=>ty_cdobjectv.

  IF new IS NOT INITIAL.
    object_id = new-client && new-parent_uuid.
  ELSE.
    object_id = old-client && old-parent_uuid.
  ENDIF.

  zcl_zbs_co_sales_chdo=>write( objectid         = object_id
                                utime            = cl_abap_context_info=>get_system_time( )
                                udate            = cl_abap_context_info=>get_system_date( )
                                username         = CONV #( cl_abap_context_info=>get_user_technical_name( ) )
                                o_zbs_saseller   = old
                                n_zbs_saseller   = new
                                upd_zbs_saseller = change_indicator ).
ENDMETHOD.
CREATE
For Create, we pass the individual new data records to the two methods. The old value is empty in each case, since we have no reference. We first have to map the new value from the CDS entity to the table; for this, we use the addition MAPPING FROM ENTITY, which uses the defined mapping in the RAP object. We set the Change Indicator to Insert (I).
LOOP AT create-sasale INTO DATA(new_sale).
  create_clog_sale( old              = VALUE #( )
                    new              = CORRESPONDING #( new_sale MAPPING FROM ENTITY )
                    change_indicator = 'I' ).
ENDLOOP.

LOOP AT create-saseller INTO DATA(new_seller).
  create_clog_seller( old              = VALUE #( )
                      new              = CORRESPONDING #( new_seller MAPPING FROM ENTITY )
                      change_indicator = 'I' ).
ENDLOOP.
UPDATE
During the update, we first need to read the current record from the database. Since we are no longer in the interaction phase, we cannot use EML here, but must resort to the classic SELECT statement. However, we need to proceed slightly differently with the data mapping this time, because in the case of an update, not all fields in the data are always populated, but only the keys and the updated information. Therefore, in addition to MAPPING FROM ENTITY, we also use the addition USING CONTROL so that the control structure is taken into account.
LOOP AT update-sasale INTO DATA(update_sale).
  SELECT SINGLE FROM zbs_sasale
    FIELDS *
    WHERE uuid = @update_sale-uuid
    INTO @DATA(actual_sale).

  create_clog_sale(
      old              = actual_sale
      new              = CORRESPONDING #( BASE ( actual_sale ) update_sale MAPPING FROM ENTITY USING CONTROL )
      change_indicator = 'U' ).
ENDLOOP.

LOOP AT update-saseller INTO DATA(update_seller).
  SELECT SINGLE FROM zbs_saseller
    FIELDS *
    WHERE uuid = @update_seller-uuid
    INTO @DATA(actual_seller).

  create_clog_seller(
      old              = actual_seller
      new              = CORRESPONDING #( BASE ( actual_seller ) update_seller MAPPING FROM ENTITY USING CONTROL )
      change_indicator = 'U' ).
ENDLOOP.
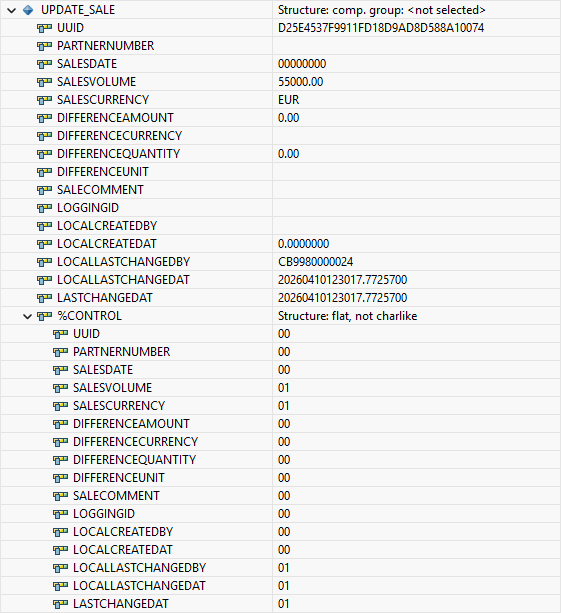
Let's look at an example line in the update. Here we find the changed fields and the key of the record. In the lower section, you'll find the %CONTROL structure and the fields that were changed. With this information and the original data as a basis, we can merge the changed record.
DELETE
The deletion is then quite similar to the insert, except that in this case we set the change indicator to Delete (D) and only have one existing record that we pass to the logic.
LOOP AT delete-sasale INTO DATA(delete_sale).
  create_clog_sale( old              = CORRESPONDING #( delete_sale MAPPING FROM ENTITY )
                    new              = VALUE #( )
                    change_indicator = 'D' ).
ENDLOOP.

LOOP AT create-saseller INTO DATA(delete_seller).
  create_clog_seller( old              = CORRESPONDING #( delete_seller MAPPING FROM ENTITY )
                      new              = VALUE #( )
                      change_indicator = 'D' ).
ENDLOOP.
Test
Let's now run a test in our application. To do this, we create a new data set, modify it, and then delete it. This allows us to test all scenarios and view the results.
Evaluation
To view the evaluations, we extend our test class ZCL_BS_DEMO_RAP_SALES_CHANGE with an additional method to output the changes for the current day.
cl_chdo_read_tools=>changedocument_read(
    EXPORTING i_objectclass    = zcl_zbs_co_sales_chdo=>objectclass
              i_date_of_change = cl_abap_context_info=>get_system_date( )
    IMPORTING et_cdredadd_tab  = DATA(db_changes) ).

out->write( db_changes ).
Create
Let's create a new record in the application using the factory actions we already created in previous exercises. We define a fixed value as the difference, a partner, and a sales date.

We then adjust the sales amount and the currency and add some information. This completes the general part of the data.

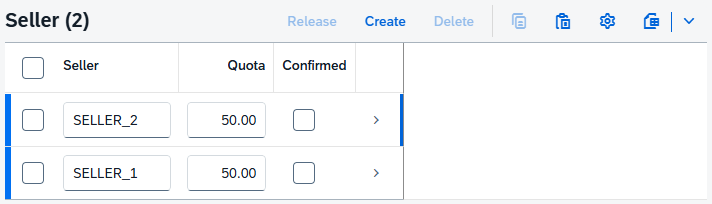
Since we also have logging at the seller level, we create two additional entries at this level. Here we assign a 50:50 share to the respective sellers.
Finally, we create and save the data record using the "Create" button. During saving, our additional logic is executed and the change documents are written. We can now use our analysis to check which data records have been created in the system.

Since we have activated single-record processing in the change object, we receive three different change numbers for a new entry. We could merge these using the option, but for that we would need to collect all changes and pass them to the logic. Furthermore, we find all the information about the tables and fields that we log in the structures. Since not all fields are active, this information is not displayed.
Change
In the next step, we change the information in the application. To do this, we adjust the sales price and change the two sales quotas. Afterwards, we save the data record and run the logic. If we look at the new data records, we again have new change records. These now show the updated data set; we also see the old value and the new value.

Delete
Finally, we then delete the data set from the system. A deletion record is now created, so we can still see the old key in the log, which has been removed from the database.
Tip
If you want to bundle all changes into one change document, which makes sense, then you need to activate the "Log Multiple Changes" setting in the Change Document for the individual tables and structures. This allows you to collect all changes and pass them with a single call. This combines the various entries into a single change document, classifying them as one change.

Complete Example
You can find the complete example in GitHub in the corresponding package for the Sales App. The changes from this article can be found in this Commit and you can follow the changes, plus the additional information.
Conclusion
Manual implementation in a RAP object is not entirely straightforward and requires a lot of additional code. However, it is generally possible to implement the function in older releases this way. In one of the next articles, we will show a more modern implementation on current releases.