RAP - Translation app (example)
Let's take a look at a practical example of developing a RAP application in the ABAP environment and how you can create an app with little effort.
Table of contents
In this article we will look at a practical example of an implementation in RAP, we will go into various things about the framework and how it helps us to develop simple applications.
Introduction
In the past we already looked at the integration of the Google Translate API and how you can easily call it from ABAP. In this example, we'll take a look at a RAP integration and how you can use the API to translate texts and words sustainably.
Table
In order to build our application, we first need a data model. To do this, we define the following table, which contains the text to be translated and the target text. We use the ISO code to make it easier to pass it to the interface. In addition to the fields for the data model, technical fields for the draft are also included. We let the framework generate the key automatically and therefore use a UUID.
define table zbs_dmo_lang {
  key client            : abap.clnt not null;
  key identification    : sysuuid_x16 not null;
  source_language       : laiso;
  source_text           : zbs_demo_text;
  target_language       : laiso;
  target_text           : zbs_demo_text;
  local_created_by      : abp_creation_user;
  local_last_changed_by : abp_locinst_lastchange_user;
  local_last_changed    : abp_locinst_lastchange_tstmpl;
  last_changed          : abp_lastchange_tstmpl;
}
The data element ZBS_DEMO_TEXT is a CHAR 500 field with upper and lower case, so that we can display the texts in it.
RAP Generator
To generate the RAP stack, we use the RAP Generator in the ABAP Development Tools, since we only have one entity and therefore the somewhat larger configuration in the Fiori version is not necessary. You start the RAP Generator via the context menu in the "Project Explorer". under the point "Generate ABAP Repository Objects ...":
We want to create an "OData UI Service" and select this point in the generator. In the next step we fill in the individual points and can adjust the names of the objects to be generated again. If we are satisfied with the result, in the next step we get an overview of the objects to be generated. After creation we should find the following objects in our package. The table and the Google integration already existed before the objects were generated.
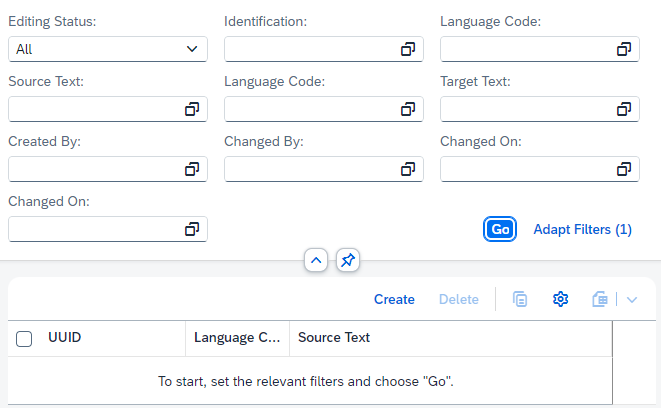
To test the service now, we have to activate it using the "Publish" button in the service binding, after which we can look at the preview. So far the app is functional, but there is still a lot of optimization missing.
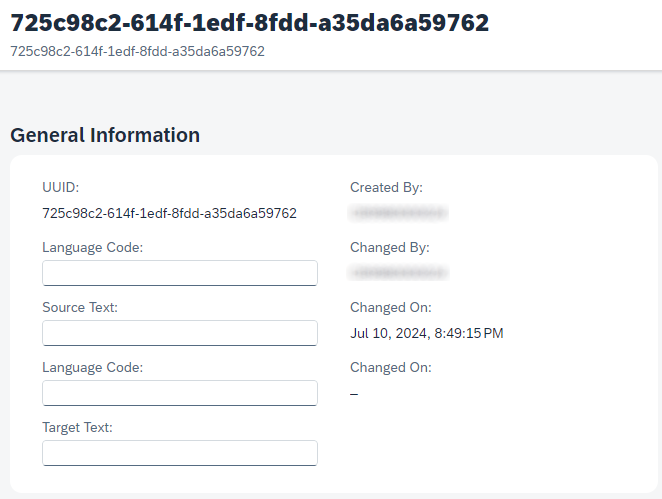
The details page contains all fields, but also information such as the technical key or organizational information that we do not want to show the user.
Hint: In principle, we recommend that you first learn the stack and structure of RAP applications manually and use the individual layers before you create applications with the generator. This will help you achieve the best results when learning the ABAP RESTful Programming Model.
Adapting the UI
In the next step, we want to adapt and clean up the UI a bit. To do this, we want to adapt the search, restrict the fields for the selection, display the most necessary information in the list, and clean up the detail screen.
Selection
In the first step, we want to restrict the fields of the selection; the source and target language is enough for us here. Using the "UI.selectionField" annotation we can display the field in the filter bar. The position determines whether the field appears further up if the number is low. The position number can be freely assigned.
@UI.selectionField: [ { position: 10 } ]
SourceLanguage;
Hide
To hide unnecessary fields (keys and technical information), we use the annotation "UI.hidden". Here is an example of identification:
@UI.hidden: true
Identification;
List
If we want to display a column in the list, we use the annotation "UI.lineItem". As with the selection, the position is the same here; the order is determined by the numbers, starting with the lowest number. We set the "importance" property to "high" for the texts. In the responsive table, it ensures that the fields with the highest importance are displayed when there is not enough space available. This allows us to control the information visible to the user.
@UI.lineItem: [ { position: 30, importance: #HIGH } ]
SourceText;
We leave the languages at default and set the texts to "high" so that they are always visible.
Heading
We want to adjust the heading of the detail page and display the text of the source language instead of the UUID. To do this, we remove the description and replace the element in the annotation "UI.headerInfo.title.value".
@Metadata.layer: #CORE
@UI.headerInfo.title.type: #STANDARD
@UI.headerInfo.title.value: 'SourceText'
annotate view ZBS_C_DMOLanguage with
Details
Now we want to divide the detail page into two areas, the source and the target, corresponding to the text and language. To do this, we first need a UI facet to which we can assign the fields. To do this, we create the following facets below the definition:
@UI.facet: [
  {
    label: 'Source',
    id: 'idSource',
    purpose: #STANDARD,
    position: 10 ,
    type: #IDENTIFICATION_REFERENCE,
    targetQualifier: 'SOURCE'
  },
  {
    label: 'Target',
    id: 'idTarget',
    purpose: #STANDARD,
    position: 20 ,
    type: #IDENTIFICATION_REFERENCE,
    targetQualifier: 'TARGET'
  }
]
The "ID" must also be unique, otherwise there may be problems when rendering the application. Position determines the order of the elements here too. The "targetQualifier" is needed to be able to assign the elements to a facet. We store the relevant information in the field using "UI.identification", the "qualifier" then takes over the assignment to the correct facet.
@UI.identification: [ { position: 10, qualifier: 'TARGET' } ]
TargetLanguage;
Long texts
Unfortunately, the field for entering long text is quite small. Here we have the option of creating a long text field using the annotation "UI.multiLineText".
@UI.multiLineText: true
TargetText;
Result
Now that we have adjusted the metadata extension, the annotation now looks like this:
@Metadata.layer: #CORE
@UI.headerInfo.title.type: #STANDARD
@UI.headerInfo.title.value: 'SourceText'
annotate view ZBS_C_DMOLanguage with
{
  @UI.facet: [
    {
      label: 'Source',
      id: 'idSource',
      purpose: #STANDARD,
      position: 10 ,
      type: #IDENTIFICATION_REFERENCE,
      targetQualifier: 'SOURCE'
    },
    {
      label: 'Target',
      id: 'idTarget',
      purpose: #STANDARD,
      position: 20 ,
      type: #IDENTIFICATION_REFERENCE,
      targetQualifier: 'TARGET'
    }
  ]


  @UI.hidden: true
  @EndUserText.label: 'Identification'
  Identification;

  @UI.identification: [ { position: 10, qualifier: 'SOURCE' } ]
  @UI.lineItem: [ { position: 10 } ]
  @UI.selectionField: [ { position: 10 } ]
  @EndUserText.label: 'Source Language'
  SourceLanguage;

  @UI.identification: [ { position: 20, qualifier: 'SOURCE' } ]
  @UI.lineItem: [ { position: 20, importance: #HIGH } ]
  @UI.multiLineText: true
  @EndUserText.label: 'Source Text'
  SourceText;

  @UI.identification: [ { position: 10, qualifier: 'TARGET' } ]
  @UI.lineItem: [ { position: 30 } ]
  @UI.selectionField: [ { position: 20 } ]
  @EndUserText.label: 'Target Language'
  TargetLanguage;

  @UI.identification: [ { position: 20, qualifier: 'TARGET' } ]
  @UI.lineItem: [ { position: 40, importance: #HIGH } ]
  @UI.multiLineText: true
  @EndUserText.label: 'Target Text'
  TargetText;

  @UI.hidden: true
  @EndUserText.label: 'Created By'
  LocalCreatedBy;

  @UI.hidden: true
  @EndUserText.label: 'Changed By'
  LocalLastChangedBy;

  @UI.hidden: true
  @EndUserText.label: 'Changed On'
  LocalLastChanged;

  @UI.hidden: true
  @EndUserText.label: 'Changed On'
  LastChanged;
}
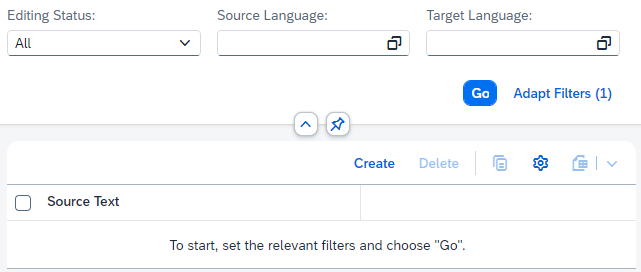
The entry page and the list are now tidied up and we only see the information that the user needs to work.
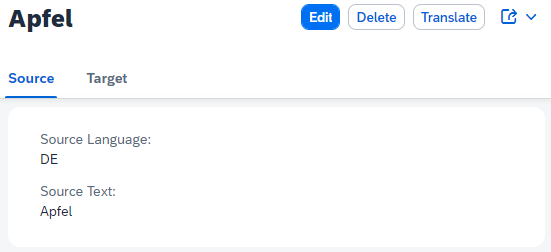
On the object page there are now two areas for the source and target language with text. The texts can be maintained as long text with more space.
Search
Here we want to improve the search in our app and implement searches and value help in the fields.
Search help
In the next step we want to provide a search help for our languages. For this we use the annotation "Consumption.valueHelpDefinition". Using the Entity element, we specify the Core Data Service that we want to use for the search help. In this case, we use the standard view I_Language. Using Element, we map the field from the search help to our current field.
@Consumption.valueHelpDefinition: [{ entity: { name: 'I_Language', element: 'LanguageISOCode' } }]
SourceLanguage,
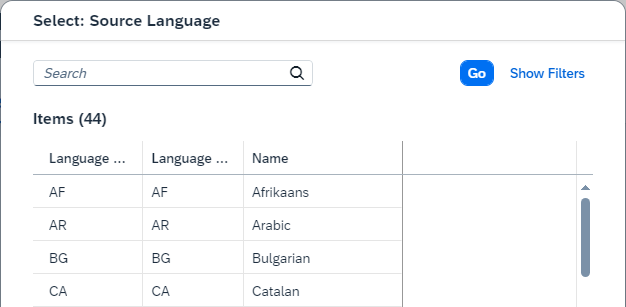
If we now open the search help on the field, the view opens and we can search for the language.
Fuzzy search
The next step is to add a search to the texts that allows for a certain degree of fuzziness. The user should be able to search across both texts (source and target) and, if there are spelling mistakes in the text or the search, still get reasonably meaningful results. To do this, we need to set the annotation "Search.searchable" in the header of the projection view so that this view can be searched using free text search.
@Search.searchable: true
define root view entity ZBS_C_DMOLanguage
Now we need to define fields that can be used to search with this field. To do this, we can use the annotation "Search.defaultSearchElement" and thus activate the two text fields for the search.
@Search.defaultSearchElement: true
SourceText,
To achieve fuzziness, we need to add an annotation "Search.fuzzinessThreshold". Here you can use a value from 1.0 (exact match) to 0.7 (very imprecise) as far as the search is concerned. You can find more information about the annotation in the SAP Help.
@Search.fuzzinessThreshold: 0.8
TargetText,
Result
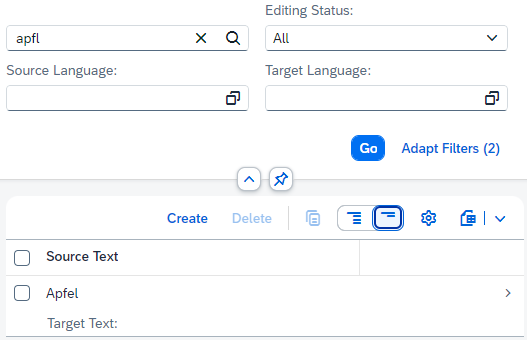
If we now call up our application, we have an additional search field (free text search) and can search in the defined columns. If we now carry out a search with spelling mistakes, we still get a hit and can continue working with the result.
The complete projection view now looks like this and all the extensions made are included (search, value help).
@Metadata.allowExtensions: true
@EndUserText.label: 'Language (Projection)'
@AccessControl.authorizationCheck: #CHECK
@Search.searchable: true
define root view entity ZBS_C_DMOLanguage
  provider contract transactional_query
  as projection on ZBS_R_DMOLanguage
{
  key Identification,
      @Consumption.valueHelpDefinition: [{ entity: { name: 'I_Language', element: 'LanguageISOCode' } }]
      SourceLanguage,
      @Search.defaultSearchElement: true
      @Search.fuzzinessThreshold: 0.8
      SourceText,
      @Consumption.valueHelpDefinition: [{ entity: { name: 'I_Language', element: 'LanguageISOCode' } }]
      TargetLanguage,
      @Search.defaultSearchElement: true
      @Search.fuzzinessThreshold: 0.8
      TargetText,
      LocalCreatedBy,
      LocalLastChangedBy,
      LocalLastChanged,
      LastChanged
}
Hint: We originally defined the texts in the app as strings, but this type is not supported in the fuzzy search and a dump occurs. Therefore, the elements were changed to data elements of type CHAR.
Translation
In this section, we integrate the translation functionality into our data model in order to make the application available to our user.
Action
In the first step, we need an action so that the user can start the translation for his text. For this, we do not want to create a static action, but an instance-based one. In the behavior definition, we create the action called "TranslateText" which returns an instance of itself as a result. We need the result so that the UI updates with the new data.
action TranslateText result [1] $self;
Using CTRL + 1 (Quick Assist) we generate the method in the behavior implementation and can start directly with the implementation.
After activation we extend the projection of the behavior definition and release the new action for use in the app. Unreleased actions cannot be used. If we do not release the "Create" action, for example, a new data record cannot be created via the app, even though the RAP object can actually do it.
use action TranslateText;
So that we can see the action in the UI, we need to include it in the metadata extension. The identification or the line item is available for this. In both cases, we need the type "FOR_ACTION" and the element "dataAction" where we record our action. Using the "Label" we then have the option of giving the button a text.
@UI.identification: [ { position: 10, qualifier: 'SOURCE' },
                      { position: 10, type: #FOR_ACTION, dataAction: 'TranslateText', label: 'Translate' } ]
@UI.lineItem: [ { position: 10 },
                { position: 10, type: #FOR_ACTION, dataAction: 'TranslateText', label: 'Translate' } ]
SourceLanguage;
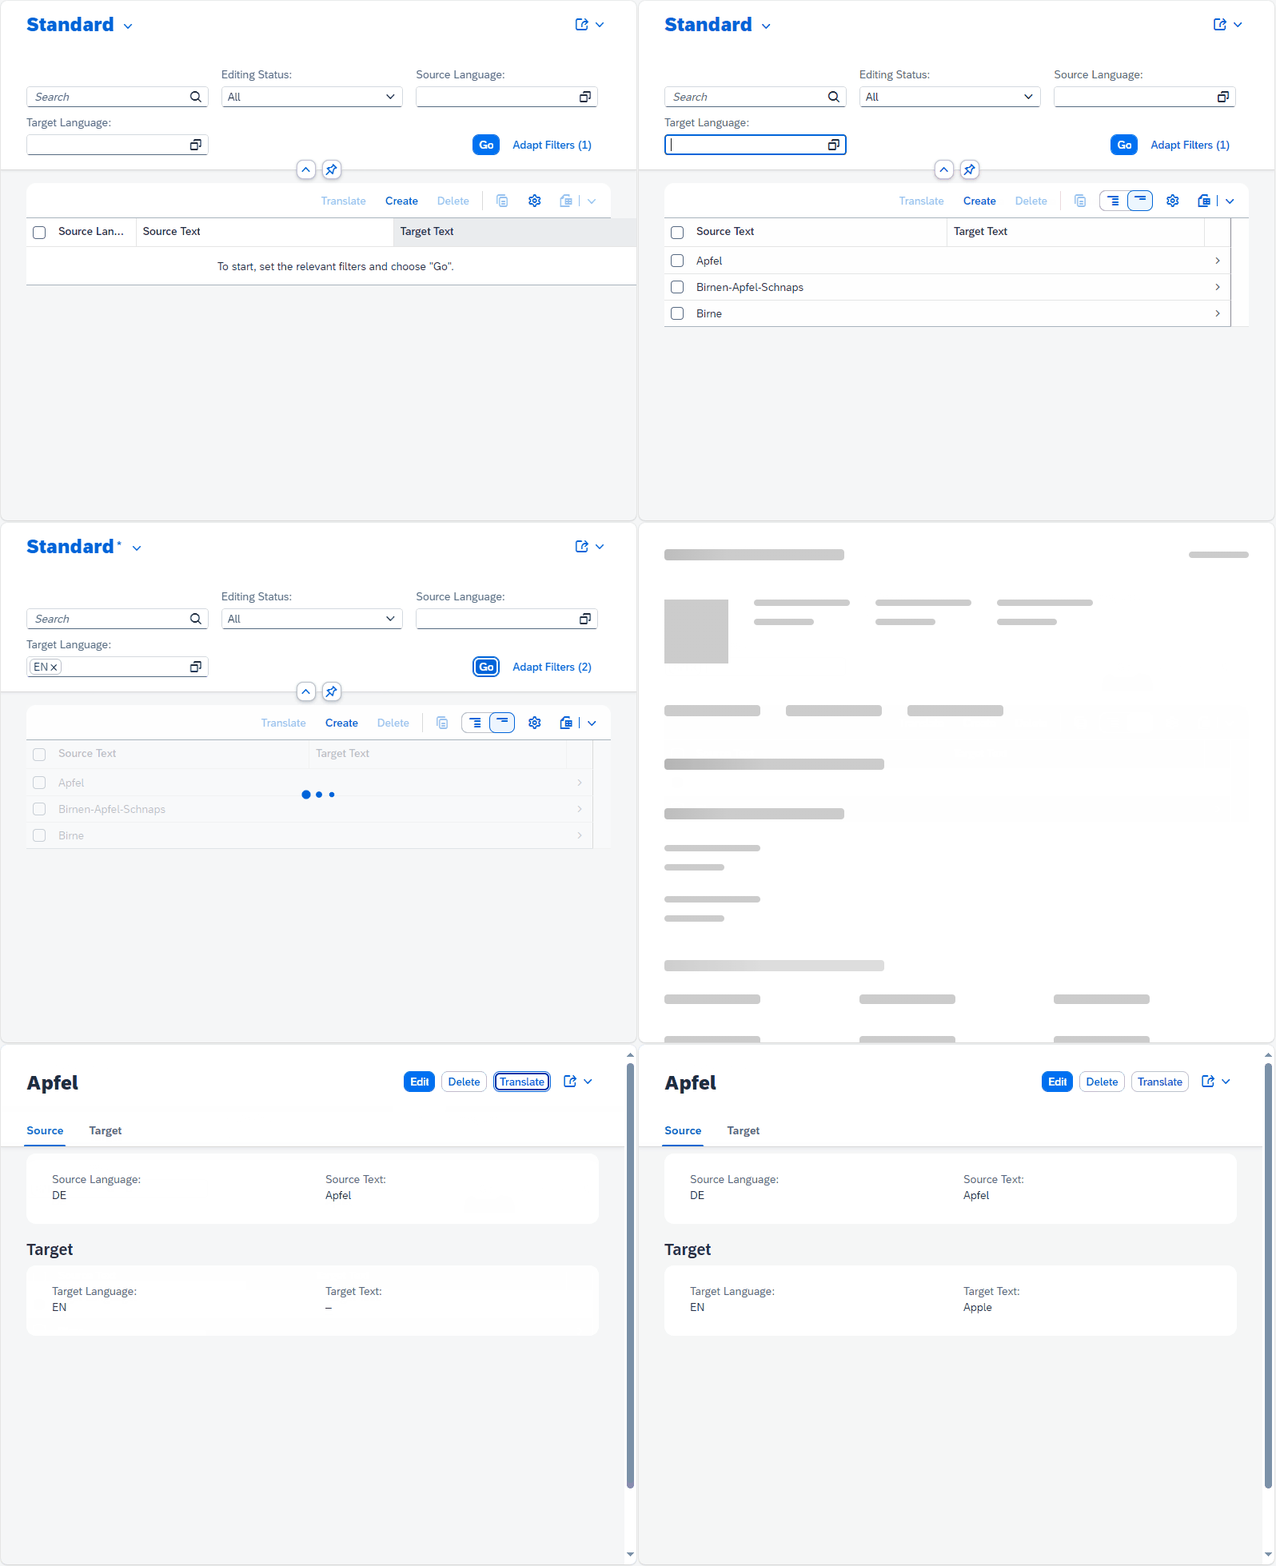
If the action is defined as a "LineItem", it appears below the FilterBar and above the table with the data.
If we define the action in the "Identification", the button for it appears on the object page next to the other actions in the upper area.
Implementation
Now that the action is visible in the UI, we take care of implementing the logic in the class. When we implement actions, we generally do so assuming that more than one record has been selected and we need to perform bulk processing. The method therefore receives a table of keys and not just one entry. However, because we have defined a result, the method is called x times, each time with one record.
In the first step, we read the additional data from the selected entities in order to get to the elements to be translated. To do this, we use the Entity Manipulation Language (EML) in LOCAL MODE so that feature control and authorization checks are not active and the object can always be changed.
READ ENTITIES OF ZBS_R_DMOLanguage IN LOCAL MODE
     ENTITY Language ALL FIELDS WITH CORRESPONDING #( keys )
     RESULT DATA(lt_selected).
We then process the data in a loop, at least where a target language is set. In the first step, we call the Google Translate API and have the text translated.
DATA(ld_translated) = NEW zcl_bs_demo_google_integration( )->translate_text(
    id_target_language = to_lower( ls_selected-TargetLanguage )
    id_text            = CONV #( ls_selected-SourceText ) ).
We then call MODIFY and pass the new content to our business object. We can access the key using %TKY and save ourselves the hassle of mapping if there are more key fields. We have to set the control structure if we really want to update the field; all other fields are ignored.
MODIFY ENTITIES OF ZBS_R_DMOLanguage IN LOCAL MODE
       ENTITY Language UPDATE FROM VALUE #( ( %tky                = ls_selected-%tky
                                              targettext          = ld_translated
                                              %control-targettext = if_abap_behv=>mk-on ) )
       FAILED DATA(ls_failed).
Finally, we read the data records again and return the new status to the result (RESULT) so that the frontend can update itself. For this simple transfer, we can use a FOR loop and take over the assignment and mapping with one command.
READ ENTITIES OF ZBS_R_DMOLanguage IN LOCAL MODE
     ENTITY Language ALL FIELDS WITH CORRESPONDING #( keys )
     RESULT DATA(lt_new).

result = VALUE #( FOR ls_new IN lt_new
                  ( %tky = ls_new-%tky %param = ls_new )  ).
The complete method implementation can be found here:
READ ENTITIES OF ZBS_R_DMOLanguage IN LOCAL MODE
     ENTITY Language ALL FIELDS WITH CORRESPONDING #( keys )
     RESULT DATA(lt_selected).

LOOP AT lt_selected INTO DATA(ls_selected) WHERE TargetLanguage IS NOT INITIAL.
  DATA(ld_translated) = NEW zcl_bs_demo_google_integration( )->translate_text(
      id_target_language = to_lower( ls_selected-TargetLanguage )
      id_text            = CONV #( ls_selected-SourceText ) ).

  MODIFY ENTITIES OF ZBS_R_DMOLanguage IN LOCAL MODE
         ENTITY Language UPDATE FROM VALUE #( ( %tky                = ls_selected-%tky
                                                targettext          = ld_translated
                                                %control-targettext = if_abap_behv=>mk-on ) )
         FAILED DATA(ls_failed).

  IF ls_failed-language IS INITIAL.
    INSERT VALUE #( %tky = ls_selected-%tky ) INTO TABLE mapped-language.
  ELSE.
    INSERT VALUE #( %tky = ls_selected-%tky ) INTO TABLE failed-language.
    INSERT VALUE #( %tky = ls_selected-%tky
                    %msg = new_message_with_text( severity = if_abap_behv_message=>severity-error
                                                  text     = 'Error while updating the data' ) )
           INTO TABLE reported-language.
  ENDIF.
ENDLOOP.

READ ENTITIES OF ZBS_R_DMOLanguage IN LOCAL MODE
     ENTITY Language ALL FIELDS WITH CORRESPONDING #( keys )
     RESULT DATA(lt_new).

result = VALUE #( FOR ls_new IN lt_new
                  ( %tky = ls_new-%tky %param = ls_new )  ).
Complete example
You can find the complete example in our GitHub repository in the package ZBS_DEMO_RAP_GOOGLE and all changes in the corresponding commit of the repository.
Conclusion
In this article, we looked in detail at the steps involved in changing, adapting and bringing the app to a productive state so that we can make it available to the user. In principle, the application would be even more rounded with validations and investigations.


