RAP - Popup
How do we get a popup with RAP to send more input to the framework? You will find out that and more in this article.
Table of contents
In this article we want to show you how you can easily implement a popup for an action without having to resort to JavaScript. We look at the abstract entities and how you can then evaluate the parameters in the backend.
Introduction
When triggering an action, regardless of whether it is instance-based or static, you want to give values in certain situations, for example if you want to assign a new name when copying. In the Fiori development you can create a fragment for this and thus implement the popup. You would then have to call the function on the OData service to transfer the data. Here the RAP Framework offers an out-of-the-box solution that makes life a lot easier for us as ABAP developers.
Abstract entity
In the first step you should understand what an abstract entity is, because we need it for the definition of the popup. This is a core data service without a data basis (table or other CDS view). Basically, we can use it to define a structure at the CDS level, which we can enrich with further annotations in order to define specific properties. Let's define the content of a possible popup:
@EndUserText.label: 'Entity for popup'
define abstract entity ZBS_I_PopupEntity
{
  SearchCountry : land1;
  NewDate       : abap.dats;
  MessageType   : abap.int4;
  FlagUpdate    : abap.char(1);
  FlagMessage   : abap_boolean;
}
The entity has no data foundation and for each field you still have to specify a data type. You can name the fields freely, just as you need them. No further annotations are necessary in the header, the name of the object is already sufficient. As a data type you can use the built-in elements or data elements.
Include Popup
To then implement a popup for an action, you must pass the entity as a parameter. To do this, we define a new static action with parameters in the partner behavior definition "ZBS_I_RAPPartner":
static action withPopup parameter ZBS_I_PopupEntity;
The addition "parameter" ensures that a popup is generated for the entity behind it and the fields are queried before the action is executed. The action must then be created in the behavior implementation. You can easily do this in Eclipse with CTRL + 1 on the action. In order to then make the action available in the UI, it must be included in the projection of the behavior definition and the metadata extension then extended.
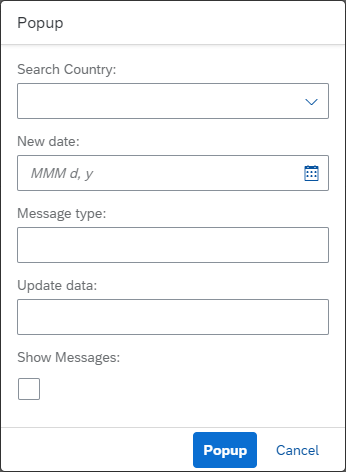
Now we have a button in the Fiori Elements Preview that displays a popup when clicked:
Some fields have already been formatted and converted to better input fields. The date already has a DatePicker so that you can simply select a date and make it available in the appropriate format. The data element "abap_boolean" was also converted into a checkbox, which is not the case for the CHAR1 field.
Hint: In a current release, there is no longer a checkbox; instead, a dropdown with Yes/No is generated. In principle, this can now also be used to represent the "Initial" state.
Annotations
We created an abstract entity at the beginning because we can do more with the formatting here. For example, we include our search help from the last article and give the elements appropriate labels.
@EndUserText.label: 'Entity for popup'
define abstract entity ZBS_I_PopupEntity
{
  @Consumption.valueHelpDefinition: [{ entity: { name: 'ZBS_C_CountryVH', element: 'Country' } }]
  @EndUserText.label: 'Search Country'
  SearchCountry : land1;
  @EndUserText.label: 'New date'
  NewDate       : abap.dats;
  @EndUserText.label: 'Message type'
  MessageType   : abap.int4;
  @EndUserText.label: 'Update data'
  FlagUpdate    : abap.char(1);
  @EndUserText.label: 'Show Messages'
  FlagMessage   : abap_boolean;
}
In return, we now get an objectively better popup for the user with current labels and additional search help for the country:
Processing
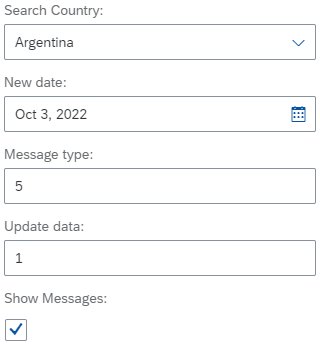
What about data processing? How do we get back to the input values? To do this, we fill the popup once with the following values:
In the implementation method we now set a breakpoint, for this we have implemented a dummy statement on which we can set the breakpoint in Eclipse:
METHOD withPopup.
  IF 0 = 0.
  ENDIF.
ENDMETHOD.
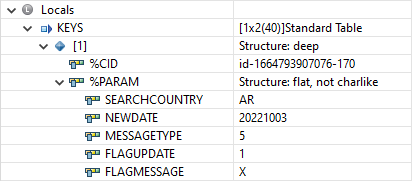
Using the "Locals" under the variables, we can now check how the parameters are passed into the method. As you can see, these are in the keys, accessible under "%param". The data types already have the correct internal formatting and can therefore be used directly for further processing.
Conclusion
In this article you have learned how you can easily define a popup for an action, get the values into the backend and also design the entries accordingly, without a line of JavaScript.


