RAP - Custom Pattern
How does the custom pattern work in ABAP development, and for which scenarios can you use it? Let's look at an example.

Table of contents
In this article, we'll look at the Custom Pattern, how you can implement it, and how you can meaningfully integrate it into your development.
Introduction
The ABAP RESTful Application Programming Model is the new model in ABAP for creating cloud-ready and clean core applications. With RAP, you can not only create applications but also provide interfaces for internal and external use. With the latest features, RAP is very flexible in terms of structure and use, which is why we would like to divide the applications into different patterns.
Structure
The "Custom Pattern" It is named this way because the basis is the custom entity, which currently gives us the most flexibility in implementation, as we can execute ABAP code at runtime to retrieve data, call interfaces, or have a way to keep old code running. To begin with, here is the key to the model.
The following characteristics serve as a distinction:
- Structure of the data model with custom entities
- Data source can usually be called via ABAP (API, legacy code, functions, or local data)
- Behavior is always Unmanaged and no Draft
- Search helps can be flexibly connected (locally or remotely)

Hint: The special feature of the custom entity is that we cannot model on this entity, so it remains at the interface level. Furthermore, you cannot create a metadata extension for a custom entity, so all UI annotations must be in the same view, which is not always easy to read.
Example
To delve a little deeper into the topic, let's look at an example on the topic. We will consume a standard API to retrieve information about our software components from the test system. In this article, we will focus on connecting the interface, consuming the data, and outputting it in a Fiori Elements application. We will extend the application in later articles.
Interface
In this chapter, we will provision the standard interface and read the first data from the system.
API
To read the software components from the test system, we will use the standard API "Manage Git Repository" (SAP_COM_0510). You can find the link to the API below in the additional information. To do this, we first need a connection to our test system and a configured communication arrangement on the system.
Steps on the test system:
- Communication arrangement for SAP_COM_0510
- Communication system as inbound only
- Communication user for accessing the system
Steps on the development system:
- Setting up the destination service
- Setting up the communication system for the connection
Whether you use the destination service or a communication system is up to you and your company's strategy. In this case, we use the destination service in the system for easy connection.
Connection
To be able to read data from the API, we need to make the structure and definition known in the system. To do this, we create a consumption model. MANAGE_GIT_REPOSITORY is a service binding that provides us with an OData v2 Web API. We can therefore load the service's metadata from the endpoint to generate our consumption model.

You can find out how to set up the consumption model in this article on Version v2 of the model.
Data
Now we create the class ZCL_BS_DEMO_CUSTOM_GIT, which we describe in this section. You won't find it on GitHub, as certain components are not intended to be published. To read the data, we use our reusable component. In the GET_SWC_CONFIGURATION method, we create a configuration to instantiate the provider.
result = VALUE zif_bs_demo_service_prov=>configuration(
    cloud_destination = cloud_destination
    consumption_model = consumption_model_git
    service_root      = `/sap/opu/odata/sap/MANAGE_GIT_REPOSITORY`
    protocol          = zif_bs_demo_service_prov=>protocol-odata_v2 ).
We previously created the Cloud Destination in the Destination Service; the Consumption Model is the name of the consumption model created in the previous step. For this, we need the relative path to the service and the protocol for the query. In the next step, we can make the query. To do this, we create the provider with the configuration and pass the settings.
DATA(provider) = zcl_bs_demo_service_prov_fact=>create_service_provider( get_swc_configuration( ) ).

TRY.
    provider->read_odata_by_request( EXPORTING setting       = setting
                                     CHANGING  business_data = business_data
                                               count         = count ).
  CATCH cx_root.
    CLEAR business_data.
ENDTRY.
We read the data using the READ_ODATA_BY_REQUEST method and pass the result to the caller. In the following sections, we will take a closer look at the call point.
App
In this chapter, we will create the basic structure of the app to read the data and display it in the application.
Custom Entity
In the first step, we define our Core Data Service as a custom entity in the system. To do this, we restrict the fields we want to include in the display later:
- Name of the software component
- Description
- Type
- Available on the system
- Active branch
You can find the information about the fields in the generated class of the consumption model. There you will find the name, type, and length of the field if you want to create the custom entity. We also define the query class, which we will use to read the data.
@EndUserText.label: 'Software Component'
@ObjectModel.query.implementedBy: 'ABAP:ZCL_BS_DCP_SWC_QUERY'
define custom entity ZBS_R_DCPSoftwareComponent
{
  key sc_name       : abap.char(18);
      descr         : abap.char(60);
      sc_type_descr : abap.char(40);
      avail_on_inst : abap_boolean;
      active_branch : abap.char(40);
}
Hint: If the field names are the same as the interface names, this saves us additional steps later with filtering and passing.
Query
In the next step, we need to implement the Query class to retrieve the data at runtime. To do this, we create the class ZCL_BS_DCP_SWC_QUERY and implement the interface IF_RAP_QUERY_PROVIDER. To retrieve the data, we create a separate method in which we then call our helper class to read the data. We also need a local type to return the data.
TYPES software_components TYPE STANDARD TABLE OF ZBS_R_DCPSoftwareComponent WITH EMPTY KEY.

METHODS get_remote_data
  IMPORTING !request      TYPE REF TO if_rap_query_request
  EXPORTING business_data TYPE software_components
            !count        TYPE int8.
We pass the entity we want to read and the REQUEST object to pass all parameters to the OData service. The request also contains settings such as selected fields, sorting, and filters from the Fiori application.
METHOD get_remote_data.
  NEW zcl_bs_demo_custom_git( )->get_software_component(
    EXPORTING setting       = VALUE #( entity_name = 'REPOSITORIES'
                                       request     = request )
    IMPORTING business_data = DATA(remote_data)
              count         = count ).

  business_data = CORRESPONDING #( remote_data ).
ENDMETHOD.
We then map the result from the interface type to our custom entity and return the data to the SELECT method. There, we pass the result to the method's RESPONSE (data and count).
get_remote_data( EXPORTING request       = io_request
                 IMPORTING business_data = DATA(software_components)
                           count         = DATA(count) ).

IF io_request->is_data_requested( ).
  io_response->set_data( software_components ).
ENDIF.

IF io_request->is_total_numb_of_rec_requested( ).
  io_response->set_total_number_of_records( count ).
ENDIF.
Annotations
To ensure our Fiori Elements application displays even more information, we define the UI annotations in the custom entity. Depending on the number of fields and the number of additional UI annotations, clarity may suffer somewhat.
@EndUserText.label: 'Software Component'
@ObjectModel.query.implementedBy: 'ABAP:ZCL_BS_DCP_SWC_QUERY'
@UI.headerInfo: { typeName: 'Software Component',
                  typeNamePlural: 'Software Components',
                  title.value: 'sc_name',
                  description.value: 'descr' }
define custom entity ZBS_R_DCPSoftwareComponent
{
      @EndUserText.label: 'SWC'
      @UI.facet: [ { id: 'idRepositoryFields',
                     label: 'Technical Details',
                     position: 10,
                     type: #IDENTIFICATION_REFERENCE,
                     targetQualifier: 'REPO' } ]
      @UI.lineItem: [ { position: 20 } ]
      @UI.selectionField: [ { position: 20 } ]
  key sc_name       : abap.char(18);

      @EndUserText.label: 'Description'
      @UI.identification: [ { position: 20, qualifier: 'REPO' } ]
      @UI.lineItem: [ { position: 30 } ]
      descr         : abap.char(60);

      @EndUserText.label: 'Type'
      @UI.lineItem: [ { position: 40 } ]
      sc_type_descr : abap.char(40);

      @EndUserText.label: 'Available'
      @UI.lineItem: [ { position: 50 } ]
      @UI.selectionField: [ { position: 50 } ]
      avail_on_inst : abap_boolean;

      @EndUserText.label: 'Branch'
      @UI.identification: [ { position: 30, qualifier: 'REPO' } ]
      @UI.lineItem: [ { position: 60 } ]
      active_branch : abap.char(40);
}
We define a header for the object page and display all fields in the list. We also define a filter for availability and for the software component itself.
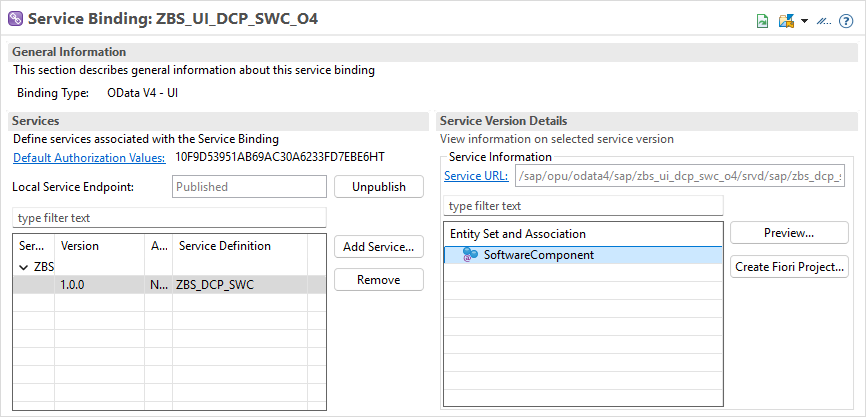
Service
Finally, we create a service definition and a service binding for our application directly on the custom entity. Finally, we publish the service using "Publish". and we can test our small application in the next step.
Test
Now that we have completed the implementation, we can test the application. To do this, we will check the data retrieval and the filters in the application.
Loading Data
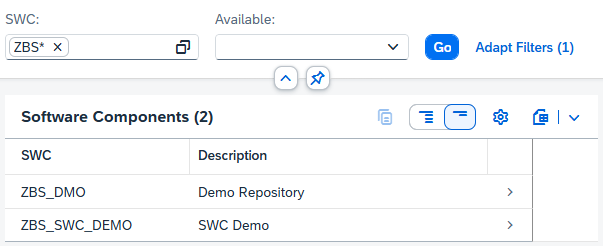
In the first step, we simply want to see the data and call the data selection directly via "Go". Our logic is executed, and we see all the software components of the target system.

For example, some of the software components are not available on the target system, which means that no clone has yet taken place and we receive the SWC from the global directory. In principle, we could also directly hide unavailable components using an additional filter.
Filtering Data
The filters we define above are passed to our SELECT method via the REQUEST. They are passed directly to the OData call via our generic logic, and we receive only the data that matches the filter. Works with the various restrictions and options of Fiori Elements Floorplans.
Sorting data
If we define a sort order on the column, this is also mapped via the generic implementation. In this case, we have sorted by SWC in descending order.

Complete example
You can find the complete example in our GitHub repository, and you can find all changes in the commit. The example is located in the ZBS_DEMO_RAP_PATTERN_CUSTOM package in the repository. As described above, you won't find the consumption model and call implementation there.
Summary
The Custom Pattern gives you the ability to create an application that isn't necessarily based on data from the current system or has a database as a data source. In our scenario, we've made our application available using just a few objects. However, we haven't implemented any additional behavior or data.

This application design can be used, for example, to migrate legacy code into a RAP object. SAP also uses this type of development to provide wrappers and successors, which usually use a standard BAPI at their core and are not based directly on the business tables.
Certain limitations, such as the lack of modeling or the lack of a custom metadata extension, make development not quite as clear as, for example, the Classic Pattern. Thanks to the reusable components, the full functionality of data retrieval is possible with just a few lines of code and can be reused in various implementations.
Conclusion
In this article, we laid the foundation for the custom pattern and looked at the various scenarios for its use. In the next article, we will extend the model with additional data and behavior.
More information: