CDS - Hierarchy
What do hierarchies actually do and how can you build them with Core Data Services in ABAP? In this article we look at the definition.

Table of contents
In this article we look at hierarchies, how you can build and define them and ultimately use them. We will go into various details in the development process.
Introduction
Core Data Services, or CDS for short, are the new standard objects when it comes to modeling RAP applications or for accessing the database. CDS views can be used to define reusable objects in the system that you can reuse in applications. If the database changes, a Core Data Service can remain stable and is therefore the perfect "middleware".
Definition
Let's define the first Core Data Service. We will use the table and the base view from the article "Custom Data Browser". There you will find the definition of the table and the view, but also an executable class with which you can generate data. The table represents different teams and each team has a team leader, i.e. a hierarchical relationship.
Interface
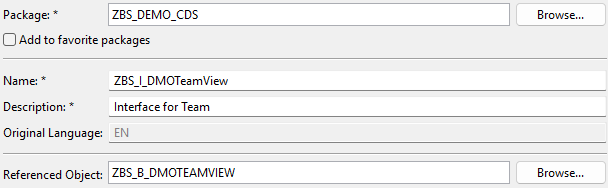
In the first step we define a new interface views on the base view, as we also want to define further associations. You can create a new Core Data Service on the basis view using the context menu in the ABAP Development Tools.

The Core Data Service is therefore already offered to us as a reference and we still have to specify the name of the new view and enter a description. Don't forget that after the transport has been assigned, the type of the Core Data Service is only queried if you want to create a VIEW ENTITY. If it didn't work in the first step, here's a little tip.
Now that we have created the CDS views, we define a new association. The association refers to the current view and not to another object. We use the team leader as access and connect him to the user ID. This allows us to access the team leader's information via the association.
@AccessControl.authorizationCheck: #NOT_REQUIRED
@EndUserText.label: 'Interface for Team'
define view entity ZBS_I_DMOTeamView
  as select from ZBS_B_DMOTeamView
  association of many to one ZBS_I_DMOTeamView as _Leader on _Leader.UserIdentification = $projection.TeamLeader
{
  key UserIdentification,
      PlayerFullName,
      EMailAddress,
      PlayerPosition,
      ELOScore,
      TeamName,
      TeamLeader,
      _Leader
}
Navigation
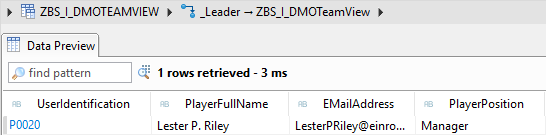
In this step we test the navigation via the association. To do this we start the "Data Preview" via the Core Data Service. You can start this via "Run" (F8), the context menu of the object or the context menu of the Project Explorer. By right-clicking on a line we select "Follow Association".

Next we can select the defined associations. Since we have only created one association so far, this is also displayed. It doesn't matter which field you selected in the list in the previous step.

All the data that we would receive via the association is now displayed. Since we go to the view with the personnel number, we get exactly one entry.
Hierarchy
Now all preparations are complete and we can start defining the hierarchy. To do this, we create a new view on our interface view.

You will find the corresponding template in the last section of the wizard, after selecting the transport. We select this and confirm the creation of the Core Data Service.

Now we have to fill in a few components in the view. To do this, we specify the association for navigation upwards, define a condition to find the topmost node (first subset) and a criterion by which the data records should be sorted. Finally, we define the fields that we want to pass on to the outside. Your hierarchy should now look like this:
@AccessControl.authorizationCheck: #NOT_REQUIRED
@EndUserText.label: 'Team Hierarchy'
define hierarchy ZBS_I_DMOTeamViewHR
  as parent child hierarchy(
    source ZBS_I_DMOTeamView
    child to parent association _Leader
    start where
      TeamLeader is initial
    siblings order by
      UserIdentification ascending
  )
{
  key UserIdentification,
      TeamLeader
}
Hierarchy Attributes
In addition to the standard fields, you can access additional attributes in a hierarchy. $NODE is available in the view and the following fields below it.

Here is an explanation of the most important fields and information:
- HIERARCHY_RANK - Unique and consecutive number for identifying the data records and determining the order.
- HIERARCHY_PARENT_RANK - Contains the RANK ID of the parent node. For root nodes, you will find a zero (0) here.
- HIERARCHY_LEVEL - Description of which level of the tree you are at. The tree starts at one (1) and the next level would be (2), etc.
- HIERARCHY_TREE_SIZE - Describes the number of nodes below this node, the current entry is included in the set.
- NODE_ID - Unique ID to identify a record, in most cases is filled with the key.
- PARENT_ID - Contains the NODE_ID of the parent element if there is another element.
- VALID_FROM, VALID_TO - Only the hierarchies with time delimitation are present and describes the interval used.
If we take the information and fields from above, then the hierarchy of our team is built up as follows:

Options
If you take a look at the SAP Help documentation on creating hierarchies, you will also find other options for the hierarchy, such as temporal hierarchies or directories. However, we will not go into these details in this article. In principle, you can also use hierarchies to display trees in Fiori Elements. We will address this aspect in a future RAP article.
Complete example
You can find the complete example in our GitHub repository, as well as all changes made in this commit in the repository. Here you can find the complete hierarchy from our example with the $node fields for the test:
@AccessControl.authorizationCheck: #NOT_REQUIRED
@EndUserText.label: 'Team Hierarchy'
define hierarchy ZBS_I_DMOTeamViewHR
  as parent child hierarchy(
    source ZBS_I_DMOTeamView
    child to parent association _Leader
    start where
      TeamLeader is initial
    siblings order by
      UserIdentification ascending
  )
{
  UserIdentification,
  TeamLeader,
  $node.hierarchy_is_cycle    as NodeCycle,
  $node.hierarchy_is_orphan   as NodeOrphan,
  $node.hierarchy_level       as NodeLevel,
  $node.hierarchy_parent_rank as NodeParentRank,
  $node.hierarchy_rank        as NodeRank,
  $node.hierarchy_tree_size   as NodeTreeSize,
  $node.node_id               as NodeID,
  $node.parent_id             as NodeParentID
}
Conclusion
With a little preparation, creating hierarchies with Core Data Services is quite easy. You can then use these in reporting or to create applications. It is especially important to understand how the data is prepared in order to create even simple hierarchies.
Source:
SAP Help - Hierarchy Definition
SAP Help - DEFINE HIERARCHY
SAP Help - Hierarchy Attributes