BTP - User creation via API
How can you actually create the Employee and Business Users via API in the ABAP Environment? In this article, we'll go into the details and implementation.

Table of contents
In this article, we'll look at creating users in the ABAP environment using the currently available API and how you can use it to simplify the process in the future.
Introduction
When the ABAP environment was introduced a few years ago, the concept of how users are created in the system and what master data a user has also changed. Before the actual business user (classic SU01) can be created in the system, it requires an employee master record (Employee). Only then can the user be created with the appropriate authorizations. This is currently done using the corresponding apps in the ABAP environment.
User
Before we delve into the topic of automatic creation, a brief explanation of the user concept used in the ABAP environment. The employee is the user master record and contains information about the name, email address, or address. A business user is created from this user in the system, and the roles are then assigned to this user. If you don't want the user to log in again, you would set the lock at this level.

Employee
To do this, we create a dummy user and go through the creation process step by step. In the first step, we need an employee. Using the "Maintain Employees" app (F2288A) we create our user, the fields ID, last name, first name and email are relevant in the first step.

After saving, we then filter for our new user via the list report and can create the business user using the "Maintain Business User" action and jump to the next app.

In the "Maintain Business Users" app (F1303) we then only need to enter the user name, which is usually required for logging into the backend. We can then assign roles to the user; in this case, we create a developer in the system.
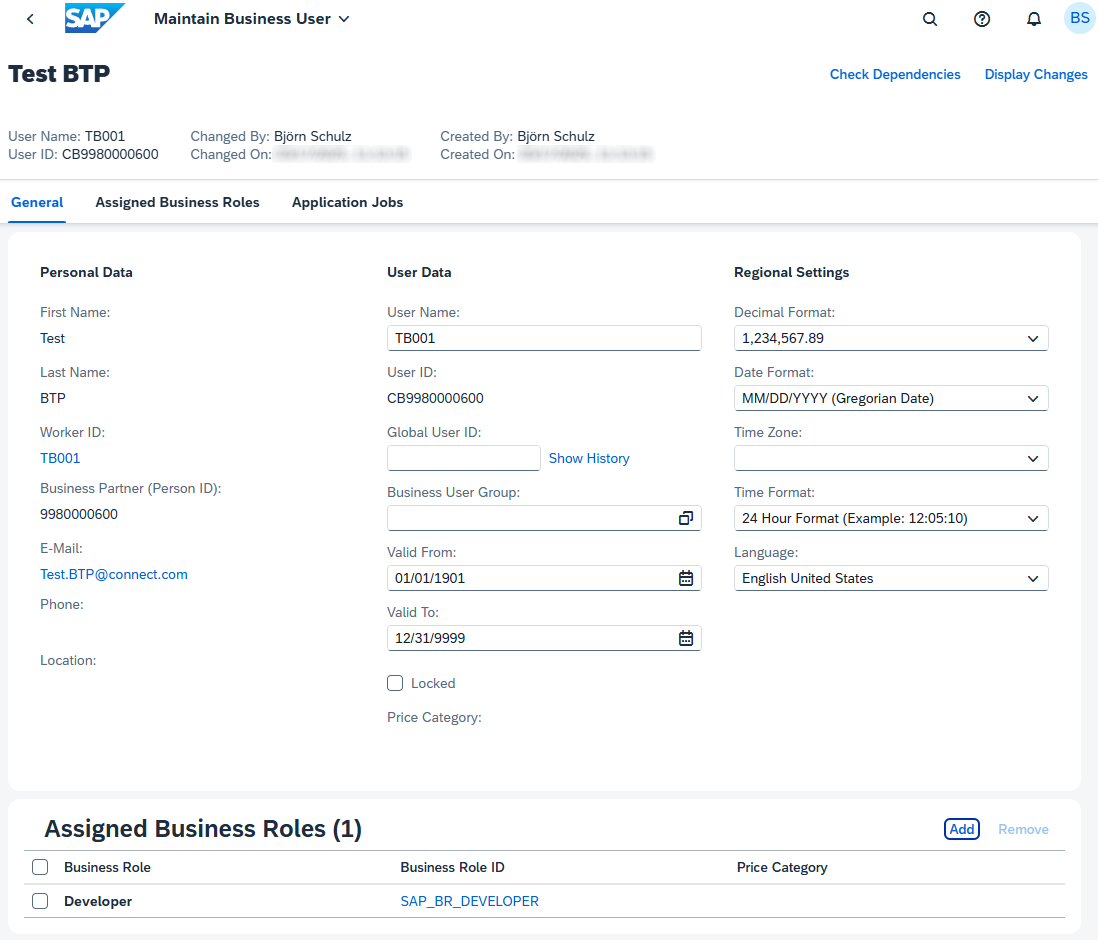
Note: With the employee, a business partner is created in the system in the background. In the business user, you will find the new ID, which varies from system to system. There is currently no solution for uniform business partner numbers per user, and the SY-UNAME field provides this non-unique ID.

API
In this chapter, we want to implement and use the API to create users in the system as described above and to automatically authorize them. An API would be very suitable, for example, for using it from within process automation or for addressing it within the system.
Business Accelerator Hub
First of all, we need the right API for this case. With a little research, we found the SOAP API SAP_COM_0093 (technical name MANAGEBUSINESSUSERIN). We can find further information on this in the SAP Business Accelerator Hub (formerly API Hub) and information on populating the interface in SAP Help. You can find the documents linked below, but they can also be accessed via the Business Accelerator Hub.
Configuration
In the next step, we need to configure the interface in the system, since we need to trigger the API externally and also want to make it available to external callers, such as SAP Build Process Automation. To do this, we set up a communication arrangement with a communication system and a user, which we need for external access. You can find further details on configuring an arrangement and associated objects in this article.
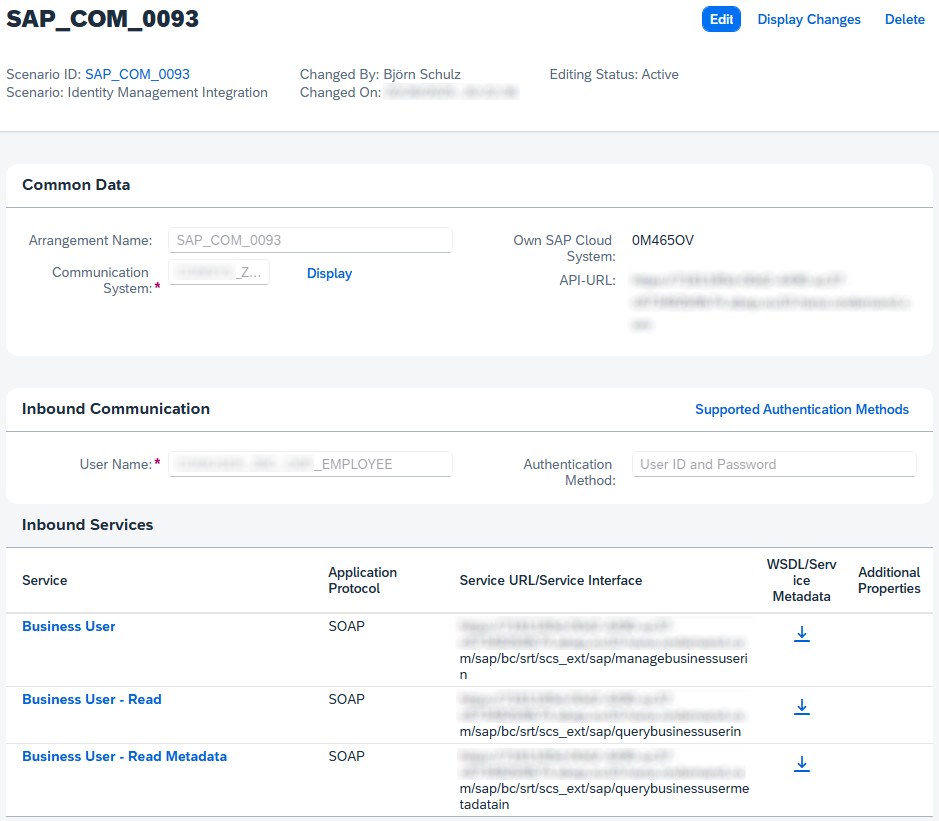
Next, we want to create a destination with the corresponding data. To do this, you need to go to the subaccount where you need the connection. We will use the communication user and password to log in to the system.

It is important to use the complete path from the communication arrangement (business user), otherwise the connection to the system will not work. So make sure that the following path can be found behind the system URL.
/sap/bc/srt/scs_ext/sap/managebusinessuserin
Note: You can find more information about inbound and outbound communication in the ABAP environment in this article.
Implementation
In the next step, we need to generate the ABAP artifacts in the system to be able to call the service. Then we build a wrapper around the class to easily use the API in the system.
Consumption Model
For this, we need the WSDL file with the description of the interface and artifacts. You can download the file via the Communication Arrangement or find it in the Business Accelerator Hub. In the next step, we need to create a consumption model in the system. To do this, simply go to the corresponding package and right-click in the Project Explorer and select "New -> Other ABAP Repository Object." In the next step, we search for consumption models.

We select the Service Consumption Model from the list and fill in the fields in the next dialog. The object is given a name and a description, and the type is Web Service, which includes SOAP.

In the final step, we specify the path to the WSDL file and define a prefix for the ABAP artifacts to be generated. The generation of the artifacts in the system then begins, creating almost 170 artifacts in the system. This means that the web service, as with the on-premise model, is not necessarily the most economical when it comes to ABAP artifacts.
Wrapper
Once the consumption model has been created in the system, we can model the service call in a wrapper so that we can reuse it in the system and our processes. Therefore, in the first step, we define a structure in the form of an abstract CDS view. We want to use this view to get the necessary data into our class.
@EndUserText.label: 'Create User in System'
define abstract entity ZBS_S_DMOCreateUser
{
  UserID        : abap.string(0);
  FirstName     : abap.char(150);
  LastName      : abap.char(150);
  EMailAddress  : abap.char(250);
  ValidTo       : abap.dats;
}
In the next step, we create a class. This class will create the employee and business users in the system. In the first step, we create a structure for the configuration and some constants in the class that we need for processing. The action code and the partner role, which can be accessed via the API, are described in the documentation below.
TYPES action TYPE c LENGTH 2.
TYPES role   TYPE c LENGTH 6.

TYPES: BEGIN OF configuration,
         application_log           TYPE REF TO object,
         cloud_destination         TYPE string,
         communication_arrangement TYPE if_com_management=>ty_cscn_id,
       END OF configuration.

CONSTANTS: BEGIN OF action_code,
             create TYPE action VALUE '01',
             update TYPE action VALUE '02',
             delete TYPE action VALUE '03',
           END OF action_code.

CONSTANTS: BEGIN OF partner_role,
             employee          TYPE role VALUE 'BUP003',
             contingent_worker TYPE role VALUE 'BBP005',
           END OF partner_role.
To do this, we pass our configuration to the class, which then decides whether we want to create the proxy via a destination or a communication arrangement. With the destination created, our proxy class is then created and passed to the caller as the result.
DATA destination TYPE REF TO if_proxy_destination.

IF configuration-cloud_destination IS NOT INITIAL.
  destination = cl_soap_destination_provider=>create_by_cloud_destination(
      i_name = configuration-cloud_destination ).

ELSEIF configuration-communication_arrangement IS NOT INITIAL.
  destination = cl_soap_destination_provider=>create_by_comm_arrangement( configuration-communication_arrangement ).

ELSE.
  RAISE EXCEPTION NEW cx_soap_destination_error( ).
ENDIF.

RETURN NEW zbs_dmo_co_manage_business_use( destination = destination ).
In the next step, we fill the structure using the user information we've provided. It's important that we fill in the action code where necessary and fill in the partner role for the employee.
INSERT INITIAL LINE INTO TABLE result-business_user_bundle_maintain-business_user REFERENCE INTO DATA(business_user).

business_user->validity_period            = VALUE #( start_date = cl_abap_context_info=>get_system_date( )
                                                     end_date   = COND #( WHEN user-ValidTo IS NOT INITIAL
                                                                          THEN user-ValidTo
                                                                          ELSE '29991231' ) ).

business_user->personal_information       = VALUE #( first_name  = user-FirstName
                                                     last_name   = user-LastName
                                                     action_code = action_code-create ).

business_user->person_external_id         = user-UserID.

business_user->user                       = VALUE #(
    user_name                  = user-UserID
    validity_period-start_date = business_user->validity_period-start_date
    validity_period-end_date   = business_user->validity_period-end_date
    action_code                = action_code-create ).

business_user->workplace_information      = VALUE #( email_address = user-EmailAddress
                                                     action_code   = action_code-create ).

business_user->action_code                = action_code-create.
business_user->business_partner_role_code = partner_role-employee.
As a final step, we can then evaluate the error log and import it into our application log. The result of the call also contains our new Business Partner ID, which we can use for the subsequent process.
LOOP AT response-business_user_bundle_maintain-business_user INTO DATA(response_log).
  result = response_log-person_id.

  LOOP AT response_log-log-item INTO DATA(item).
    DATA(severity) = SWITCH #( item-severity_code
                               WHEN '1' THEN if_bali_constants=>c_severity_status
                               WHEN '2' THEN if_bali_constants=>c_severity_warning
                               WHEN '3' THEN if_bali_constants=>c_severity_error
                               ELSE          if_bali_constants=>c_severity_status ).

    configuration-application_log->add_msg_text( id_type = severity
                                                 id_text = item-note ).
  ENDLOOP.
ENDLOOP.
Authorizations
If we no longer receive any errors from the interface, the business partner has been created in the system. In the final step, we can assign the developer role to it. To do this, we use the standard ABAP class CL_IAM_BUSINESS_USER_FACTORY and the BP number or user ID from the previous step, which we can use to import the user and assign new roles. However, we will not describe the API in detail in this article, as we want to limit ourselves to the User API.
Complete example
You can find the examples in this article in the code snippets in our GitHub repository. There you will find the Core Data Service for transferring the data and the class for calling and filling the service.
You won't find our standard Application Log object there; you will have to replace everything in this context with a suitable object. We will use a wrapper of the standard class.
Conclusion
Setting up the SOAP API in the system takes some time, but implementing the class should be quite easy since we get a fully typed interface. With our tip you should now be able to automatically create users in the system and from outside.
Source:
SAP Help - Business User
SAP Community - How to call local SOAP API in ABAP Environment
SAP Developers - Consume SOAP Based Web Services