ABAP Cloud - Locks
What do you need to set locks for and how can you easily do that in ABAP Cloud? In this article we will look at the process in detail.
Table of contents
In this article we will discuss the topic of locks, how you use them and what you actually need them for. We will go into the details with ABAP Cloud.
Introduction
Already during training, an ABAP developer should learn that you lock a table or a process before carrying out any actions that change it. The lock ensures that only he can change the data record and that no parallel changes are made. This is the only way to ensure that changes are adopted cleanly and securely. Locks are primarily set when data records are changed, but can also occur when a user goes into change mode in a data record. This means that other users receive a message when they try to go into change mode or perform changing operations in the system.
In a classic system, you can use transaction SM12 to see your own locks and, with sufficient authorization, also other people's locks in the system. If you have administrative rights, you can also delete lock entries from the system if processes were not terminated properly.
ENQ process
The system has a process type "ENQ" that is responsible for managing locks. This sets and removes locks and checks further requests. If a write lock has already been set on a data record, further requests from other users are rejected and a corresponding notification is sent. The locking process is unique in the system, even if several application servers are active, in order to keep the setting of locks consistent.
The locks are managed in the lock table, but this can also lead to errors in processes. If, for example, a process were to create 300,000 locks and the lock table were full, other processes in the system would no longer be able to set locks and change operations would no longer be possible.
Basic objects
In order to set locks in the system, we first need a main table to set the lock and a lock object in the system.
Table
To do this, we define a simple table.
@EndUserText.label : 'Lock Entries'
@AbapCatalog.enhancement.category : #NOT_EXTENSIBLE
@AbapCatalog.tableCategory : #TRANSPARENT
@AbapCatalog.deliveryClass : #A
@AbapCatalog.dataMaintenance : #RESTRICTED
define table zbs_dmo_lock {
  key client         : abap.clnt not null;
  key identification : abap.int4 not null;
  description        : abap.char(120);
  value_date         : abap.dats;
}
Lock object
In the second step, we create our locking object in the system. To do this, right-click on the system or your package and select "New -> Other ABAP Repository Object" from the menu. There you will find a corresponding object, which we want to create in the next step.
Locking objects in the customer namespace must always begin with EY* or EZ*, so the naming of the object takes some getting used to. We also save our table as the primary table.
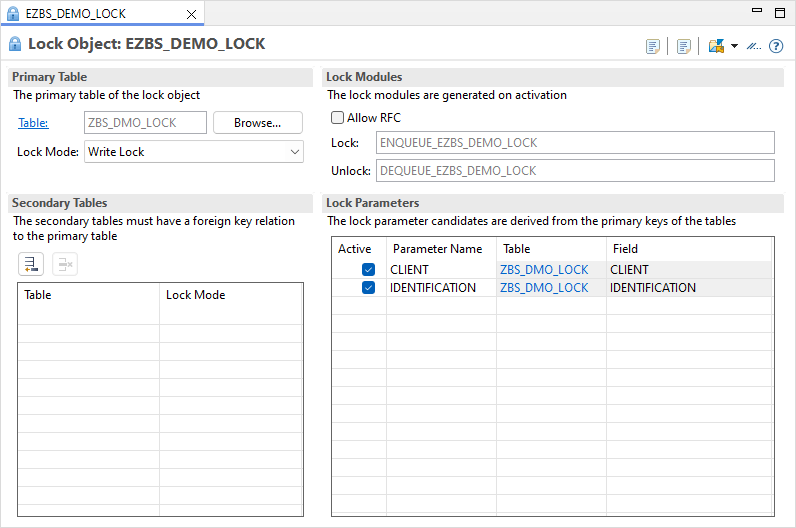
With "Next" and the assignment to transport, we can complete the creation of the object. Now the object must be activated so that the locking modules are generated in the system. Before that, however, we should define a "Lock Mode". After generation, the object looks like this:
Here you will find various information and can make further settings for the object. Some settings are described here
- Lock Mode - Different types of locks can be set. A write lock is usually used so that you can make changes to the data record.
- Allow RFC - If the checkbox is active, the function modules are RFC-capable and can be called from other systems.
- Secondary Tables - Additional tables with foreign key relationships can be added here if it makes sense.
Usage
The lock is usually set when the user goes into change mode for the data record or shortly before the change is to be made. When you set the lock, you also receive information about whether the data record is already locked.
Generic lock
In the first example, we set a generic lock. To do this, we create a corresponding object for our lock object using the factory CL_ABAP_LOCK_OBJECT_FACTORY.
DATA(lo_lock) = cl_abap_lock_object_factory=>get_instance( 'EZBS_DEMO_LOCK' ).
In the next step, we can then call the ENQUEUE method of the new object and thereby set a lock in the system. Since we have not passed any parameters, a general lock is set on the entire table.
lo_lock->enqueue( ).
The created object is of type IF_ABAP_LOCK_OBJECT.
Lock data record
If we now want to lock a specific data record, we create a specific object for our lock object again via the factory. Then we fill the transfer parameter IT_PARAMETER and pass the lock arguments. In this case, we want to lock the data record with the identification 12.
lo_lock->enqueue( it_parameter = VALUE #( ( name = 'IDENTIFICATION' value = REF #( 12 ) ) ) ).
The client field is also included in the key, but does not necessarily have to be filled in. If the parameter is not set, the system presets it.
Check lock
To test the lock behavior, we basically create an executable class that implements the logic for us. Such a class could look like this.
CLASS zcl_bs_demo_locks DEFINITION
  PUBLIC FINAL
  CREATE PUBLIC.

  PUBLIC SECTION.
    INTERFACES if_oo_adt_classrun.
ENDCLASS.


CLASS zcl_bs_demo_locks IMPLEMENTATION.
  METHOD if_oo_adt_classrun~main.
    TRY.
        DATA(lo_lock) = cl_abap_lock_object_factory=>get_instance( 'EZBS_DEMO_LOCK' ).

        lo_lock->enqueue( it_parameter = VALUE #( ( name = 'IDENTIFICATION' value = REF #( 13 ) ) ) ).

      CATCH cx_abap_foreign_lock INTO DATA(lo_locked).
        out->write( |Locked by { lo_locked->user_name }| ).
      CATCH cx_abap_lock_failure.
        out->write( `Failed ...` ).
    ENDTRY.
  ENDMETHOD.
ENDCLASS.
In the next step, we start the class using F9 in the ABAP Development Tools (Eclipse) and debug while the lock is being set. Once we have executed the enqueue method, we can start the class again and should now receive an error. However, we must still keep the first instance in the debugger, otherwise the lock will be released again once the class has been executed. Two exceptions can be generated when we try to set the lock:
- CX_ABAP_FOREIGN_LOCK - Is triggered if there is already a lock on the same data record. You can use the USER_NAME attribute to get the user ID of the locking user if you want to display an error message.
- CX_ABAP_LOCK_FAILURE - This is a generic error message if there are problems with the customization of the lock object or the parameters passed on. You can then get further information from the message or other parameters in the object.
Display
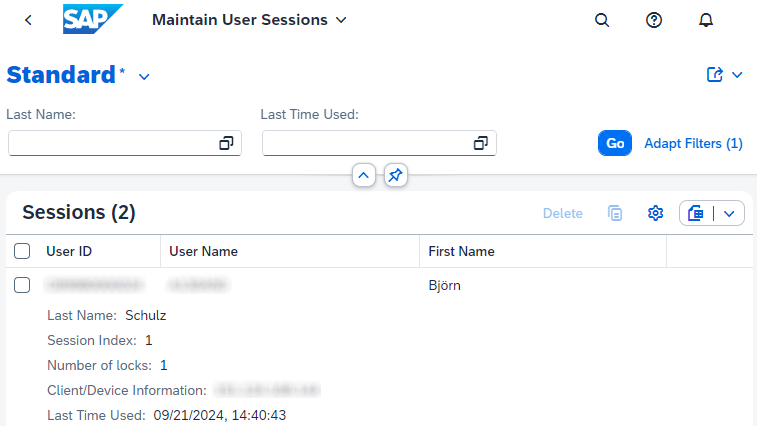
On-premise, with the necessary authorizations, you can view your and other locks that currently exist in the system in transaction SM12 or SMENQ. In ABAP Cloud, you can first view the locks in the transactions as usual. The "Maintain User Sessions" (F6049) app is also available in the BTP, but this does not cover the full scope of the transaction. With the app you can see users who have set and hold locks in the system and you can also delete these processes via the app.
Conclusion
SAP has now provided a more easily accessible class for calling the generic function modules, which provides a simpler interface. In the background, however, not much has changed and a lot of things will seem familiar to you.
More information:
SAP Community Q&A
SAP Help - Enqueue Server


